FP241VW 24" Wide-Screen LCD Monitor User Manual Welcome
Copyright Copyright © 2007 by BenQ Corporation. All rights reserved. No part of this publication may be reproduced, transmitted, transcribed, stored in a retrieval system or translated into any language or computer language, in any form or by any means, electronic, mechanical, magnetic, optical, chemical, manual or otherwise, without the prior written permission of BenQ Corporation.
Table of Contents Getting started ...................................................................................................................... 4 Getting to know your monitor ............................................................................................ 6 Front view (1) ..............................................................................................................6 Front view (2) ...........................................................................................
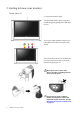
1. Getting started Your FP241VW will provide the optimal display performance of the video resolution standard of 1920 x 1200. Please ensure that your graphic card supports the resolution of 1920 x 1200. When unpacking please check you have the following items. If any are missing or damaged, please contact the place of purchase for a replacement.
USB cable (optional) HDMI cable (optional) Consider keeping the box and packaging in storage for use in the future when you may need to transport the monitor. The fitted foam packing is ideal for protecting the monitor during transport.
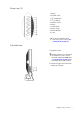
2. Getting to know your monitor Front view (1) 1. Top-mount monitor shelf The detachable shelf is space saving and stylishly designed, gaining extra desk space for you. You can put small stationery items or toy collectibles on the shelf to keep the desk roomy. The two hooks on the rear of the allow you to hang accessories on hand, such as the headset, the game gear, etc.
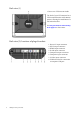
Front view (2) 1. Power 2. ENTER / PIP 3. t / Brightness 4. u/ Contrast 5. MENU / EXIT 6. Mode 7. Game Mode 8. Input / Swap 9. PerfectMotion 10. i key For more information about these keys, please refer to The control panel on page 23. Left-side view 1. Earphone socket Plug the earphone or headset into the earphone socket to receive the audio signal from HDMI input. See Audio menu on page 39 for information about audio controls. 2.
Back view (1) 1. Rear cover: VESA mount inside The back of your LCD monitor has a VESA standard mount with 100mm pattern, allowing the installation of a wall mount bracket. See Using the monitor wall mounting kit on page 12 to learn more. Back view(2): locations of plugs & sockets 1. Power AC input connector 2. DVI-D input connector 3. HDMI input connector 4. D-Sub input connector 5. Component input connector 6. Composite input connector 7. S-Video input connector 8.
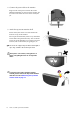
3. How to assemble your monitor hardware If the computer is turned on you must turn it off before continuing. Do not plug-in or turn-on the power to the monitor until instructed to do so. 1. Unpack the monitor and place it on a stable surface. 2. Connect the PC video cable. Either Do not use both DVI-D cable and D-Sub cable on the same PC. The only case in which both cables can be used is if they are connected to two different PCs with appropriate video systems.
4. Connect the power cable to the monitor. Plug one end of the power cord into the socket labelled ‘POWER IN’ on the rear of the monitor. Do not connect the other end to an electric outlet just yet. 5. Attach the top-mount monitor shelf. Fit the tenon joints at the rear of the shelf to the mortises on top of the monitor. You can put small stationery items or toy collectibles on the shelf to keep the desk roomy.
6. Turn on the power. Connect the other end of power cable to the nearby electric outlet. Picture may differ from product supplied for your region. Turn on the monitor by pressing the power key. Turn on the computer too, and follow the instructions in Section 4: Getting the most from your BenQ monitor on page 14 to install the monitor software. Adjusting the monitor angle For comfortable viewing of images on the screen, you may tilt the monitor upward to 12 degrees and downward to -5 degrees.
Detaching the top-mount monitor shelf It’s easy to detach the top-mount monitor shelf from the monitor and no removal tool is needed. Before you begin, take away all the items displayed or hung on the shelf. Then, hold both sides of the shelf assembly and gently pull the it upward away from the monitor. Using the monitor wall mounting kit The back of your LCD monitor has a VESA standard mount with 100mm pattern, allowing the installation of a wall mount bracket.
2. Follow the instruction manuals of the wall mount bracket you purchased to complete the installation.
4. Getting the most from your BenQ monitor Monitors and USB hubs Your BenQ FP241VW LCD Monitor is a modern state-of-the-art device. It not only utilizes the latest LCD display technology currently available – it contains a built-in 2 port USB 2.0 hub. Using only one USB 2.0 port on your computer (freeing the others up for other uses), the built-in hub provides close, handy, easy-to-use access for your USB devices.
If you require a User Name and Password to login to your Windows computer, you must be logged on as an Administrator or as a member of the Administrators group in order to install the monitor driver software. Furthermore, if your computer is connected to a network which has security access requirements, network policy settings may prevent you from installing software on your computer.
How to install the monitor on a new computer This instruction details the procedure for selecting and installing the BenQ LCD Monitor driver software on a new computer which has never had a monitor driver installed before. This instruction is only suitable for a computer which has never been used before, and for which the BenQ LCD Monitor is the first ever monitor to be connected to it.
How to upgrade the monitor on an existing computer This instruction details the procedure for manually updating the existing monitor driver software on your Microsoft Windows computer. It is currently tested as compatible (and recommended only) for Windows XP and Windows Vista Operating System (OS).
How to install on Windows Vista systems 1. Open Display Settings. Right-click the desktop and select Personalize from the popup menu. Select Display Settings from the Personalize appearance and sounds window. The Display Settings window will display. 2. Click the Advanced Settings button. The Generic PnP Monitor Properties window will display. 3. Click the Monitor tab and the Properties button. 4. Click Continue in the prompted User Account Control window. 5.
How to install on Windows XP system 1. Open Display Properties. The quickest shortcut to Display Properties is through the Windows desktop. Right-click the desktop and select Properties from the popup menu. Alternatively, the Windows menu to Display Properties is located in Control Panel. In Windows XP version, Control Panel is located directly under the main Start menu item. The menu options displayed will depend upon which type of view is selected for your system.
5. How to adjust the screen resolution Due to the nature of liquid crystal display (LCD) technology, the screen resolution is always fixed. The best possible picture for your FP241VW is achieved with a resolution of 1920 x 1200. This is called “Native Resolution” or maximal resolution – that is, the clearest picture. Lower resolutions are displayed on a full screen through an interpolation circuit.
6. How to adjust the screen refresh rate You don’t have to choose the highest possible refresh rate on an LCD display, because it is not technically possible for an LCD display to flicker. The best results are obtained by using the factory modes already set in your computer. There is a table with the factory modes in the specification section of this User Manual: Supported PC Timings on page 45 You can choose 60, 70 and 75 Hertz, (but not 72Hz) for the native resolution of 1920 x 1200. 1.
7. Picture optimization The easiest way to obtain an optimal display from an analog (D-Sub) input is to use the i key function. Press the i key to optimize the currently displayed image to the screen. When you connect a digital video output using a digital (DVI) cable to your monitor, the i key and the Auto Adjustment function will be disabled, because the monitor will automatically display the best image.
8. How to adjust your monitor The control panel 1. “Power”: Turn the power on or off. 2. “ENTER/PIP” key: Enter sub menus and select items. The key is also the hot key for activating the PIP (Picture-in-Picture) function and selecting a video input source for the PIP window. 3. t (Up) key: For Up/Increase adjustment. The key is also the hot key for Brightness. 4. u (Down) key: For Down/Decrease adjustment. The key is also the hot key for Contrast. 5.
On Screen Display (OSD) menu structure DISPLAY Auto Adjustment H. Position V. Position Pixel Clock Phase PICTURE Brightness Contrast Sharpness Color Hue Saturation Normal Bluish Reddish User Mode Reset Color Red Green Blue YES NO Hue and Saturation are not available for use when the input source is D-Sub or DVI-D. PICTURE ADVANCED Picture Mode Standard Senseye Demo PerfectMotion Movie Dynamics Photo Action Game Racing Game ON OFF Input Size H. Position V.
SYSTEM Input Display Mode OSD Settings DDC/CI Information Reset All D-sub DVI HDMI Component Composite S-Video Full Aspect 1: 1 Language H. Position V. Position Display Time OSD Lock YES NO YES NO English French German Italian Spanish Polish/Japanese Czech/Traditional Chinese Hungarian/Simplified Chinese Serbo-croatian Romanian Dutch Russian Swedish Portuguese 5 sec. 10 sec. 15 sec. 20 sec. 25 sec. 30 sec.
Hot key mode The monitor keys perform as hot keys to provide direct access to particular functions whenever the menu isn't currently displaying on-screen. Brightness hot key Press the t key to display the Brightness indicator. Further press the t key to increase or the u key to decrease the screen brightness, and press the MENU key to exit. Contrast hot key Press the u key to display the Contrast indicator.
• If the input source of the main window is from the computer graphic/PC video signals (D-sub, DVI, HDMI, or Component), you will cycle through the following messages indicating the video input sources for the PIP window. PIP off and Exit • If the input source of the main window is from the video signals (Composite or S-video), you will cycle through the following messages indicating the computer graphic/PC video signals for the PIP window.
Game Mode hot key Press the key continually to switch between the 3 modes for the main window, including Standard, Action Game, and Racing Game. The setting will take effect immediately. See also Picture Mode on page 35. Input /Swap hot key Press the Input/Swap key continually to select an input source for the main window or swap the input signals between the main window and the PIP window when the PIP function is activated.
• When the PIP function is ON, select between various input sources of the current video type (Computer Graphic/PC video or Video) for the main window. The cycle will be performed in a specific sequence. Keeping pressing the key will swap the current main window’s signal source with the current PIP window’s signal source. To specify the input signal, release the key while the message displays.
Main menu mode You can use the OSD (On Screen Display) menu to adjust all the settings on your monitor. Press the MENU key to display the following main OSD menu. 1 2 3 4 5 6 There are 6 main OSD menus: 1. Display 2. Picture 3. Picture Advanced 4. PIP (Picture in Picture) 5. Audio 6. System Use the t (Up) or u (Down) keys to highlight a menu item, and press the ENTER key to enter the Menu item settings.
Display menu 1. Press the MENU key to display the main menu. 2. Press the t or u keys to select DISPLAY and then press the ENTER key to enter the menu. 3. Press the t or u keys to move the highlight to a menu item and then press the ENTER key to select that item. 4. Press the t or u keys to make adjustments or selections. 5. To return to the previous menu, press the MENU key. The current picture mode is displayed in the top right corner of the main menu.
H. Position V. Position Pixel Clock Adjusts the horizontal position of the screen image. Adjusts the vertical position of the screen image. Adjusts the pixel clock frequency timing to synchronize with the analog input video signal. Not applicable to a digital input signal. 0 to 100 0 to 100 0 to 100 Press the t or u keys to adjust the value. See also: Picture optimization on page 22 Phase Adjusts the pixel clock phase timing to synchronize with the analog input video signal.
Picture menu 1. Press the MENU key to display the main menu. 2. Press the t or u keys to select PICTURE and then press the ENTER key to enter the menu. 3. Press the t or u keys to move the highlight to a menu item and then press the ENTER key to select that item. 4. Press the t or u keys to make adjustments or selections. 5. To return to the previous menu, press the MENU key. Item Brightness Function Adjusts the balance between light and dark shades.
User Mode Tailors the image color tint. The blend of the Red, Green and Blue primary colors can be altered to change the color tint of the image. The default start setting is 50. Decreasing one or more of the colors will reduce their respective influence on the color tint of the image. e.g. if you reduce the Blue level the image will gradually take on a yellowish tint. If you reduce Green, the image will become a magenta tint. Press Menu to leave the menu.
Picture Advanced menu 1. Press the MENU key to display the main menu. 2. Press the t or u keys to select PICTURE ADVANCED and then press the ENTER key to enter the menu. 3. Press the t or u keys to move the highlight to a menu item and then press the ENTER key to select that item. 4. Press the t or u keys to make adjustments or selections. 5. To return to the previous menu, press the MENU key.
Senseye Demo PerfectMotion Displays the preview of screen images under the selected mode from Picture Mode. The screen will be divided into two windows; the left window demonstrates images of Standard mode, while the right window presents the images under the specified mode. Selects to activate PerfectMotion* to reduce the ghosting effect on the dynamic images. It is recommended that you use this function specially when you are viewing dynamic contents, such as movies, games, etc.
PIP (Picture-in-Picture) menu 1. Press the MENU key to display the main menu. 2. Press the t or u keys to select PIP and then press the ENTER key to enter the menu. 3. Press the t or u keys to move the highlight to a menu item and then press the ENTER key to select that item. 4. Press the t or u keys to make adjustments or selections. 5. To return to the previous menu, press the MENU key. Item Input Function Selects the video input for PIP viewing window.
Contrast Sharpness 38 Adjusts the degree of difference between darkness and lightness of the images in the PIP window. Adjusts the clarity and visibility of the edges of the subjects in the images displayed in the PIP window. How to adjust your monitor Press the t key to increase the contrast and press the u key to decrease the contrast. 0 to 100 Press the t key to improve the crispness of the display and press the u key to have softness effect on the display.
Audio menu 1. Press the MENU key to display the main menu. 2. Press the t or u keys to select AUDIO and then press the ENTER key to enter the menu. 3. Press the t or u keys to move the highlight to a menu item and then press the ENTER key to select that item. 4. Press the t or u keys to make adjustments or selections. 5. To return to the previous menu, press the MENU key.
System menu 1. Press the MENU key to display the main menu. 2. Press the t or u keys to select SYSTEM and then press the ENTER key to enter the menu. 3. Press the t or u keys to move the highlight to a menu item and then press the ENTER key to select that item. 4. Press the t or u keys to make adjustments or selections. 5. To return to the previous menu, press the MENU key. Item Input Function Selects the video input for the main window.
Display Mode Adjusts the screen image to fit into the size you prefer when the input video images may have different native aspect ratios. Press the t or u keys to change the settings. • Full • Aspect • 1:1 • Full - Displays the image across the complete width and height of the screen. This mode may cause distortion of the image. • Aspect - Vertically fits the image to the height of the screen and adjusts the width of image to maintain the image proportions.
H. Position V. Position Display Time Adjusts the horizontal position of the OSD menu. Adjusts the vertical position of the OSD menu. Adjusts the display time of Press the t or u keys to the OSD menu. adjust the value. 0 to 100 0 to 100 • 5 sec. • 10 sec. • 15 sec. • 20 sec. • 25 sec. OSD Lock Prevents all the monitor settings from being accidentally changed. When this function is activated, the OSD controls and hotkey operations will be disabled. Press the t or u keys to change the settings. • 30 sec.
9. Troubleshooting Frequently asked questions (FAQ) The image is blurred: Read the How to adjust the screen resolution on page 20 section, and then select the correct resolution, refresh rate and make adjustments based on these instructions. How do you use a VGA extension cable? Remove the extension cable for the test.
If the LED is illuminated in orange, the power management mode is active. Press any key on the computer keyboard or move the mouse. If that does not help, check the signal cable connectors. If any pin is bent or broken off, please contact your dealer to get necessary support. Is the prompt on the display not illuminated at all? Check the power supply mains socket, the external power supply and the mains switch.
10. Supported PC Timings Resolution 640 x 350 720 x 400 640 x 480 640 x 480 640 x 480 640 x 480 800 x 600 800 x 600 800 x 600 832 x 624 1024 x 768 1024 x 768 1024 x 768 1024 x 768 1152 x 864 1152 x 870 1152 x 900 1152 x 900 1280 x 960 1280 x 1024 1280 x 1024 1280 x 1024 1280 x 1024 1600 x 1200 1920 x 1200 Incoming display mode (Input timing) Horizontal Vertical Pixel Frequency (KHz) Frequency (Hz) Frequency (MHz) 31.47 70.08 25.17 31.47 70.08 28.32 31.47 60.00 25.18 35.00 67.00 30.24 37.86 72.80 31.50 37.
11. Specifications Model FP241VW Display type 24.0”, active, TFT Viewable diagonal 611.32 mm Native (maximum) resolution 1,920 x 1200 Colors 16.7 million Contrast / Brightness 1000:1 / 500 cd/m2 Response time* 16 ms 6 ms (GTG*) 12 ms (MPRT*, PerfectMotion* Level 3) Viewing angle (left/right, up/down) Line frequency Image frequency Image diagnostics 56 - 76 Hz modes within these parameters Digital, OSD Technology, i key (automatic image setting) Controls 9 keys and i key.
Operating voltage Automatic switched mode power supply, 100-240 V, 50-60 Hz Tilt (down/up) -5° ~ +12 ° Dimensions (H x W x D) 471.4 x 700 x 135.6 mm Weight 10 kg *Response Time: The time it takes to switch a pixel off and then on and then off again (or from black to white and back to black). A low response time is desirable for the display of moving images without ghosting.