FP72G / FP72G+ LCD Color Monitor 17.0" (43.
i Copyright Copyright © 2005 by BenQ Corporation. All rights reserved. No part of this publication may be reproduced, transmitted, transcribed, stored in a retrieval system or translated into any language or computer language, in any form or by any means, electronic, mechanical, magnetic, optical, chemical, manual or otherwise, without the prior written permission of BenQ Corporation.
i Table of Contents Getting started ...................................................................................................................... 4 Getting to know your monitor ............................................................................................ 5 Front View ...................................................................................................................5 Back View .............................................................................................
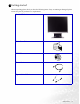
111 1Getting started When unpacking please check you have the following items. If any are missing or damaged, please contact the place of purchase for a replacement. BenQ LCD Monitor Quick Start Guide 2 CD-ROM 3. 00 P / N : 5 3.
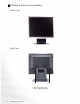
121 1Getting to know your monitor Front View Back View 1 2 1. Power AC input jack 2.
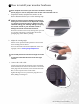
131 1How to install your monitor hardware If the computer is turned on you must turn it off before continuing. Do not plug-in or turn-on the power to the monitor until instructed to do so. 1. Unpack the monitor and place the monitor on the desk as illustrated before you cut the retaining strap. Please be careful to prevent damage to the monitor. Placing the screen surface on an object like a stapler or a mouse will crack the glass or damage the LCD substrate voiding your warranty.
4. Connect the power cable to the monitor. Plug one end of the power cord into the socket labelled ’POWER IN’ on the rear of the monitor. Do not connect the other end to a power point just yet. 5. Connect-to and turn-on the power. Plug the other end of the power cord into a power point and turn it on. Turn on the monitor by pressing the power button on the front of the monitor.
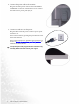
Viewing Angle Adjustment You may position the screen to the desired angle with -5° to +20° monitor tilt, 360° monitor swivel, and 72 mm monitor height.
141 1Getting the most from your BenQ monitor How do I gain the most benefit from my new monitor? To gain the most benefit from your new BenQ color LCD flat screen monitor, you should install the custom BenQ LCD Monitor driver software as provided on the BenQ LCD Monitor CD-ROM. The circumstances under which you connect and install your BenQ LCD Monitor will determine which process you need to follow to successfully install the BenQ LCD Monitor driver software.
How to install the monitor on a new computer This instruction details the procedure for selecting and installing the BenQ LCD Monitor driver software on a new computer which has never had a monitor driver installed before. This instruction is only suitable for a computer which has never been used before, and for which the BenQ LCD Monitor is the first ever monitor to be connected to it.
How to upgrade the monitor on an existing computer This instruction details the procedure for manually updating the existing monitor driver software on your Microsoft Windows computer. It is currrently tested as compatible (and recommended only) for Windows 98, Windows ME, Windows 2000, and Windows XP Operating System (OS).
How to install on Windows XP systems 1. Open Display Properties. The quickest shortcut to Display Properties is through the Windows desktop. Right-click the desktop and select Properties from the popup menu. Alternatively, the Windows menu to Display Properties is located in Control Panel. In Windows XP version, Control Panel is located directly under the main Start menu item. The menu options displayed will depend upon which type of view is selected for your system.
11. Click Close, OK, and OK. This will close the Display Properties windows. You do not need to restart Windows XP, as the BenQ LCD monitor drivers will operate immediately with no further action required by you.
How to install on Windows 2000, ME, & 98 systems You do not need to follow this instruction if you are installing onto a computer which has a Windows XP (or later) version system. In that case, see the instructions at How to install on Windows XP systems. 1. Open Display Properties. The quickest shortcut to Display Properties is through the Windows desktop. Right-click the desktop and select Properties from the popup menu. Alternatively, the Windows menu to Display Properties is located in Control Panel.
How to complete the Windows Upgrade Device Driver Wizard 1. Load the BenQ LCD Monitor CD-ROM which came with your monitor. Insert the CD-ROM into a CD drive on the computer you attached the monitor to. The autorun User’s Guide language selection page will display in your web browser. You can select a language and view the online version of this manual from the next window. You could then print it out for reference if you wish to work off-line.
This will close the Advanced Display Properties window, and return you to the Display Properties window. Should you wish to do so, this is where you can change the screen resolution (area and color). See How to adjust the screen resolution for details. 14. Click OK. This will close the Display Properties window, and if you made any changes to the screen resolution, Windows 2000 will prompt you for confirmation to effect the changes, and further confirmation to accept the changes.
151 1How to adjust the screen resolution Due to the nature of liquid crystal display (LCD) technology, the picture resolution is always fixed. The best possible picture for your FP72G/FP72G+ is achieved with a resolution of 1280x1024. This is called “Native Resolution” or maximal resolution – that is, the clearest picture. Lower resolutions are displayed on a full screen through an interpolation circuit. However flaws do occur with the interpolated resolution.
161 1How to adjust the screen refresh rate You don’t have to choose the highest possible refresh rate on an LCD display, because it is not technically possible for an LCD display to flicker. The best results are obtained by using the factory modes already set in your computer. There is a table with the factory modes in the specification section of this User’s Manual. You can choose 60, 70 and 75 Hertz, (but not 72Hz) for the native resolution of 1280x1024. 1.
171 1How to set the picture optimization The easiest way to obtain an optimal display is to use the i key function. Press the i key to optimize and adjust the screen settings automatically for you. Refer to How to adjust your monitor for button locations and functionality. If you wish to, you can always adjust the screen settings manually using the buttons on the monitor panel.
181 1How to adjust your monitor A Look at the Control Panel There are 6 keys for user’s control including “iKey”, “Exit”, “Enter”, “<” and “>” key and a power swith. The following descriptions are the introduction of these keys & switch. 1. “iKey” : Adjust vertical position, phase, horizontal position and pixel clock automatically. 2. “Exit” key: Back to previous menu or exit OSD. 3. W (Left) key: For Left/Decrease adjustment. Left key is the hot key for Contrast. 4.
Main Menu Mode Control Functions Available in Main Menu Main Menu Luminance sub menu Press the W or X keys to adjust the degree of Brightness. Press the Exit key to return to previous menu. Press the W or X keys to adjust the degree of Contrast. Press the Exit to return to previous menu.
Geometry sub menu Press the W or X keys to adjust the display Horizontal Position. Press the Exit key to return to previous menu. Press the W or X keys to adjust the display Vertical Position. Press the Exit key to return to previous menu. . Press the W or X key to adjust the monitor Pixel Clock. Press the Exit key to return to previous menu. Press the W or X keys to adjust the degree of screen display Phase. Press the Exit key to return to previous menu.
Color sub menu Bluish - applies a cool tint to the image and is factory pre-set to the PC industry standard white color. Reddish - applies a warm tint to the image and is factory pre-set to the news print standard white color. Normal - allows video and still photographs to be viewed with natural coloring. This is the factory default color. User Preset: User Preset is provided so you can tailor the image color tint to suit your liking.
OSD sub menu Press the W or X keys to adjust the Horizontal Position of the OSD. Press the Exit key to return to previous menu. Press theW or Xkeys to adjust the Vertical Position of the OSD. Press the Exit key to return to previous menu. Press theW or X keys to adjust the display time of the OSD. Press the Exit key to return to previous menu.
Languages Sub menu Press the W or X keys to select a language to have the OSD display menus in that language. Press the Exit key to return to previous menu.
Recall sub menu Press the W or X keys to select Color Recall. Press the Enter key to recall color settings, or press the Exit key to return to previous menu. Press the W or X keys to select Recall All. Press the Enter key to recall position and color settings, or press the Exit key to return to previous menu.
Miscellaneous sub menu Sharpness: Press the W or X keys to adjust the degree of Sharpness. Press the Exit key to return to previous menu. Display Information: Select Display Information to display the current monitor property settings. Press the Exit key to return to previous menu.
191 1Troubleshooting Frequently Asked Questions (FAQ) The image is blurred: Read the How to adjust the screen resolution section, and then select the correct resolution, refresh rate and make adjustments based on these instructions. How do you use a VGA extension cable? Remove the extension cable for the test.
The image is distorted, flashes or flickers: Read the How to adjust the screen resolution section and then select the correct resolution, refresh rate and make adjustments based on these instructions. The image is displaced in one direction: Read the How to adjust the screen resolution section and then select the correct resolution, refresh rate and make adjustments based on these instructions.
11 10 1Supported operating modes Resolution 640x350 720x400 640x480 640x480 640x480 640x480 800x600 800x600 800x600 800x600 832x624 1024x768 1024x768 1024x768 1152x864 1152x870 1152x900 1152x900 1280x1024 1280x1024 1280x1024 1280x1024 Incoming display mode (Input timing) Horizontal Vertical Pixel Frequency (KHz) Frequency (Hz) Frequency (MHz) 31.47(P) 70.08(N) 25.17 31.47(N) 70.08(P) 28.32 31.47(N) 60.00(N) 25.18 35.00(N) 67.00(N) 30.24 37.86(N) 72.80(N) 31.50 37.50(N) 75.00(N) 31.50 35.16(P) 56.25(P) 36.
11 11 1Specifications BenQ FP72G Model Display type 17.0" , active, TFT Viewable diagonal 43.2 cm Native (maximum) resolution 1,280X1,024 Colors 16.2 million Contrast / Brightness 500:1 / 260 cd/m2 Response time 12 ms Viewing angle (left/right, up/down) 140, 130 (CR=10) 30 - 83 kHz Multi- frequency monitor Line frequency Image frequency Image checks 56 - 76 Hz modes within these parameters Digital, Screen OSD Technology, iKey (automatic image setting) Controls 5 buttons and iKey.
BenQ FP72G+ Model FP72G+ Display type 17.0" , active, TFT Viewable diagonal 43.2 cm Native (maximum) resolution 1,280X1,024 Colors 16.2 million Contrast / Brightness 500:1 / 300 cd/m2 Response time 8 ms Viewing angle (left/right, up/down) 140, 130 (CR=10) 30 - 83 kHz Multi- frequency monitor Line frequency Image frequency Image checks 56 - 76 Hz modes within these parameters Digital, Screen OSD Technology, iKey (automatic image setting) Controls 5 buttons and iKey.