FP73G S LCD Color Monitor 17.0" LCD Panel Size User Manual Welcome Downloaded from ManualMonitor.
Copyright Copyright © 2007 by BenQ Corporation. All rights reserved. No part of this publication may be reproduced, transmitted, transcribed, stored in a retrieval system or translated into any language or computer language, in any form or by any means, electronic, mechanical, magnetic, optical, chemical, manual or otherwise, without the prior written permission of BenQ Corporation.
Table of Contents Getting started ...................................................................................................................... 4 Getting to know your monitor ............................................................................................ 5 Front view ....................................................................................................................5 Back view ..............................................................................................
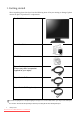
1. Getting started When unpacking please check you have the following items. If any are missing or damaged, please contact the place of purchase for a replacement. BenQ LCD Monitor Quick Start Guide CD-ROM Power Cord (Picture may differ from product supplied for your region) Signal Cable: D-Sub Signal Cable: DVI-D (optional) Consider keeping the box and packaging in storage for use in the future when you may need to transport the monitor.
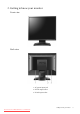
2. Getting to know your monitor Front view Back view 1. AC power input jack 2. DVI-D input socket 3. D-Sub input socket Getting to know your monitor Downloaded from ManualMonitor.
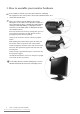
3. How to assemble your monitor hardware If the computer is turned on you must turn it off before continuing. Do not plug-in or turn-on the power to the monitor until instructed to do so. 1. Attach the monitor base. Please be careful to prevent damage to the monitor. Placing the screen surface on an object like a stapler or a mouse will crack the glass or damage the LCD substrate voiding your warranty.
2. Connect the PC video cable. Either Do not use both DVI-D cable and D-Sub cable on the same PC. The only case in which both cables can be used is if they are connected to two different PCs with appropriate video systems. Connect one end of the DVI-D cable to the monitor DVI-D socket and the other end to the DVI-D port on your computer. (optional) The DVI-D format is used for direct digital connection between source video and digital LCD monitors or projectors.
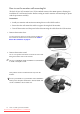
4. Route the cables via the cable clip. Release the cable retaining clip by squeezing the clip inwards as illustrated. Position the cables together and reinsert the clip over them to retain the cables neatly in place behind the monitor stand. 5. Connect-to and turn-on the power. Plug the other end of the power cord into a power outlet and turn it on. Picture may differ from product supplied for your region. Turn on the monitor by pressing the power button on the front of the monitor.
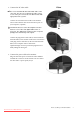
How to detach the stand base 1. Prepare the monitor and area. Turn off the monitor and the power before unplugging the power cable. Turn off the computer before unplugging the monitor signal cable. Please be careful to prevent damage to the monitor. Placing the screen surface on an object like a stapler or a mouse will crack the glass or damage the LCD substrate voiding your warranty. Sliding or scraping the monitor around on your desk will scratch or damage the monitor surround and controls.
How to use the monitor wall mounting kit The back of your LCD monitor has a VESA standard mount with 100mm pattern, allowing the installation of a wall mount bracket. Before starting to install a monitor wall mounting kit, please read the precautions carefully. Precautions: • Install your monitor and monitor mounting kit on a wall with flat surface. • Ensure that the wall material is stable to support the weight of the monitor.
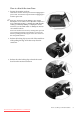
3. Remove the rear cover. Slide the rear cover back toward you to remove it. The screw plate at the back of the monitor could be revealed. 4. Follow the instruction manuals of the wall mount bracket you purchased to complete the installation. To attach the rear cover: 1. Tilt the rear cover forward and insert the two tabs on the front edge into the recesses of the screw plate. No tools are required. 2. Position the two tabs on left side of the rear cover to fit into the grooves in the screw plate. 3.
4. Getting the most from your BenQ monitor To gain the most benefit from your new BenQ color LCD flat screen monitor, you should install the custom BenQ LCD Monitor driver software as provided on the BenQ LCD Monitor CD-ROM. The circumstances under which you connect and install your BenQ LCD Monitor will determine which process you need to follow to successfully install the BenQ LCD Monitor driver software.
How to install the monitor on a new computer This instruction details the procedure for selecting and installing the BenQ LCD Monitor driver software on a new computer which has never had a monitor driver installed before. This instruction is only suitable for a computer which has never been used before, and for which the BenQ LCD Monitor is the first ever monitor to be connected to it.
How to upgrade the monitor on an existing computer This instruction details the procedure for manually updating the existing monitor driver software on your Microsoft Windows computer. It is currently tested as compatible (and recommended only) for Windows XP and Windows Vista Operating System (OS).
How to install on Windows Vista systems 1. Open Display Settings. Right-click the desktop and select Personalize from the popup menu. Select Display Settings from the Personalize appearance and sounds window. The Display Settings window will display. 2. Click the Advanced Settings button. The Generic PnP Monitor Properties window will display. 3. Click the Monitor tab and the Properties button. 4. Click Continue in the prompted User Account Control window. 5.
How to install on Windows XP system 1. Open Display Properties. The quickest shortcut to Display Properties is through the Windows desktop. Right-click the desktop and select Properties from the popup menu. Alternatively, the Windows menu to Display Properties is located in Control Panel. In Windows XP version, Control Panel is located directly under the main Start menu item. The menu options displayed will depend upon which type of view is selected for your system.
5. How to adjust the screen resolution Due to the nature of liquid crystal display (LCD) technology, the picture resolution is always fixed. The best possible picture for your FP73G S is achieved with a resolution of 1280 x 1024. This is called “Native Resolution” or maximal resolution – that is, the clearest picture. Lower resolutions are displayed on a full screen through an interpolation circuit.
6. How to adjust the screen refresh rate You don’t have to choose the highest possible refresh rate on an LCD display, because it is not technically possible for an LCD display to flicker. The best results are obtained by using the factory modes already set in your computer. There is a table with the factory modes in the specification section of this User’s Manual: Supported PC Timings on page 35. You can choose 60, 70 and 75 Hertz, (but not 72Hz) for the native resolution of 1280 x 1024. 1.
7. Picture optimization The easiest way to obtain an optimal display from an analog (D-Sub) input is to use the i key function. Press the i key to optimize the currently displayed image to the screen. When you connect a digital video output using a digital (DVI) cable to your monitor, the i key and the Auto Adjustment function will be disabled, because the monitor will automatically display the best image.
8. How to adjust your monitor The control panel 1. “i key”: Adjust vertical position, phase, horizontal position and pixel clock automatically. 2. “Exit” key: Back to previous menu or exit OSD. This key is also the hot key for Input. 3. W (Left) key: For Left/Decrease adjustment. Left key is the hot key for Contrast. 4. X (Right) key: For Right/Increase adjustment. Right key is the hot key for Brightness. 5. “ENTER” key: Activate OSD, enter sub menu, select items, and confirm selection. 6.
On Screen Display (OSD) menu structure DISPLAY PICTURE PICTURE ADVANCED Auto Adjustment H. Position V. Position Pixel Clock Phase Brightness Contrast Sharpness Color Normal Bluish Reddish User Mode Reset Color Picture Mode Standard Senseye Demo Movie Dynamics Photo sRGB Red Green Blue Yes No ON OFF SYSTEM Input DVI D-sub OSD Settings Information Language Reset All H. Position V.
Hot key mode The monitor keys perform as hotkeys to provide direct access to particular functions whenever the menu isn't currently displaying on-screen. Brightness hot key Press the X key to display the Brightness indicator. Further press the X key to increase or the W key to decrease the screen brightness, and press the Exit key to exit. Contrast hot key Press the W key to display the Contrast indicator.
Main menu mode You can use the OSD (On Screen Display) menu to adjust all the settings on your monitor. Press the ENTER key to display the following main OSD menu. 1 2 3 4 There are four main OSD menus: 1. Display 2. Picture 3. Picture Advanced 4. System Use the W (left) or X (right) keys to highlight a menu item, and press the ENTER key to enter the Menu item settings. There are 14 different menu languages, see “Language on page 31” under “OSD Settings” for more details.
Display menu 1. Press the ENTER key to display the main menu. 2. Press the W or X keys to select DISPLAY and then press the ENTER key to enter the menu. 3. Press the W or X keys to move the highlight to a menu item and then press the ENTER key to select that item. 4. Press the W or X keys to make adjustments or selections. 5. To return to the previous menu, press the Exit button. Item Auto Adjustment Function Optimizes and adjusts the screen settings automatically for you.
H. Position V. Position Pixel Clock Adjusts the horizontal position of the screen image. Adjusts the vertical position of the screen image. Adjusts the pixel clock frequency timing to synchronize with the analog input video signal. Not applicable to a digital input signal. 0 to 100 0 to 100 0 to 100 Press the W or X keys to adjust the value. See also: Picture optimization on page 19 Phase Adjusts the pixel clock phase timing to synchronize with the analog input video signal.
Picture menu 1. Press the ENTER key to display the main menu. 2. Press the W or X keys to select PICTURE and then press the ENTER key to enter the menu. 3. Press the W or X keys to move the highlight to a menu item and then press the ENTER key to select that item. 4. Press the W or X keys to make adjustments or selections. 5. To return to the previous menu, press the Exit button. Item Brightness Function Adjusts the balance between light and dark shades.
User Mode Reset Color Tailors the image color tint. The blend of the Red, Green and Blue primary colors can be altered to change the color tint of the image. The default start setting is 50. Decreasing one or more of the colors will reduce their respective influence on the color tint of the image. e.g. if you reduce the Blue level the image will gradually take on a yellowish tint. If you reduce Green, the image will become a magenta tint. Resets the User Mode custom color settings to the factory defaults.
Picture Advanced menu 1. Press the ENTER key to display the main menu. 2. Press the W or X keys to select PICTURE ADVANCED and then press the ENTER key to enter the menu. 3. Press the W or X keys to move the highlight to a menu item and then press the ENTER key to select that item. 4. Press the W or X keys to make adjustments or selections. 5. To return to the previous menu, press the Exit button.
Senseye Demo Displays the preview of screen images under the selected mode from Picture Mode. The screen will be divided into two windows; the left window demonstrates images of Standard mode, while the right window presents the images under the specified mode. Press the W or X keys to change the settings. • ON • OFF How to adjust your monitor Downloaded from ManualMonitor.
System menu 1. Press the ENTER key to display the main menu. 2. Press the W or X keys to select SYSTEM and then press the ENTER key to enter the menu. 3. Press the W or X keys to move the highlight to a menu item and then press the ENTER key to select that item. 4. Press the W or X keys to make adjustments or selections. 5. To return to the previous menu, press the Exit button. Item Input Function Operation Selects the D-sub (analog) Press the W or X keys to or DVI (digital) input.
Language Sets the OSD menu language. Press the W or X keys to adjust the value. • English • French • German • Italian • Spanish The language options displayed on your OSD may differ from those shown on the right, depending on the product supplied in your region. • Polish/ Japanese • Czech/ Traditional Chinese • Hungarian/ Simplified Chinese • Serbo-Croatian • Romanian • Dutch • Russian • Swedish H. Position V. Position Display Time Adjusts the horizontal position of the OSD menu.
OSD Lock Prevents all the monitor settings from being accidentally changed. When this function is activated, the OSD controls and hotkey operations will be disabled. Press Exit to leave the OSD Settings menu. Information Displays the current monitor property settings. Reset All Resets all mode, color and geometry settings to the factory default values. 32 How to adjust your monitor Downloaded from ManualMonitor.com Manuals Press the W or X keys to change the settings.
9. Troubleshooting Frequently asked questions (FAQ) The image is blurred: Read the How to adjust the screen resolution on page 17 section, and then select the correct resolution, refresh rate and make adjustments based on these instructions. How do you use a VGA extension cable? Remove the extension cable for the test.
If the LED is illuminated in orange, the power management mode is active. Press any button on the computer keyboard or move the mouse. If that does not help, check the signal cable connectors. If any pin is bent or broken off, please contact your dealer to get necessary support. Is the prompt on the display not illuminated at all? Check the power supply mains socket, the external power supply and the mains switch.
10. Supported PC Timings Resolution 640x350 720x400 640x480 640x480 640x480 640x480 800x600 800x600 800x600 800x600 832x624 1024x768 1024x768 1024x768 1152x864 1152x870 1152x900 1152x900 1280x1024 1280x1024 1280x1024 1280x1024 Incoming display mode (Input timing) Horizontal Vertical Pixel Frequency (KHz) Frequency (Hz) Frequency (MHz) 31.47(P) 70.08(N) 25.17 31.47(N) 70.08(P) 28.32 31.47(N) 60.00(N) 25.18 35.00(N) 67.00(N) 30.24 37.86(N) 72.80(N) 31.50 37.50(N) 75.00(N) 31.50 35.16(P) 56.25(P) 36.00 37.
11. Specifications Model FP73G S Display type 17.0” , active, TFT Viewable diagonal 430 mm Native (maximum) resolution 1,280 x 1,024 Colors 16.7 million Contrast / Brightness 1000:1 / 300 cd/m2 Response time* 5 ms Viewing angle (left/right, up/down) 160, 160 (CR>10) 31 - 83 kHz Multi- frequency monitor Line frequency Image frequency Image diagnostics 56 - 76 Hz modes within these parameters Digital, OSD Technology, i key (automatic image setting) Controls 5 buttons and i key.
Operating voltage Automatic switched mode power supply, 100-240 V, 50-60 Hz Dimensions (H x W x D) 363.8 x 356.5 x 135 mm Weight 3.7 kg *Response Time: The time it takes to switch a pixel off and then on and then off again (or from black to white and back to black). A low response time is desirable for the display of moving images without ghosting.