Securing the projector Using the Kensington lock The projector has to be installed in a safe place to prevent theft. It has a Kensington lock slot located at the rear of the projector which you can use to secure the projector via a Kensington lock cable. Kensington Lock Selecting an input source The projector can be connected to multiple equipment at the same time. However, it only displays one full screen at a time. When starting up, the projector automatically searches for the available signals.
1. Press on the projector or your remote control to display the source selection bar. 2. Press / until your desired signal is selected and press OK. Once detected, the selected source information displays on the screen for seconds. If there are multiple pieces of equipment connected to the projector, repeat steps 1-2 to search for another signal. The native display resolution of this projector is in a 16:9 aspect ratio.
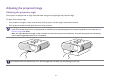
Adjusting the projected image Adjusting the projection angle The projector is equipped with an angle adjust dial which changes the image height and projection angle. To adjust the projection angle: • • Turn the dial to the right to slowly raise the front of the projector until the image is positioned as desired. Turn the dial to the left to slowly lower the front of the projector. • The angle adjust dial works in the same manner when the projector is installed on the GS1 Battery.
Fine-tuning the image clarity To sharpen the picture, rotate the focus ring on the projector. Correcting keystone Keystoning refers to the situation where the projected image is noticeably wider at either the top or bottom. It occurs when the projector is not perpendicular to the screen. You may correct this in the following way. • Using the OSD settings menu • Select Keystone.
Use Use • To correct keystoning at the top of the image, use on your remote control. • • To correct keystoning at the bottom of the image, use on your remote control. When done, press BACK to save your changes and exit. You may only make these adjustments if Auto Keystone is disabled in the Setting menu, see Auto Keystone on page 63 for details.
. Select the speaker or headphones from the list of Bluetooth devices in the Bluetooth setting menu. If you are unable to find the speaker or headphones from the list of Bluetooth devices on the first try, ensure that pairing mode is activated on the device, then select Scan for devices in the Bluetooth setting menu to restart the scanning process. 7.
BenQ Launcher BenQ Launcher is a multimedia platform that integrates various applications ranging from entertainment, education, games, online shopping, TV, and other practical functions that caters to your everyday needs. Under BenQ Launcher mode, please use your remote control or an optional wireless keyboard/mouse for operating BenQ Launcher functions. The projector’s control panel keys are limited to control projector functions.
Using the BenQ Launcher applications Before you start using BenQ Launcher applications, make sure you are connected to the Internet via a wireless connection. See Changing network settings on page 54 for connection instructions. The main menu of the BenQ Launcher mode features four main sections. • • • • Streaming Video section - Shortcuts to direct streaming of Teleplay shows, Movies, or Cartoons.
Using the Notification menu and Clean Tool function Press twice on your remote control from the main menu to choose either the Notification menu or Clean Tool function and press OK to enter the menu. Actual screen may vary based on your BenQ Launcher firmware version. • • Notification - Select this menu to view any app or system related messages for the projector. Clean Tool - Select this function to clear the memory cache for the projector, which speeds up the performance of the BenQ Launcher.
Using the History menu Press twice on your remote control from the main menu to view a list of recently opened apps. Actual screen may vary based on your BenQ Launcher firmware version. To re-open an app from the History menu use re-open that app.
Using the BenQ Launcher Settings page The Settings page for the BenQ Launcher offers a set of configurations that allow you to make adjustments to the BenQ Launcher environment. Actual screen may vary based on your BenQ Launcher firmware version. BenQ Launcher Settings overview Submenu Internet Functions and Descriptions Allows you to: • Connect to the Internet via a wireless connection. See Using the All Apps page on page 53 for more details. • Perform Network diagnostic.
Submenu Mirror Functions and Descriptions Allows you to: • Show the connected smart device’s screen from the projector. To perform the screen mirroring function, follow the instructions in the connected device’s user manual. • Enable or disable Bluetooth on your projector and pair with a Bluetooth speaker or headphones to output the projector’s audio in outdoor settings See Bluetooth pairing on page 45 for more details. Allows you to: • Change the input type. • Change the language for the projector.
Submenu Functions and Descriptions Allows you to: • Manage the apps installed on the projector. • Upgrade the system to the latest version via the Internet or the connected media flash drive. For each system upgrade, the system will send a notice message to remind all users to undergo system upgrade. Make sure you have stable wireless connection during system upgrades.
2. From the list of apps press OK on your remote control to check the box for the apps you want to add to the App Shortcuts section, or press OK on your remote control un-check the box for the apps you want to remove from the App Shortcuts section. 3. Press to confirm your selections and return to the BenQ Launcher main page. Deleting an app from the All Apps page To delete an app from the All Apps page: 1.
3. Press / / / text field. 4. Press on your remote control to navigate the keyboard, and press OK to select the letter/key/symbol you want to enter into the at anytime to exit out of the keyboard.
Navigating the OSD menus About the OSD menus To let you make various adjustments or settings on the projector and the projected image, the projector provides multilingual On-Screen Display (OSD) menus, which contains primary menu functions. (See Using the OSD menu on page 58) To access the OSD menu, press MENU on your remote control.
The following is the OSD menu: Use the arrow keys ( / / / ) on your remote control to move through the menu items, and use OK to confirm the selected menu item.
The following is the Settings menu of the OSD menu: When selecting items within the Setting menu press OK, and then ( selection and return to navigating the Settings menu. / /) to toggle through the options. Press when you want to confirm your Using the OSD menu The OSD menu provides primary menu functions. Available menu items may vary depending on the connected video sources or specified settings. Menu options that are not available will become grayed out.
Menu Submenus and descriptions Selects a preset picture mode to suit your operating environment and input signal picture type. The preset picture modes are described as below: Picture Mode Bright Maximizes the brightness of the projected image. This mode is suitable for environments where extra-high brightness is required, such as using the projector in well lit rooms. Office Emphasizes brightness to match coloring from a PC.
Menu Submenus and descriptions Color Saturation Adjusts the color saturation level -- the amount of each color in a video picture. Lower settings produce less saturated colors; setting to the minimum value makes the image black and white. If the image setting is too high, colors on the image will be overpowering, which makes the image unrealistic. Sharpness Adjusts the sharpness of the image -- the distinctness of the boundaries between different tones or colors.
Menu Submenus and descriptions The native display resolution of this projector is in a 16:9 aspect ration. However you may use this function to display projected pictures in a different aspect ratio In the following illustrations, the black portions are inactive areas and the white portions are active areas. Scales a picture proportionally to fit the projector’s native resolution in its horizontal and vertical width. This makes the most use of the screen and maintains the aspect ratio of a picture.
Menu Submenus and descriptions This projector supports playing three-dimensional (3D) content transferred through your 3D-compatible video devices and contents, such as game consoles (with 3D game discs), 3D Blu-ray players (with 3D Blu-ray discs), 3D TV (with 3D channel), and so on. After you have connected the 3D video devices to the projector, wear the BenQ 3D glasses and make sure the power is on to view 3D contents.
Menu Submenus and descriptions Menu Display Time Sets the length of inactive time before the OSD menu on the screen disappears. The following Menu Display Time options are provided: Always On, 5 sec, 10 sec, 15 sec, 20 sec, 25 sec, and 30 sec. High Altitude Mode Sets whether the projector increases fan speed in high altitude settings to increase the intake of air to cool the projector. Select On to enable an increased fan speed. Select Off to keep the projector’s fan working at normal speed.
Menu Settings Submenus and descriptions Information Displays the following information about your projector. • Source: Displays the current signal source. • Picture Mode: Displays the current Picture Mode. • Resolution: Displays the native resolution of the input source. • Color System: Displays input system format. • Equivalent Lamp Hour: Displays the number of hours the lamp has been used. • Firmware Version: Displays the firmware version of your projector.
Accessories GS1 Battery Your projector comes with an attachable battery which is suitable for use in outdoor situations when a traditional power outlet is not readily available. Rear View 1. Charge indicator light The indicator light lights up blue when the GS1 battery is charging. 2. Micro USB 2.0 Type-B port Used to charge the GS1 Battery via a traditional Micro-USB power adapter. An adapter for the GS1 Battery is not supplied with the package. 3. USB 2.0 Type-A port Used to connect to other devices (e.
Charging the battery There are two ways to charge the GS1 battery: • Connect a traditional Micro USB Type-B power adapter to the Micro USB Type-B port at the rear of the battery. When the projector is installed onto the GS1 Battery and a Micro USB adapter is plugged into the GS1 battery the following situations will occur: • The adapter will charge the GS1 battery when the projector is powered off. • The adapter will not provide power to both the battery or projector when the projector is powered on (i.e.
Installing the battery 1. Ensure that there are no connections to the ports on the projector or battery before installing the battery. 2. Place the projector on top of the battery so that the projector connector and securing tabs on the battery fits into the battery connector and securing slots on the projector respectively. 3. Push the projector forward on the battery until it clicks in place.
Connections Connect the GS1 Battery to other devices using a USB cable to supply power from the GS1 Battery to the connected device. USB cable Mobile device (smartphone, tablet, etc.) Removing the battery 1. Ensure that there are no connections to the ports on the projector or battery before removing the battery.
2. Push the projector backwards on the battery so that it unlocks from the battery. 3. Slowly lift the projector off the battery. When the angle adjust dial is set high you will not be able to remove the projector from the battery. To remove the projector from the battery ensure that the angle adjust dial is set to a low position.
Do not wrap it with conduct material to avoid the damage caused by the direct contact between the metal and battery. Keep the battery in day places. Well disposed the disused battery. Do not put it into fire or water. • • Hazard warning Forbid disassemble batteries The battery has protective component and circuit internally to avoid danger. Mishandling such as improper disassembly will destroy its protective function and make it heat, smoke, distort or burning.
Over-heated will cause the isolated element dissolved in the battery and losing protective function its cycle life, even will cause over heated, distort, smoke or burning. • Forbid directly charging on the power socket or car kit cigarette. High voltage and amplified current will damage the battery and reduce its cycle life, even will cause overheated, distort, smoke or burning.
• • Read carefully the manual before use or whenever in need. Charging method Use the special chargers in the recommended charging method to charge the battery. • First usage When you use the battery for its first time, do not put it into the equipment once you find it in unusual conditions such as unclearness or odors. The battery should be returned to the vendor. • Children use When Children use the battery, they should be under their parents' instructions and superintend in use.
Protective Case Your projector comes with a rubber protective case which helps prevent damage caused by accidental spillage or unintended impact, particularly in outdoor situations. Installing the protective case To install the protective case on the projector slide the projector into the opening at the rear of the protective case until the case wraps around the edges of the projector.
Maintenance Care of the projector Your projector needs little maintenance. The only thing you have to do on a regular basis is keep the lens clean. Never remove any parts of the projector. Contact your dealer or local customer service center if the projector fails to operate as expected. Cleaning the lens Clean the lens whenever you notice dirt or dust on the surface.
Storing the projector To store the projector for an extended time: • • • • Make sure the temperature and humidity of the storage area are within the recommended range for the projector. Refer to Specifications or consult your dealer about the range. Retract the adjuster feet. Remove the batteries from the remote control. Pack the projector in its original packing or equivalent. Transporting the projector It is recommended that you ship the projector with its original packing or equivalent.
Setting LED Mode Setting the projector in Economic mode extends the lamp life. LED mode Description Normal 100% lamp brightness Economic Economic mode dims the projector’s LED lamp which will lower power consumption, extend the LED lamp life and reduce the projector’s noise level. The reduced light output will result in darker projected pictures. If you set your projector to Economic mode choose Normal to return to the default normal mode.
Indicators There are three indicators which show the status of the projector. Check the following information about the indicator lights. If there is anything wrong, turn the projector off and contact your dealer.
PWR TEMP LED Green Flashing Red Off Green Flashing Red Flashing Off Status & description 78
Troubleshooting Problem Cause Remedy There is no power from the power cable. Plug the power cable into the AC inlet on the rear of the projector, and plug the power cable into to the power outlet. If the power outlet has a switch, make sure that it is switched on. Attempting to turn the projector on again during the cooling process. Wait until the cooling down process has completed. The video source is not turned on or connected correctly.
Problem 3D content does not display correctly Cause Remedy The 3D glasses are out of battery. Recharge the 3D glasses. The settings in the 3D menu are not set correctly. Correctly set the settings in the 3D menu. Your Blu-ray Disc is not in 3D format. Use a 3D Blu-ray Disc and try again. The input source has not been correctly selected. Select the correct source with the SOURCE key on the projector or remote control.
Specifications Projector specifications All specifications are subject to change without notice. Category Optical Item Specification Resolution 1280 (H) x 720 (V), 0.3” Display system Mstar ARM A7 Quad-Core CPU Lens F/Number F = 1.5, f = 5.53 mm Lamp type OSRAM Q8 20,000/30,000 hours Lamp Life (Normal/Economic) Audio Electrical Mechanical Lamp life results will vary depending on environmental conditions and usage.
Category Output Terminals Item Speaker (Stereo) 2 watt x 2 Audio signal output Audio jack x 1 USB USB port 2.0 Type-A x 1 USB port 3.0 Type A x 1 Control Input Terminals Environmental Requirements Specification IR receiver x 2 Video signal input SD/HDTV signal input Digital - HDMI x 1 USB USB port 2.0 Type-A x 1 USB port 3.
Dimensions (with adjustment feet not extended) 215.63 mm x 201.7 mm x 93.16 mm (W x D x H) 203.9 206.1 83 91.7 88.2 215.8 127.
Timing chart Supported timing for video input Timing Resolution H. Frequency (KHz) V. Frequency (KHz) Dot Clock Frequency (MHz) 480i**** 720 (1440) x 480 15.73 59.95 27 480p**** 720 x 480 31.47 59.94 27 576i 720 (1440) x 576 15.63 50 27 576p 720 x 576 31.25 50 27 720/50p** 1280 x 720 37.5 50 74.25 720/60p* 1280 x 720 45.00 60 74.25 1080/24P** 1920x1080 27 24 74.25 1080/25P 1920x1080 28.13 25 74.25 1080/30P 1920x1080 33.75 30 74.
Supported timing for PC input Timing 640 x 480 800 x 600 1024 x 768 1152 x 864 1280 x 720 1280 x 768 1280 x 800 Resolution H. Frequency (KHz) V. Frequency (KHz) Dot Clock Frequency (MHz) VGA_60 59.940 31.469 25.175 VGA_72 72.809 37.861 31.500 VGA_75 75.000 37.500 31.500 VGA_85 85.008 43.269 36.000 SVGA_60 60.317 37.879 40.000 SVGA_72 72.188 48.077 50.000 SVGA_75 75.000 46.875 49.500 SVGA_85 85.061 53.674 56.250 XGA_60* 60.004 48.363 65.000 XGA_70 70.069 56.
Timing Resolution H. Frequency (KHz) V. Frequency (KHz) Dot Clock Frequency (MHz) SXGA_60 60.020 63.981 108.000 SXGA_75 75.025 79.976 135.000 1280 x 960_60 60.000 60.000 108 1280 x 960_85 85.002 85.938 148.500 1360 x 768 1360 x 768_60 60.015 47.712 85.500 1440 x 900 WXGA+_60 59.887 55.935 106.500 1400 x 1050 SXGA+_60 59.978 65.317 121.750 1600 x 1200 UXGA 60.000 75.000 162.000 1680 x 1050 1680 x 1050_60 59.954 65.290 146.250 640 x 480@67Hz MAC13 66.667 35.
Supported file formats File type File extension Description Adobe PDF 1.0 - 1.4 (.pdf) Documents MS PowerPoint 97 - 2010 (.ppt, .pptx) MS Excel 95 - 2010, Office XP (.xls, .xlsx) MS Word 95 - 2010, Office XP (.doc, .docx) Photos JPG (.jpg, .jpeg), BMP (.bmp) Music MP3, MP2, MP1, AAC, WAV AVI (XVID, MJPEG) Video DVIX (MJPEG, XVID) DAT (MPEG1) MPG (MPEG1) Subtitles • Subtitle files must be in the same directory as the video files.