SH960 Digital Projector User Manual Welcome
English Table of contents Important safety instructions ..... 3 Overview ...................................... 6 Shipping contents ..................................6 Remote control batteries .......................7 Remote control operation.....................7 Projector features...................................8 Projector exterior view ..........................9 Controls and functions........................10 Control panel ............................................10 Remote control ..............
Important safety instructions Your projector is designed and tested to meet the latest standards for safety of information technology equipment. However, to ensure safe use of this product, it is important that you follow the instructions mentioned in this manual and marked on the product. 1. Please read this user manual before you operate your projector. Keep this manual in a safe place for future reference. 2. Always place the projector on a level, horizontal surface during operation.
English 5. Do not block the vents holes while the projector is on (even in standby mode): 9. Do not look straight into the projector lens during operation. It may harm your sight. - Do not cover the projector with any item; - Do not place the projector on a blanket, bedding or any other soft surface. 6.
Moisture condensation 14. When you think service or repair is required, take the projector only to a suitably qualified technician. Avoid volatile liquids English 13. Never attempt to replace the lamp assembly until the projector has cooled down and is unplugged from the power supply. Never operate the projector immediately after moving it from a cold location to a hot location. When the projector is exposed to such a change in temperature, moisture may condense on the crucial internal parts.
English Overview Shipping contents Carefully unpack and verify that you have the items below. Some of the items may not be available depending on your region of purchase. Please check with your place of purchase. Some of the accessories may vary from region to region. The warranty card is only supplied in some specific regions. Please consult your dealer for detailed information.
1. To open the battery cover, turn the remote control over to view its back, push on the finger grip on the cover and slide it up in the direction of the arrow as illustrated. The cover will slide off. 2. Remove any existing batteries (if necessary) and install two new AAA batteries observing the battery polarities as indicated in the base of the battery compartment. Positive (+) goes to positive and negative (-) goes to negative. 3.
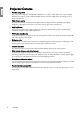
English Projector features • • • • • • • • • 8 Full HD compatible The projector is compatible with Standard Definition TV (SDTV) 480i, 480p, 576i, 576p, and High Definition TV (HDTV) 720p, 1080i and 1080p formats, with the 1080p format providing a true 1:1 image reproduction. High picture quality The projector provides excellent picture quality due to its high resolution, excellent home theater brightness, super high contrast ratio, vivid color and rich gray-scale reproduction.
English Projector exterior view Front and upper side view 1 2 3 5 6 4 7 8 1. Control panel (See "Control panel" on page 10 for details.) 2. Lamp cover 3. Vent (heated air exhaust) 4. Projection lens 5. Kensington lock slot 6. Vent (cold air intake) 7. Front IR sensor 8. Lens shift lever Rear view See "Connecting with video equipment" on page 17 for connection details. 9 10 11 12 13 14 15 16 17 18 19 20 21 9. AC Power cable inlet 10. Rear IR sensor 11. Audio input jack Audio output jack 12.
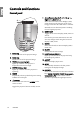
English Controls and functions Control panel 7. Arrow/Keystone keys (Left / , Up / , Right / , Down / ) Moves the current On-Screen Display (OSD) menu selection in the direction of the arrow being pressed when the OSD menu is activated. 1 2 Manually corrects distorted pictures resulting from an angled projection. 8. MENU/EXIT Toggles the On-Screen Display (OSD) menu on and off. 3 4 6 8 7 10 5 7 9 11 12 13 7 14 7 1. Focus ring Adjusts the focus of the projected image. 2.
6. MODE/ENTER Sequentially selects a predefined picture setting available for each input. 1 Enacts the selected On-Screen Display (OSD) menu item. 2 3 12 4 7. LASER Emits visible laser pointer light for presentation purposes. 8. TEST PATTERN Displays the test pattern. 5 9. 6 Starts the FAQ function. 13 10. FREEZE Freezes the projected image. 14 11. ASPECT Selects the display aspect ratio. 10 15 11 16 12. AUTO Automatically determines the best picture timings for the displayed image.
English Positioning your projector Choosing a location Your projector is designed to be installed in one of four possible installation locations. Your room layout or personal preference will dictate which installation location you select. Take into consideration the size and position of your screen, the location of a suitable power outlet, as well as the location and distance between the projector and the rest of your equipment. 1. Floor Front: 3.
The distance from the projector lens to the screen, the zoom setting, and the video format each factors in the projected image size. This projector is equipped with a movable lens. See "Shifting the projection lens" on page 16 for details. You can see the diagrams on pages 14 and 15 for the vertical offset values in the dimension tables that are measured when the lens is shifted fully up or down.
English Projection dimensions Installation for a 16:9 ratio screen Ceiling Installation Floor Installation : Screen : Screen : Center of lens : Center of lens The screen aspect ratio is 16:9 and the projected picture is 16:9 Screen dimensions Diagonal Height [inch (mm)] [cm] Projection distance [cm] Width [cm] Min distance (with max zoom) Max distance Average (with min zoom) Lowest/ Highest lens position
The illustrations and table below are provided for those users who already have 4:3 aspect ratio screens or intend to purchase 4:3 aspect ratio screens to view 4:3 ratio projected images.
English Shifting the projection lens The lens shift control provides flexibility for installing your projector. It allows the projector to be positioned off the center of the screen. The lens shift is expressed as a percentage of the projected image height or width. It is measured as an offset from the projected image’s vertical or horizontal center. You can use the lever to shift the projection lens in any direction within the allowable range depending on your desired image position.
You can connect the projector to any type of video equipment, such as a VCR, DVD player, digital tuner, cable or satellite decoder, video game console or digital camera. You can also connect it to a desktop or laptop PC or Apple Macintosh system. You need only connect the projector to a source device using just one of the connecting methods, however each provides a different level of video quality.
English Connecting component-video devices Be sure to match the corresponding colors between the cables and the terminals. The RCA type component video jacks are provided for connection to video output devices. The audio connections are provided for informational purposes only. You can also connect the separate audio cable to a suitable audio amplifier. AV equipment: DVD player, digital tuner, etc.
English Connecting a computer Connect the projector to a computer with a VGA cable. Laptop or desktop computer VGA cable Audio cable Speakers Audio cable Many laptops do not turn on their external video ports when connected to a projector. Usually a key combination like Fn + F3 or CRT/LCD key turns the external display on/off. Locate a function key labeled CRT/LCD or a function key with a monitor symbol on the laptop. Press Fn and the labeled function key simultaneously.
English Using the projector Preparations 1. Plug in and turn all of the connected equipment on. 2. If not already in, plug the supplied power cable into the AC inlet on the rear of the projector. 3. Plug the power cable into a wall power outlet and turn the wall switch on. Please use the original accessories (e.g. power cable) only with the device to avoid possible dangers such as electric shock and fire. Turning the projector on Follow the steps below. 1.
English Selecting an input source The projector can be connected to multiple equipment at the same time. When the projector is first turned on, it will attempt to reconnect with the input source which was in use when the projector was last shut down. To select the video source: • Using the remote control or projector Press one of the Source keys on the remote control, or press SOURCE repeatedly until your desired signal is selected. • Using the OSD menu 1.
English Using the menus The projector is equipped with multilingual On-Screen Display (OSD) menus for making various adjustments and settings. Below is the overview of the OSD menu. Main menu icon Main menu Picture -- Basic Picture Mode Highlight Cinema Load Settings From Sub-menu Brightness + 50 Contrast + 50 Color + 50 Status 0 Tint Sharpness +3 Reset Picture Settings Press EXIT to go back to the previous page or to exit.
For security purposes and to help prevent unauthorized use, the projector includes an option for setting up password security. The password can be set through the On-Screen Display (OSD) menu. Once the password is set and this function is selected, the projector is password-protected. Users who do not know the correct password can not use the projector. You will be inconvenienced if you activate the password functionality and subsequently forget the password.
English Entering the password recall procedure 1. Make sure the Input Password page is displayed on screen. Press MODE. The projector will display a coded number on the screen. 2. Write down the number and turn off your projector. 3. Seek help from the local BenQ service center to decode the number. You may be required to provide proof of purchase documentation to verify that you are an authorized user of the projector.
English Adjusting the projected image Adjusting the projection angle There are four adjuster feet on the bottom of the projector. These can be used if necessary to change the projection angle. Screw the feet in or out as appropriate to aim and level the projection angle. If the screen and the projector are not perpendicular to each other, the projected image becomes vertical trapezoidal. To correct this problem, see "Correcting picture distortion" on page 26 for details.
English Correcting picture distortion Keystoning occurs when the projector is not perpendicular to the screen and is where the projected picture displays visible as a trapezoid shape like either of the following: • • Two parallel sides (left and right, or top and bottom) but is noticeably wider on either side. No parallel sides. To correct the picture’s shape, you can perform the following steps. 1. Adjust the projection angle.
English Using the preset and user modes Selecting a preset mode The projector is preset with several pre-defined picture modes so that you can choose one to suit your operating environment and input source picture type. To select a picture mode that suits your need: • Press MODE repeatedly until your desired mode is selected. • Using the OSD menu 1. Press MENU/EXIT and then press / until the Picture -- Basic menu is highlighted. 2. Press to highlight Picture Mode. 3.
English Setting the User 1/User 2 mode There are two user-definable modes if the current available picture modes are not suitable for your need. You can use one of the picture modes (except the selected User mode) as a starting point and customize the settings. 1. In the Picture -- Basic menu, highlight Picture Mode and press to select User 1 or User 2 mode. 2. Press to highlight Load Settings From.
English Fine-tuning the picture quality No matter what picture mode you have selected, you are able to fine-tune those settings to fit every presentation purpose. Those adjustments will be saved to the preset mode you are at when you exit the OSD menu. Adjusting Brightness Highlight Brightness in the Picture -- Basic menu and adjust the values by pressing / on the projector or remote control. 30 50 30 50 The higher the value, the brighter the picture. And the lower the setting, the darker the picture.
English Advanced picture quality controls There are more advanced functions in the Picture -- Advanced menu to be adjusted to your preference. To save the settings, just press MENU/EXIT to leave the OSD menu. Setting Black Level Highlight Black Level and press to select 0 IRE or 7.5 IRE. / on the projector or remote control Picture -- Advanced Black Level 0 IRE Clarity Control The grayscale video signal is measured in IRE units.
To set a preferred color temperature: English Setting a preferred color temperature Color Temp User 1 Fine Tuning 1. Highlight Color Temperature and select User 1, User 2, or User 3 by pressing / on the projector or remote control. 2. Press to highlight Color Temperature User_ Fine Tuning and press ENTER. The Color Temperature User_ Fine Tuning page is displayed.
English Color Management In most installation situations, color management will not be necessary, such as in classroom, meeting room, or lounge room situations where lights remain on, or where building external windows allow daylight into the room. Only in permanent installations with controlled lighting levels such as boardrooms, lecture theaters, or home theaters, should color management be considered.
This feature separates composite signal to Y (brightness) signal and C (color) signal, and can help produce clearer and sharper images with correct colors in place.
English 3. Letter Box (LB): Scales a picture to fit the projector’s native resolution in its horizontal width and resize the picture’s height to the 3/4 of the projection width. This may produce a picture greater in height than can be displayed, so part of the picture is lost (not displayed) along the top and bottom edges of the projection. This is suitable for the display of movies which are presented in letter box format (with black bars on the top and bottom). 4.
English Hiding the image In order to draw the audience's full attention to the presenter, you can use BLANK to hide the screen image. When this function is activated with an audio input connected, the audio can still be heard. You can set the blank time in the Display > Blank Timer menu to let the projector return the image automatically after a period of time when there is no action taken on the blank screen. The length of time can be set from 5 to 30 minutes in 5-minute increments.
English Adjusting the sound The sound adjustments made as below will have an effect on the projector speaker(s). Be sure you have made a correct connection to the projector audio input. See "Connecting with video equipment" on page 17 for how the audio input is connected. Muting the sound To temporarily turn off the sound: 1. Press MENU/EXIT to open the OSD menu and press / to highlight the Advanced Setup menu. 2. Press to highlight Audio Settings and press ENTER. The Audio Settings page is displayed. 3.
If one lamp fails, the projector enters Single-Alternative mode automatically. Dual-Brightest, DualReliable and Single-Eco settings are not available. • After switching from Dual-Brightest/Dual-Reliable mode to Single-Alternative/Single-Eco mode or vice versa, wait for 90 seconds before you can adjust the lamp mode again. • A slight variation in the picture brightness and colors may be observed during the very short time of switching lamp modes.
English Controlling the projector remotely through a web browser Once you have the correct IP address for the projector and the projector is on or in standby mode, you can use any computer that is on the same local area network to control the projector. 1. Enter the address of the projector in the address bar of your browser and click Go. 2. The remote network operation page opens. This page allows you to operate the projector as if you were using the remote control or control panel on the projector.
i iii ii iv v i. ii. iii. iv. You can name the projector, keep track of its location and the person in charge of it. You can adjust the Lan Control Settings. Once set, access to the remote network operation on this projector has been password-protected. Once set, access to the tools page has been password-protected. After making the adjustments, press the Send button and the data will be saved in the projector. v. Press Exit to go back to the remote network operation page.
English The info page displays the information and status of this projector. Press Exit to go back to the remote network operation page. For more information, visit http://www.crestron.com & www.crestron.com/getroomview. Operating in a high altitude environment We recommend that you activate High Altitude Mode when your environment is higher than 1500 meters (around 4920 feet) above sea level, or whenever the projector will be used for extended periods of time (>10 hours) without shutdown.
English Displaying more than one image source simultaneously Your projector is capable of displaying pictures simultaneously from two input sources, which can be used to enhance your presentation in an interesting way. Ensure the signals you want to display are correctly connected to the projector. To display the PIP window: 1. Press MENU/EXIT and then press / until the Display menu is highlighted. 2. Press to highlight PIP and press ENTER. The PIP page is displayed. 3.
English Turning the projector off To turn the projector off, press POWER ( II ) on the projector or ON I I on the remote control and a warning message appears. Press POWER/ON ( II ) again. • The Power indicator light flashes orange and the fans run for about two minutes to cool the lamp. The projector will not respond to any commands until the cooling process is complete. • Then, the Power indicator light is a steady orange once the cooling process has finished and fans stop.
English On-Screen Display (OSD) menus On-Screen Display (OSD) structure Please note that the on-screen display (OSD) menus vary according to the signal type selected. Main menu Sub-menu Picture Mode Options Cinema/Dynamic/Presentation/sRGB/User 1/User 2 Load Settings From Brightness Picture -Basic 0–100 Contrast 0–100 Color 0–100 Tint -20–+20 Sharpness 0–8 Reset Picture Settings Rename User Mode Black Level Clarity Control 0 IRE/7.
English Main menu Sub-menu Options Aspect Ratio Anamorphic/4:3/Letter Box/Wide/Real Keystone 2D Keystone Position Display Overscan Adjustment 0/1/2/3 Color Space Conversion Auto/RGB/YUV PIP PIP On/Off Main Source Second Source HDMI/Video/S-Video/Component 1/ Component 2/PC Active Window Main/PIP Position Top-Right/Bottom-Left/Bottom-Right/TopLeft Size Large/Small H.
Sub-menu Lamp Mode English Main menu Options Dual-Brightest/Dual-Reliable/SingleAlternative Reset Lamp Timer 1 Lamp Settings Reset Lamp Timer 2 Equivalent Lamp Hour #1 Equivalent Lamp Hour #2 Auto HDMI Settings HDMI Format PC Signal Video Signal Baud Rate 2400/4800/9600/14400/19200/38400/57600/ 115200 High Altitude Mode On/Off Mute Advanced Setup Audio Settings Password On/Off Volume Power On/Off Ring Tone On/Off Password On/Off Change Password (inputs current password) Control By RS
English Picture -- Basic menu Function Picture Mode Load Settings From Brightness Contrast Color Tint Sharpness Description Pre-defined picture modes are provided so you can optimize your projector picture set-up to suit your program type. See "Selecting a preset mode" on page 27 for details. Selects a preset mode that most suits your need for the picture quality and further fine-tune the picture based on the selections listed below. See "Setting the User 1/User 2 mode" on page 28 for details.
Function Aspect Ratio Keystone Position Description There are several options to set the picture’s aspect ratio depending on your input source. See "Selecting the aspect ratio" on page 33 for details. Corrects any keystoning of the picture. See "Correcting picture distortion" on page 26 for details. Displays the position adjustment page. To move the projected picture, use the directional arrow keys.
English System Setup menu Function Language Splash Screen Projector Position Auto Power Off Sleep Timer Background Color Description Sets the language for the On-Screen Display (OSD) menus. See "Using the menus" on page 22 for details. Allows you to select which logo screen will be displayed during projector startup. You can choose BenQ logo screen, Blue screen or Black screen. The projector can be installed on a ceiling or behind a screen, or with one or more mirrors.
Function English Advanced Setup menu Description Lamp Mode Selects the projector lamp power among Dual-Brightest, Dual-Reliable and Single-Alternative modes. Reset Lamp Timer 1/Reset Lamp Timer 2 Lamp Settings Once the lamp is renewed, select Reset to return the lamp timer to "0". See "Resetting the lamp timer" on page 55 for details. Equivalent Lamp Hour #1/Equivalent Lamp Hour #2 HDMI Settings Shows the lamp hour information. See "Getting to know the lamp hour" on page 52 for details.
English Information menu This menu shows you the current operating status of the projector. Some picture adjustments are available only when certain input sources are in use. Unavailable adjustments are not shown on the screen. Function FAQ-Image and Installation FAQ-Features and Service Displays possible solutions to problems you may encounter. Source Shows the current signal source. Picture Mode Shows the selected mode in the Picture -- Basic > Picture Mode menu.
English Additional information Care of the projector Your projector needs little maintenance. The only thing you have to do on a regular basis is keep the lens clean. Never remove any parts of the projector except the lamp. Contact your dealer or local customer service center if the projector fails to operate as expected. Cleaning the lens Clean the lens whenever you notice dirt or dust on the surface.
English Lamp information Getting to know the lamp hour When the projector is in operation, the duration (in hours) of lamp usage is automatically calculated by the built-in timer. To obtain the lamp hour information: 1. Press MENU/EXIT and then press / until the Advanced Setup menu is highlighted. 2. Press to highlight Lamp Settings and press ENTER. The Lamp Settings page is displayed. 3. The lamp hour information is shown in the row of Equivalent Lamp Hour #1/Equivalent Lamp Hour #2. 4.
When the Lamp indicator lights up red or a message appears suggesting it is time to replace the lamp, please install a new lamp or consult your dealer. An old lamp may cause a malfunction in the projector and in some instances the lamp may explode. Go to http://lamp.BenQ.com for a replacement lamp. The Lamp indicator light and Temperature warning light will light up if the lamp becomes too hot. Turn the power off and let the projector cool for 45 minutes.
English 1. Turn the power off and disconnect the 5. projector from the power outlet. Turn off all connected equipment and disconnect all other cables. See "Turning the projector off " on page 42 for details. 2. Loosen the screw on the lamp cover. 3. Remove the lamp cover. 4. Identify the lamp you want to replace by looking at the top of the lamp. 2 54 Additional information 6. 1 Loosen the screw that hold the lamp to the projector. Disconnect the lamp connector from the projector.
Insert the replacement lamp. Make sure it is pushed fully and firmly in place. 8. Tighten the screw securing the lamp box. Reconnect the lamp connector. 9. Ensure the handle is fully locked in place. English 7. 10. Replace the lamp cover. 11. Tighten the screws on the lamp cover. 12. Reapply power and turn the projector back on. Notes • Please be careful to not over-tighten the screws. • Loose screws may cause a bad connection, which could result in malfunction.
English 1. After the start-up logo, press MENU/EXIT and then press / until the Advanced Setup menu is highlighted. 2. Press to highlight Lamp Settings and press ENTER. The Lamp Settings page is displayed. 3. Highlight Reset Lamp Timer 1/Reset Lamp Timer 2 and press ENTER. A warning message is displayed asking if you want to reset the lamp timer. Highlight Reset and press ENTER. The lamp time will be reset to "0".
POWER Orange Green Flashing Green Orange Flashing Orange Flashing Orange Flashing Red Light TEMP LAMP1 English Indicators Status & Description LAMP2 Power events Off Off Off Stand-by mode. Off Off Off Powering up. Off Off Off Normal operation. 1. The projector needs 90 seconds to cool down as it was abnormally shut down without the normal cooling down process. Or 2. The projector needs to cool for 90 seconds after the power is turned off.
English Troubleshooting Problem The projector does not turn on. No picture. Image is unstable. Picture is blurred. Remote control does not work correctly. 58 Cause Remedy There is no power from the power cable. Plug the power cable into the AC inlet on the rear of the projector, and plug the power cable into to the power outlet. If the power outlet has a switch, make sure that it is switched on. (See page 20.) Attempting to turn the projector on again during the cooling process.
English Specifications All specifications are subject to change without notice. Optical Projection system DMD chip Lens Projection screen size Lamp Single-chip DLP™ system. 0.65" DLP (1920 x 1080) F = 2.48 to 2.81, f = 24.1 to 36.15 mm 28" to 300" 330W Electrical Compatibility PC: 640 x 480 to 1920 x 1200 Color Space Video: NTSC, PAL, SECAM, YPbPr (480i/480p/576i/576p/720p/ 1080i/1080p), HDTV (720p/1080i/1080p) Typ. = 60% NTSC (Target Color Gamut = HDTV Rec.
English Dimensions 443 mm x 354.7 mm x 167 mm (W x D x H) 443 167 354.7 Ceiling mount installation 266 298 106 70 46 222 24 288 72.52 Ceiling mount screws: M6 x 8 (Max. L = 8 mm) 128 124.5 397.9 364.4 88 Unit: mm 60 Additional information 151.2 211.7 424.4 173 324.
Supported timing for PC input Format Resolution Refresh rate (Hz) H. Frequency (KHz) Pixel Frequency (MHz) 31.469 37.861 37.5 43.269 31.469 35.156 37.879 48.077 46.875 53.674 48.363 56.476 60.023 68.667 67.500 35.82 41.467 67.5 47.776 60.289 68.633 49.702 62.795 71.554 63.981 79.976 91.146 60 85.938 47.712 55.935 70.635 80.43 65.317 75 65.29 25.175 31.5 31.5 36 28.3221 36.000 40 50 49.5 56.25 65 75 78.75 94.5 108.000 46.996 51.419 108 79.5 102.25 117.5 83.5 106.5 122.5 108 135 157.5 108 148.5 85.
English Supported timing for HDMI (HDCP) input Format Resolution Refresh rate (Hz) H. Freq. (KHz) Pixel Freq. (MHz) 480i 720 x 480 59.94/60 15.734/15.75 27/27.027 480p 720 x 480 59.94/60 31.469/31.5 27/27.027 576i 720 x 576 50 15.625 27 576p 720 x 576 50 31.25 27 720/50p 1280 x 720 50 37.5 74.25 720/60p 1280 x 720 59.939/60 44.955/45 74.175/74.25 1080/50i 1920 x 1080 50 28.125 74.25 1080/60i 1920 x 1080 59.939/60 33.716/33.75 74.175/74.
Warranty BenQ warrants this product against any defects in material and workmanship, under normal usage and storage. Proof of purchase date will be required with any warranty claim. In the event this product is found to be defective within the warranty period, BenQ’s only obligation and your exclusive remedy shall be replacement of any defective parts (labor included). To obtain warranty service, immediately notify the dealer from which you purchased the product of any defects.