
User Guide


20
Operation
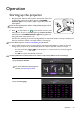
4. If you are prompted to enter the password, use the arrow keys on the projector or remote control
to enter a six-digit password. See Utilizing the password function for details.
5. Switch on the connected equipment.
6. The projector starts to search for available input signals. The current input signal being scanned
displays on the screen. If the projector does not detect a valid signal, the "No Signal" message
appears. You may press SOURCE on the projector or remote control to select your desired input
signal.
7. If the horizontal frequency of the input source exceeds the range supported the projector, the "No
Signal" message displays on the screen. It will remain on-screen until you change the horizontal
frequency of the input source to an appropriate one.
Step 3:
Specify Verti cal Keys tone.
For more information about vertical
keystone, see Correcting keystone.
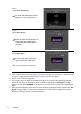
Step 4:
Specify Auto Source.
Select On if you want the projector to
always search for available signals
automatically when the projector is
turned on.
Step 5:
Specify Menu Type.
For more information about menu
types, see About the OSD Menus.
Now you’ve completed the initial setup.