LX770 / LH770 Digital Projector User Manual V1.
English Copyright & Disclaimer Copyright Copyright 2017 by BenQ Corporation (Shanghai). All rights reserved. No part of this publication may be reproduced, transmitted, transcribed, stored in a retrieval system or translated into any language or computer language, in any form or by any means, electronic, mechanical, magnetic, optical, chemical, manual or otherwise, without the prior written permission of BenQ Corporation (Shanghai).
Table of Contents Copyright & Disclaimer.........................................................................2 Copyright............................................................................................................................................... 2 Disclaimer.............................................................................................................................................. 2 Statement for hyper links and third-party websites.....................................
Operation..............................................................................................27 Starting up the projector.................................................................................................................27 Adjusting the projected image.................................................................................. 28 Adjusting the projection angle........................................................................................................
Clean the lens.............................................................................................................. 62 Cleaning the projector case....................................................................................... 62 Dust filter maintenance............................................................................................. 63 Dust filter replacement....................................................................................................................
English Important safety instructions Your projector is designed and tested to meet the latest standards for safety of information technology equipment. However, to ensure safe use of this product, it is important that you follow the instructions mentioned in this manual and marked on the product. Safety Instructions 1. Do not look straight at the projector lens during operation. The intense light beam may damage your eyes. 2.
Do not remove it. English 9. Do not step on the projector or place any objects upon it. Besides probable physical damage to the projector, doing so may result in accidents and possible injury. 10. Do not place liquids near or on the projector. Liquids spilled into the projector may cause it to fail. If the projector does become wet, disconnect it from the power supply's wall socket and call BenQ to have the projector serviced. This device comes with the three-pin power plug with earth contact.
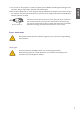
Label indication English The following diagram shows label locations. 1. Laser warning label 2. Specification label Note: Specification labels may vary due to different delivery regions. Consult the dealer for details.
Laser indication English The following diagram shows the location of laser aperture. Be aware that you must not look straight at the laser. Laser aperture Heat radiation notice Leave a space at least 500 mm (19.7 in.) around the air outlet. Make sure that no object blocks the ventilation within 300 mm (11.8 in.). Keep the air vent at least 1 m away from the air inlet of other projectors.
yy Leave a space at least 50 cm around the air outlet. English Min. 500 mm (19.69 in.) Min. 500 mm (19.69 in.) Min. 500 mm (19.69 in.) Min. 100mm (3.94 in.) Min. 300 mm (11.81 in.) Min. 500 mm (19.69 in.) yy Make sure that the air inlet would not suck in the hot air from the air outlet. yy When using this product in a confined space, make sure that the temperature of the air near this space does not exceed the operating temperature of the projector in operation.
Shipping contents English Standard accessories Remote controller VGA cable Battery Quick start guide Warranty card Power cord Optional accessories 1. Ceiling mount kit 2. 3D glasses 3. Wireless dongle: QCast (QP01), InstaShow™(WDC10) * The warranty card is only supplied in some specific regions. Please consult your dealer for detailed information.
English Introduction Projector exterior view Front/upper side 1. 2. 3. 4. 5. 6. 7. POWER indicator light TEMP (temperature) warning light LAMP indicator light Front IR remote sensor Front adjuster foot Side ventilation hole Front adjuster foot Rear/upper side 8. Vertical lens knob 9. Lens lock knob 10. Horizontal lens knob 11. AC power cord inlet 12. Kensington anti-theft lock slot 13. Control terminal 14. Control panel 15. Dust cap (air inlet area) 16. Ventilation hole (sucking cool air) 17.
Controls and functions English Control panel yy MENU/EXIT Turns on the On-Screen Display (OSD) menu. Goes back to previous OSD menu, exits and saves menu settings. See “Using the menus” on page 31 for details. yy Volume/Arrow keys ( /◄ Left) Turns down the volume. yy SOURCE Displays the source selection bar. yy MODE/ENTER Selects an available picture setup mode. Activates the selected On-Screen Display (OSD) menu item. See “Using the menus” on page 31 for details.
English Control terminal yy MONITOR OUT Connects to other display devices used for simultaneous playback and display. yy PC 1/PC 2 This indicates the RGB or YPbPr/YCbCr output signal. yy S-VIDEO Connecting S-Video source. yy HDMI 1 Connecting HDMI source. yy HDMI 2/MHL Connecting HDMI or MHL source. yy LAN Connecting to RJ45 Cat5/Cat6 Ethernet cable to control the projector via Internet. yy USB 1.5A Supporting 5V/1.5A output. yy VIDEO Connecting Video source.
Remote controller English 7. LASER Emits visible laser pointer light for presentation purposes. 8. MHL control buttons These buttons are used when playing the media. Their functions are listed by order: Go to the previous document/Play/Pause/Go to the next document/Fast rewind/Stop/Fast forward. These buttons can only be used when controlling the intelligent device in MHL mode. 9. ZOOM+/ZOOMMagnifies or reduces the projected picture size. 10. ASPECT Selects the display aspect ratio. 11.
English 16. ► Right/ Turn up the projector volume. When the On-Screen Display (OSD) menu is activated, the #3, #5 and #16 keys are used as directional arrows to select the desired menu items and to make adjustments. In the MHL mode, use #3, #5 and #16 as arrow keys. Use #4 for MENU/EXIT and #17 for MODE/ENTER. 17. MODE/ENTER Selects an available picture setup mode. Activates the selected On-Screen Display (OSD) menu item.
Effective range of remote control English Infra-Red (IR) remote control sensors are located on the front and rear of the projector. The remote control must be held at an angle within 30 degrees perpendicular to the projector's IR remote control sensor to function correctly. The distance between the remote control and the sensor should not exceed 8 meters (~ 26 feet). Ƞ30Ƀ Approx. ±30° Replacing the remote control battery 1.
English Installation Positioning your projector Choosing a location Your projector is designed to be installed in one of four possible installation locations: 1.Front Table Select this location with the projector placed near the floor in front of the screen. This is the most common way to position the projector for quick setup and portability. 2.Rear Table Select this location with the projector placed near the floor behind the screen. Note that a special rear projection screen is required.
Evaluate the distance based on the image size English Obtaining a preferred projected image size The distance from the projector lens to the screen, the zoom setting (if available), and the video format each factors in the projected image size. Projection dimensions Refer to “Dimensions” on page 69 for the center of lens dimensions of this projector before calculating the appropriate position. Max. zoom Min.
LH770 English The screen aspect ratio is 16:9 and the projected picture is 16:9 Distance from screen (mm) Screen size Diagonal H W Min distance Average Max distance Offest (mm) Inch mm (mm) (mm) (max.
Press the lens shift button for adjustment English Horizontal lens shift adjustment bar Vertical lens shift adjustment bar You can use the lens shift function to adjust the location of projected image horizontally or vertically in the range described below. Adjust the location of vertical image You can adjust the height of vertical image between the shift locations 124.5% +/-7.8% (XGA), 125.7% +/-7.9% (1080P).
Adjust the zoom/focus function English You can turn the zoom gear for zoom-in and zoom-out.You can turn the focus gear to focus on an image until the image becomes clear. The projector will focus on an image in a certain distance. Refer to “Finetuning the image size and clarity” on page 28.
Connection English Before connection yy Please read the manual for connection to external devices carefully before connection. yy Shut down the power supply of all devices before connecting the cable. yy Bear the following in mind before connecting the cable. A breakdown might occur if not following these rules. yy Please touch metal objects nearby to release static electricity before connecting the cable to the projector or device linking to the projector.
English HDMI 1 No. 24 Serial No. Serial 1 TMDS Data2+ 11 TMDS Clock Shield 2 TMDS Data2 Shield 12 TMDS Clock- 3 TMDS Data2- 13 CEC 4 TMDS Data1+ 14 Reserved (no pin) 5 TMDS Data1 Shield 15 SCL 6 TMDS Data1- 16 SDA 7 TMDS Data0+ 17 DDC/CEC Ground 8 TMDS Data0 Shield 9 TMDS Data0- 18 +5V power supply (50 mA max.
Connection with the AV device English A/V device Smart phone or tablet Connection with the computer Display Control computer Computer 25
English Connection with LAN (Ethernet) 26
Operation English Starting up the projector 1. Plug the power cord into the projector and into a power outlet. Turn on the power outlet switch (where fitted). Check that the POWER indicator light on the projector lights orange after power has been applied. Please use the original accessories (e.g. power cable) only with the device to avoid possible dangers such as electric shock and fire. 2. Press POWER on the projector or on the remote control to turn on the projector. Now you will hear the start sound.
English Adjusting the projected image Adjusting the projection angle The projector is equipped with 2 front adjuster feet. These adjusters change the image height and projection angle. To adjust the projector: 1. Adjust the foot before turning the projector to ensure that the image is at the position you prefer. 2. To retract the foot, screw the front and rear adjuster feet in a reverse direction.
Correcting 2D keystone English 2D Keystone function enables a wider projector installation area compared to conventional projectors with limited positioning in front of the screen. To correct this, you will need to manually correct it following one of these steps. yy Using the projector or remote control Press / to display the 2D Keystone page. 2D Keystone Press ▲/▼ to adjust vertical values from -30 to 30. Press ◄/► to adjust horizontal values from -30 to 30. MENU EXIT yy Using the menus 1.
English Adjusting corner fit Manually adjust four corners of the image by setting the horizontal and vertical values. yy Using the OSD menu 1. Press MENU/EXIT and then press ◄/► until the DISPLAY menu is highlighted. 2. Press ▼ to highlight Corner Fit and press MODE/ ENTER. The Corner Fit page displays. Display OFF Auto Wall Color Aspect Ratio 2D Keystone Corner Fit Position Phase H. Size Digital Zoom 3D ENTER S-VIDEO 3. Press ▲, ▼, ◄, ► to select one of the four corners and press MODE/ENTER.
Using the menus English The projector is equipped with On-Screen Display (OSD) menus for making various adjusents and settings. Below is the overview of the OSD menu. Main menu icon Main menu Display OFF Wall Color Aspect Ratio Highlight Auto 2D Keystone ENTER Corner Fit Status Position Phase H. Size Sub-menu Current input Digital Zoom Press MENU/EXIT to the previous page or to exit. 3D MENU EXIT S-VIDEO To use the OSD menus, please set them to your familiar language first. 1.
English Securing the projector Using a security cable lock The projector has to be installed in a safe place to prevent theft. Otherwise, purchase a lock, such as the Kensington lock, to secure the projector.You can locate a Kensington lock slot on the left side of the projector. A Kensington security cable lock is usually a combination of key(s) and the lock. Refer to the lock's documentation for finding out how to use it.
If you forget the password English If the password function is activated, you will be asked to enter the six-digit password every time you turn on the projector. If you enter the wrong password, the password error message as pictured to the right displays lasting for three seconds, and the message ‘INPUT PASSWORD’ follows.
English Switching input signal The projector can be connected to multiple devices at the same time. However, it can only display one full screen at a time. Be sure the Quick Auto Search function in the SOURCE menu is On (which is the default of this projector) if you want the projector to automatically search for the signals. You can also manually cycle through the available input signals. 1. Press SOURCE on the projector or remote control. Displays the source selection bar. 2.
Selecting the aspect ratio English The "aspect ratio" is the ratio of the image width to the image height. Most analog TV and computers are in 4:3 ratio,and digital TV and DVDs are usually in 16:9 ratio. With the advent of digital signal processing, digital display devices like this projector can dynamically stretch and scale the image output to a different aspect than that of the image input signal. To change the projected image ratio (no matter what aspect the source is): yy Using the remote control 1.
English About the aspect ratio In the pictures below, the black portions are inactive areas and the white portions are active areas. OSD menus can be displayed on those unused black areas. 1. Auto: Scales an image proportionally to fit the projector's native resolution in its horizontal width. This is suitable for the incoming image which is not in 4:3 and you want to make most use of the screen without altering the image's aspect ratio. 4:3 picture 2.
Optimizing the image English Using Wall Color In the situation where you are projecting onto a colored surface such as a painted wall which may not be white, the Wall Color feature can help correct the projected picture’s color to prevent possible color difference between the source and projected pictures. To use this function, go to the DISPLAY > Wall Color menu and press ◄/► to select a color which is the closest to the color of the projection surface.
Setting the User 1 mode English You can use one of the picture modes (except the User 1) as a starting point and customize the settings if the current available picture modes are not suitable for your need. 1. 2. 3. 4. Press MENU/EXIT to open the On-Screen Display (OSD) menu. Go to the PICTURE > Picture Mode menu. Press ◄/► to select User 1. Press ▼ to highlight Reference Mode. This function is only available when User 1 mode is selected up in the Picture Mode sub-menu item. 5.
Selecting a Color Temperature English The options available for color temperature* settings vary according to the signal type selected. 1. Cool: Makes images appear bluish white. 2. Normal: Maintains normal colorings for white. 3. Warm: Makes images appear reddish white. * About color temperatures: There are many different shades that are considered to be "white" for various purposes. One of the common methods of representing white color is known as the “color temperature”.
English 2. Press MODE/ENTER and the 3D Color Management page displays. 3. Select Primary Color and press ◄/► to select a color from among Red, Green, Blue, Cyan, Magenta, or Yellow. 4. Press ▼ to highlight Hue and press ◄/► to select its range. Increase in the range will include colors consisted of more proportions of its two adjacent colors. Please refer to the illustration to the right for how the colors relate to each other.
Remote paging operations English Connect the projector to your PC or notebook with a USB cable prior to using the paging function. See “Connection” on page 23 for details. You can operate your display software program (on a connected PC) which responds to page up/down commands (like Microsoft PowerPoint) by pressing PAGE +/PAGE - on the remote control.
Locking control keys English With the control keys locked, you can prevent your projector settings from being changed accidentally (by children, for example). When the Panel Key Lock is on, no control keys on the projector will operate except POWER. 1. Go to the SYSTEM SETUP: Basic > Panel Key Lock menu and select On by pressing ◄/► on the projector or remote control. A confirmation message appears. 2. Highlight Yes and press MODE/ENTER.
Muting the sound English To temporarily turn off the sound, yy Using the remote control Press MUTE to temporarily turn off the sound. When turning off the sound, corner of screen. To turn the sound on again, press MUTE again. appears on the top-right yy Using the menus 1. Press MENU/EXIT and then press ◄/► until the SYSTEM SETUP: Advanced menu is highlighted. 2. Press ▼ to highlight Audio Settings and press MODE/ENTER. The Audio Settings page displays. 3. Highlight Mute and press ◄/► to select On. 4.
Using Quick Install English This projector provides hot keys to set up Projector Installation, Test Pattern and Keystone. Press QUICK INSTALL on the remote control and press ▲/▼ to select options: yy Projector Installation: See “Installation” on page 18. yy Test Pattern: See “Using Test Pattern” on page 43. yy 2D Keystone: See “Correcting 2D keystone” on page 29.
English 7. IP Address, Subnet Mask, Default Gateway and DNS Server settings will appear. Record the IP address displayed in IP Address line. Wired LAN Status DHCP IP Address Subnet Mask Default Gateway DNS Server Apply Connection On MENU EXIT Contact your ITS administrator if the IP address still has not appeared. 3. Go to the SYSTEM SETUP: Advanced > Network Settings menu. 9. Press ▼ to highlight AMX Device Discovery and press ◄/► to select On or Off.
Remote control the projector via web browser English If a correct IP address of projector exists and the projector is turned on or in standby mode, you can use any computer in the same LAN to control the projector. 1. Enter the address of projector in the address field of browser and click Go. 2. Open the operation page of remote control network. This page (Crestron eControl) allows you to operate the projector like using the remote control or the control panel of projector.
1. 2. 3. 4. 5. English The tools page allows you to manage the projector, configure the LAN control settings and secure access of remote network operation on this projector. You can name the projector, keep track of its location and the person in charge of it. You can adjust the Wired LAN Control settings. Once set, access to the remote network operation on this projector has been password-protected. Once set, access to the tools page has been password-protected.
English Category Item Input length Maximum number of characters Admin Password Enabled (Not applicable) New Password 15 Confirm 15 The Information page displays the information and status of this projector. Press Exit to return to the operation page of remote control network. Visit http://www.crestron.com and www.crestron.com/getroomview for details. Shutting down the projector 1. Press POWER or OFF. A confirmation message displays prompting you.
Menu operations English Menu system Please note that the on-screen display (OSD) menus vary according to the signal type selected. Main menu Sub-menu Option Wall Color Off/Light Yellow/Pink/Light Green/Blue/ Blackboard Aspect Ratio Auto/Real/4:3/16:9/16:10 2D Keystone Top-Left/Top-Right/Bottom-Left/ Bottom-Right Corner Fit Position Phase 1. DISPLAY H. Size PC: 1.0x~2.0x Video: 1.0x~1.
English Main menu Sub-menu Option Picture Mode Dynamic/Presentation/sRGB/Infographic/ (3D)/Vivid/User 1 Reference Mode Dynamic/Presentation/sRGB/Infographic/ (3D)/Vivid Brightness Contrast Color Tint 2. PICTURE Sharpness Brilliant Color On/Off Color Temperature Cool/Normal/Warm Color Temperature Fine Tuning R Gain/G Gain/B Gain/R Offset/G Offset/B Offset Primary Color 3D Color Management R/G/B/C/M/Y Tint Saturation Gain 3.
Sub-menu Option English Main menu Language Front Table/Rear Table/Rear Ceiling/ Front Ceiling Projector Installation Menu Settings Operation Settings 4.
English Main menu Sub-menu Option High Altitude Mode On/Off Mute Audio Settings On/Off Volume Microphone Volume Light Source Settings Light Source Mode Normal/Economic/Dimming Dynamic Black On/Off Reset Light Source Timer Reset/Cancel Light Source Information Normal/Economic/Dimming Light Hour Equivalent Light Hour Change Password Security Settings Change Security Power On Lock 5.
Sub-menu 6. Current System INFORMATION Status Option yy yy yy yy yy yy yy yy English Main menu Source Picture Mode Light Source Mode Resolution 3D Format Color System Light Source Usage Time Firmware Version Note that the menu items are available when the projector detects at least one valid signal. If there is no equipment connected to the projector or no signal detected, limited menu items are accessible.
English Description of each menu FUNCTION DESCRIPTION 1.DISPLAY menu Wall Color Corrects the projected picture’s color when the projection surface is not white. See “Using Wall Color” on page 37 for details. Aspect Ratio There are several options to set the image's aspect ratio depending on your input signal source. See “Selecting the aspect ratio” on page 35 for details. 2D Keystone Adjust the shape of projected image to ensure that all the lines forming the four angles are straight ones.
DESCRIPTION English FUNCTION This projector features a 3D function which enables you to enjoy the 3D movies, videos, and sporting events in a more realistic way by presenting the depth of the images.You need to wear a pair of 3D glasses to view the 3D images. 3D Mode The default setting is Auto and the projector automatically chooses an appropriate 3D format when detecting 3D contents. If the projector cannot recognize the 3D format, press ◄/► to choose a 3D mode. When the 3D function is turned on: 1.
English FUNCTION Picture Mode Pre-defined picture modes are provided so you can optimize your projector image set-up to suit your program type. See “Selecting a picture mode” on page 37 for details. Reference Mode Selects a picture mode that best suits your need for the image quality and further fine-tune the image based on the selections listed on the same page below. See “Setting the User 1 mode” on page 38 for details. Brightness Adjusts the brightness of the image.
DESCRIPTION 3.SOURCE menu 4.SYSTEM SETUP: Basic menu Quick Auto Search See “Switching input signal” on page 34 for details. HDMI Range Select the type of input source for the HDMI signal. "Auto" means to confirm and recommend the setting.You can also select the source type. Different brightness standards are carried out for different source types. This function is only available when a HDMI signal is selected. Color Space Conversion See “Changing Color Space” on page 34 for details.
English FUNCTION DESCRIPTION Direct Power On When connecting the power cable, the projector is turned on automatically. Signal Power On The default setting is that the projector is turned On automatically without pressing POWER or when it is in standby mode and a signal exists in the VGA or HDMI 1 cable. 4.SYSTEM SETUP: Basic menu 58 Operation Settings Auto Power Off Allows the projector to turn off automatically if no input signal is detected after a set period of time.
High Altitude Mode DESCRIPTION English FUNCTION It is the operation mode suitable for high altitude areas. See “Operating in a high altitude environment” on page 42 for details. See “Adjusting the sound” on page 42 for details. Mute Sets the mute function. Audio Settings Volume Adjusts the audio volume level. Microphone Volume Adjusts the microphone’s audio volume level. Power On/Off Ring Tone Sets the power on/off ring tone. 5.
English FUNCTION DESCRIPTION Closed Caption Enable Activates the function by selecting "On" when the selected input signal carries closed captions. Closed Caption yy Captions: An on-screen display of the dialogue, narration, and sound effects of TV programs and videos that are closed captioned (usually marked as "CC" in TV listings). Caption Version Selects a preferred closed captioning mode. To view captions, select CC1, CC2, CC3, or CC4 (CC1 displays captions in the primary language in your area).
DESCRIPTION 5.SYSTEM SETUP: Advanced menu English FUNCTION Wired LAN See “Control the projector via the wired LAN environment” on page 44 for details. Network Settings AMX Device Discovery When AMX Device Discovery is On, the projector can be detected by AMX controller. MAC Address Displays the mac address for this projector. Returns all settings to the factory preset values. Reset All Settings The following settings will still remain: Position, Phase, H.
English Maintenance Prior to projector maintenance yy Be sure to turn off the projector before maintenance. yy Be sure to follow the steps in “Shutting down the projector” on page 48 when shutting down the projector. Care of the projector Your projector needs little maintenance. The only thing you need to do on a regular basis is to keep the lens clean. Never remove any parts of the projector. Contact your dealer if other parts need replacing.
Dust filter maintenance English Dust filter replacement The dust filter can be used to prevent the dust from piling up on the surface of the optical element in the projector. If the dust filter is dirty or blocked, the projector would heat excessively or the quality of projected image would be reduced. 1. A replacement notice pops up after the dust filter is used for 500 hours. Select Reset to reset the timer and replace the dust filter. 2.
Side dust filter replacement English 1. Shut down the projector and pull off the power plug from the socket. Clean the dust on the projector and near the ventilation hole. Loosen the 5 fasten screws used for fastening the cap of dust filter. 2. Pull the cap of dust filter. 3. Remove the module of dust filter from the projector. 64 4. Align the hole on the module of the new dust filter to the fasten screw on the cap of dust filter. 5.
LED Indicator TEMP English LIGHT POWER System message Power Temp Light Status & Description Orange - - Stand-by mode Green Flashing - - Powering up Green - - Normal operation Orange Flashing - - Normal power-down cooling Red Flashing Red Flashing Red Flashing Green - Red Green - Orange Download CW start fail The lamp dies out.
English Thermal error messages 66 Power Temp Light Status & Description Red Red - Fan 1 error Red Red Flashing - Fan 2 error Red Green - Fan 3 error Red Green Flashing - Fan 4 error Red Flashing Red - Fan 5 error Red Flashing Red Flashing - Fan 6 error Red Flashing Green - Fan 7 error Green Red - Temperature 1 error
Troubleshooting English Troubleshooting The projector does not turn on. Cause There is no power from the power cable. Remedy Plug the power cord into the AC inlet on the projector, and plug the power cord into the power outlet. If the power outlet has a switch, make sure that it is switched on. No picture Cause Remedy The video source is not turned on or connected correctly. Turn the video source on and check that the signal cable is connected correctly.
English Specifications Specifications Optical Resolution LX770 1024 x 768 LH770 1920 x 1080 Display system Single-chip DLP™ system Light source Laser Diode Electrical Power supply AC 100-240 V 50-60 Hz (Automatic) 6.00 A Power consumption 540 W (Max); < 0.5 W (Standby) Mechanical Weight 30.4 lbs (13.8 Kg) Output terminals Speaker 10w x 1 (peak-to-peak value) Audio signal output PC audio jack x 1 Monitor Out D-Sub 15-pin (female) x1 USB Type-A (5 V/1.
Dimensions English 538.0 269.0 400.0 423.0 108.0 184.0 440.0 Ceiling mount installation 180(7.08) 129(5.07) M4×10L M4×10L 280(11.02) M4×10L 10 M4×10L 4 65(2.55) * Ceiling mounting screws: M4 (Max. L=10, Min.
English Appendix Timing chart Supported timing for PC/PC2 input Resolution Mode Refresh Rate (Hz) Horizontal Frequency (kHz) Clock (MHz) 720 x 400 720 x 400_70 70.087 31.469 28.3221 VGA_60 59.940 31.469 25.175 VGA_72 72.809 37.861 31.500 VGA_75 75.000 37.500 31.500 VGA_85 85.008 43.269 36.000 SVGA_60 60.317 37.879 40.000 SVGA_72 72.188 48.077 50.000 SVGA_75 75.000 46.875 49.500 SVGA_85 85.061 53.674 56.250 SVGA_120 (Reduce Blanking) 119.854 77.425 83.
Mode Refresh Rate (Hz) Horizontal Frequency (kHz) Clock (MHz) 1360 x 768 1360 x 768_60 60.015 47.712 85.500 1440 x 900 WXGA+_60 59.887 55.935 106.500 1400 x 1050 SXGA+_60 59.978 65.317 121.750 1600 x 1200 UXGA 60.000 75.000 162.000 1680 x 1050 1680 x 1050_60 59.954 65.290 146.250 640 x 480@67Hz MAC13 66.667 35.000 30.240 832 x 624@75Hz MAC16 74.546 49.722 57.280 1024 x 768@75Hz MAC19 74.930 60.241 80.000 1152 x 870@75Hz MAC21 75.060 68.680 100.
English Supported timing for VIDEO/S-VIDEO input Video mode Horizontal Frequency (KHz) Vertical Frequency (Hz) Sub-carrier Frequency (MHz) NTSC 15.73 60 3.58 PAL 15.63 50 4.43 SECAM 15.63 50 4.25 or 4.41 PAL-M 15.73 60 3.58 PAL-N 15.63 50 3.58 PAL-60 15.73 60 4.43 NTSC4.43 15.73 60 4.43 3D Field Sequential Supported timing for HDMI/DVI-D (HDCP) input Mode Refresh Rate (Hz) Horizontal Frequency (KHz) Clock (MHz) VGA_60 59.940 31.469 25.175 VGA_72 72.809 37.861 31.
Refresh Rate (Hz) Horizontal Frequency (KHz) Clock (MHz) WXGA_60 59.810 49.702 83.500 WXGA_75 74.934 62.795 106.500 WXGA_85 84.880 71.554 122.500 WXGA_120 (Reduce Blanking) 119.909 101.563 146.250 SXGA_60 60.020 63.981 108.000 SXGA_75 75.025 79.976 135.000 SXGA_85 85.024 91.146 157.500 1280 x 960_60 60.000 60.000 108.000 1280 x 960_85 85.002 85.938 148.500 1360 x 768 1360 x 768_60 60.015 47.712 85.500 1440 x 900 WXGA+_60 59.887 55.935 106.
English Supporting timing for HDMI Video input 74 Horizontal Vertical Frequency Frequency (KHz) (Hz) Dot Clock 3D Field 3D Frame Frequency Sequential Packing (MHz) Timing Resolution 480i 720 (l440) x 480 15.73 59.94 27.00 480p 720 x 480 31.47 59.94 27.00 576i 720 (1440) x 576 15.63 50.00 27.00 576p 720 x 576 31.25 50.00 27.00 720/50p 1280 x 720 37.50 50.00 74.25 720/60p 1280x720 45.00 60.00 74.25 1080/24p 1920 x 1080 27.00 24.00 74.25 1080/25p 1920 x 1080 28.
PJLink English PJLink protocol The network function of this projector supports PJLink class 1. The PJLink protocol can be used to carry out projector settings from the computer and lookup and operate the projector status. Control command The following list shows PJLink protocol commands for projector control.
English 76 Command Control details Parameter/ Return string Note INF2? Model name query SX751/SW752/ SH753/SU754 Returns moder name INF0? Other information queries xxxxx Returns information such as version number CLASS? Class information query 1 Returns class for PJLink