MX731/MW732/MH733 Digital Projector User Manual V 1.
Warranty and Copyright information Limited warranty BenQ warrants this product against any defects in material and workmanship, under normal usage and storage. Proof of purchase date will be required with any warranty claim. In the event this product is found to be defective within the warranty period, BenQ's only obligation and your exclusive remedy shall be replacement of any defective parts (labor included).
Table of Contents Warranty and Copyright information ................................................................................ 2 Important safety instructions .............................................................................................. 4 Introduction .......................................................................................................................... 7 Shipping contents .............................................................................................
Important safety instructions Your projector is designed and tested to meet the latest standards for safety of information technology equipment. However, to ensure safe use of this product, it is important that you follow the instructions mentioned in this manual and marked on the product. 1. Please read this manual before you operate your projector. Save it for future reference. 2. Do not look straight at the projector lens during operation. The intense light beam may damage your eyes. 3.
13. Always place the projector on a level, 9. Never replace the lamp assembly or any horizontal surface during operation. electronic components unless the projector is unplugged. - Do not use if tilted at an angle of more than 10 degrees left to right, nor at angle of more than 15 degrees front to back. Using the projector when it is not fully horizontal may cause a malfunction of, or damage to, the lamp. 10. Do not place this product on an unstable cart, stand, or table. The product may fall, 14.
17. Do not place liquids near or on the projector. 20. Do not place this projector in any of the Liquids spilled into the projector may cause it following environments. to fail. If the projector does become wet, - Space that is poorly ventilated or confined. Allow at least 50 cm clearance from walls and free flow of air disconnect it from the power supply's power around the projector. outlet and call BenQ to have the projector - Locations where temperatures may become serviced.
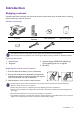
Introduction Shipping contents Carefully unpack and verify that you have all of the items shown below. If any of these items are missing, please contact your place of purchase. Standard accessories Digital Quick Projector Start Guide Projector Remote control with batteries User manual CD Warranty card* Power cord VGA cable Quick start guide • The supplied accessories will be suitable for your region, and may differ from those illustrated.
Projector exterior view 7 1 8 2 9 4 3 4 10 5 4 11 12 13 14 15 16 17 19 18 6 22 20 21 22 22 4 1. Focus ring 12. USB Type A port (for USB wireless dongle) 2. Vent (air exhaust) 13. HDMI/MHL-input port 3. Projection lens 4. Adjuster feet 14. USB Type A port (for USB flash drive / power for HDMI dongle) 5. Lens cap 15. RGB (PC) signal input jacks 6. IR remote sensor 16. RGB (PC) signal output jack 7. External control panel (See Controls and functions on page 9.) 17.
Controls and functions Projector & Remote control • All the key presses described in this document are available on the remote control or projector. 1 • The remote control is without laser pointer in Japan 1 2 5 6 7 3 4 8 9 10 6 11 5 8 10 4 12 9 18 7 13 14 15 16 17 1. INFO 5. Arrow keys ( , POWER Toggles the projector between standby mode and on. ON/ 19 20 21 22 Off Toggles the projector between standby mode and on. 2.
6. SOURCE Displays the source selection bar. 7. ECO BLANK Used to hide the screen picture. Do not block the projection lens from projecting as this could cause the blocking object to become heated and deformed or even cause a fire. 8. OK Confirms the selected On-Screen Display (OSD) menu item. 9. AUTO 16. PAGE /PAGE Operate your display software program (on a connected PC) which responds to page up/down commands (like Microsoft PowerPoint). 17. INFO Displays the projector information. 18.
Controlling your smart device with the remote control When the projector projects the content from your MHL compatible smart device, you can use the remote control to control your smart device. To enter the MHL mode, press and hold AUTO for 3 seconds. The following buttons are available for controlling your smart device: Arrow keys ( , , , ), MENU, BACK, OK, MHL control buttons. To leave the MHL mode, press and hold AUTO for 3 seconds.
Positioning your projector Choosing a location Before choosing an installation location for your projector, take the following factors into consideration: • Size and position of your screen • Electrical outlet location • Location and distance between the projector and the rest of your equipment You can install your projector in the following ways. 1. Front Table 2. Rear Table Select this location with the projector placed on the table in front of the screen.
Obtaining a preferred projected image size The distance from the projector lens to the screen, the zoom setting (if available), and the video format each factors in the projected image size. Projection dimensions MX731 4:3 Screen diagonal Screen Center of lens H W Offset Projection distance • The screen aspect ratio is 4:3 and the projected picture is in a 4:3 aspect ratio Screen size Diagonal Projection distance (mm) H (mm) W (mm) Min distance (max.
All measurements are approximate and may vary from the actual sizes. BenQ recommends that if you intend to permanently install the projector, you should physically test the projection size and distance using the actual projector in situ before you permanently install it, so as to make allowance for this projector's optical characteristics. This will help you determine the exact mounting position so that it best suits your installation location.
All measurements are approximate and may vary from the actual sizes. BenQ recommends that if you intend to permanently install the projector, you should physically test the projection size and distance using the actual projector in situ before you permanently install it, so as to make allowance for this projector's optical characteristics. This will help you determine the exact mounting position so that it best suits your installation location.
All measurements are approximate and may vary from the actual sizes. BenQ recommends that if you intend to permanently install the projector, you should physically test the projection size and distance using the actual projector in situ before you permanently install it, so as to make allowance for this projector's optical characteristics. This will help you determine the exact mounting position so that it best suits your installation location.
Adjusting the projected image Adjusting the projection angle If the projector is not placed on a flat surface or the screen and the projector are not perpendicular to each other, the projected image becomes trapezoidal. You can screw the adjuster feet to fine-tune the horizontal angle. To retract the feet, screw the adjuster feet in a reverse direction. Do not look into the lens while the lamp is on. The strong light from the lamp may cause damage to your eyes.
1. Do one of the following steps to display the keystone correction page. • Press / on the projector or remote control. Press . Press . • Press QUICK INSTALL on the remote control. Press to highlight 2D Keystone and press OK. • Go to Advanced Menu - Display > 2D Keystone and Press . Press . press OK. 2. After the 2D Keystone correction page displays. Press to correct keystoning at the top of the image. Press to correct keystoning at the bottom of the image.
Connection When connecting a signal source to the projector, be sure to: 1. Turn all equipment off before making any connections. 2. Use the correct signal cables for each source. 3. Ensure the cables are firmly inserted.
• In the connections above, some cables may not be included with the projector (see Shipping contents on page 7). They are commercially available from electronics stores. • The connection illustrations are for reference only. The rear connecting jacks available on the projector vary with each projector model. • Many notebooks do not turn on their external video ports when connected to a projector. Usually a key combo like FN + function key with a monitor symbol turns the external display on/off.
Connecting smart devices The projector can project the content directly from a smart device by using a wireless dongle. HDMI wireless dongle (e.g. BenQ QCastMirror, QCast) • Connect the dongle to HDMI and USB TYPE-A ports on the projector and switch the input signal to HDMI-1. • Connect the dongle to HDMI2/MHL port on the projector and switch the input signal to HDMI-2/MHL. Set MHL Power Switch to On in the OSD menu to ensure the dongle is powered, see MHL Power Switch on page 38. USB wireless dongle (e.
Connecting a USB flash drive 1. Plug the USB flash drive into the USB TYPE-A port of the projector. 2. A dialog is shown for quick source switching. Select Yes to enter USB Reader source. Or you can manually select USB Reader from the source selection bar. For details, see Presenting from a USB Reader on page 27.
Operation Starting up the projector 1. Plug the power cord. Turn on the power outlet switch (where fitted). The power indicator on the projector lights orange after power has been applied. 2. Press on the projector or on the remote control to start the projector. The power indicator flashes green and stays green when the projector is on. The start up procedure takes about 30 seconds. In the later stage of start up, a startup logo is projected.
Using the menus The projector is equipped with 2 types of On-Screen Display (OSD) menus for making various adjustments and settings. • Basic OSD menu: provides primary menu functions. (See Basic menu on page 30) • Advanced OSD menu: provides full menu functions. (See Advanced menu on page 32) To access the OSD menu, press MENU on the projector or remote control. • Use the arrow keys ( / / / ) on the projector or remote control to move through the menu items.
Likewise, when you wish to switch from the Advanced OSD menu to the Basic OSD menu, follow the instructions below: 1. Go to Advanced Menu - System > Menu Settings and press OK. 2. Select Menu Type and OK. 3. Press / to select Basic. Next time when you turn on the projector, you may access the Basic OSD menu by pressing MENU. Securing the projector Using a security cable lock The projector has to be installed in a safe place to prevent theft.
Entering the password recall procedure 1. Press and hold AUTO for 3 seconds. The projector will display a coded number on the screen. Recall Password Please write down the recall code, and contact BenQ Customer Center. 2. Write down the number and turn off your projector. 3. Seek help from the local BenQ service center to decode the number. You may be required to provide proof of purchase documentation to verify that you are an authorized user of the projector.
• The brightness level of the projected image will change accordingly when you switch between different input signals. • For best display picture results, you should select and use an input signal which outputs at the projector’s native resolution. Any other resolutions will be scaled by the projector depending upon the “aspect ratio” setting, which may cause some image distortion or loss of picture clarity. See Aspect Ratio on page 30.
• BMP resolution supports up to 1600x1200(3.2 seconds). • JPEG progressive resolution supports up to 1600 x 120. • BMP and JPEG progressive (SW decode) only show icon. • Unsupported BMP and JPGE file will show unsupported icon. • Document Image format Adobe PDF MS Word MS Excel MS PowerPoint Support version PDF 1.3 PDF 1.4 PDF 1.5 PDF 1.6 Word 97, 2000, 2002, 2003. Word 2007 (.docx), 2010 (.docx) Excel 97, 2000, 2002, 2003. Excel 2007 (.xlsx), 2010 (.xlsx). British PowerPoint 97.
• Function bar for viewing documents Fits the width/height of the page with the screen Zooms in/out the file for details Navigates the file after it is magnified Shutting down the projector 1. Press on the projector or on the remote control and a confirmation message will appear prompting you. If you don't respond in a few seconds, the message will disappear. 2. Press or a second time.
Menu operation Please note that the on-screen display (OSD) menus vary according to the signal type selected and the projector model you are using. The menu items are available when the projector detects at least one valid signal. If there is no equipment connected to the projector or no signal detected, limited menu items are accessible. Basic menu Brightness The higher the value, the brighter the image.
The projector is preset with several predefined picture modes so that you can choose one to suit your operating environment and input signal picture type. • Bright: Maximizes the brightness of the projected image. This mode is suitable for environments where extra-high brightness is required, such as using the projector in well lit rooms. • Presentation: Is designed for presentations. The brightness is emphasized in this mode to match PC and notebook coloring.
Advanced menu Picture The projector is preset with several predefined picture modes so that you can choose one to suit your operating environment and input signal picture type. • Bright: Maximizes the brightness of the projected image. This mode is suitable for environments where extra-high brightness is required, such as using the projector in well lit rooms. • Presentation: Is designed for presentations. The brightness is emphasized in this mode to match PC and notebook coloring.
Color Temperature There are several preset color temperature settings available. The available settings may vary according to the signal type selected. • Normal: Maintains normal colorings for white. • Cool: Makes images appear bluish white. • Warm: Makes images appear reddish white. Color Temperature Tuning You can also set a preferred color temperature by adjusting the following options. • R Gain/G Gain/B Gain: Adjusts the contrast levels of Red, Green, and Blue.
Display There are several options to set the image's aspect ratio depending on your input signal source. • Auto: Scales an image proportionally to fit the projector's native resolution in its horizontal or vertical width. Aspect Ratio (MX731) (MW732) (MH733) 16:9 picture • Real: Projects an image as its original resolution and resizes it to 4:3 picture fit within the display area. For input signals with lower resolutions, the projected image will be displayed in its original size.
This projector features a 3D function which enables you to enjoy the 3D movies, videos, and sporting events in a more realistic way by presenting the depth of the images. You need to wear a pair of 3D glasses to view the 3D images. • 3D Mode: The default setting is Off. If you want the projector to automatically choose an appropriate 3D format when detecting 3D contents, select Auto.
Reset Display Returns all of the adjustments you’ve made for the Display menu to the factory preset values. Network Wireless LAN See BenQ Network Projector Operation Guide, which can be downloaded from BenQ product webpage. Wired LAN AMX Device Discovery MAC Address (Wireless) MAC Address (Wired) When this function is On, the projector can be detected by AMX controller. Displays the mac address for this projector.
Reminder Message Sets the reminder messages on or off. High Altitude Mode We recommend you use the High Altitude Mode when your environment is between 1500 m –3000 m above sea level, and ambient temperature is between 0°C–30°C. Operation under "High Altitude Mode" may cause a higher decibel operating noise level because of increased fan speed necessary to improve overall system cooling and performance.
Panel Key Lock With the control keys on the projector locked, you can prevent your projector settings from being changed accidentally (by children, for example). When the Panel Key Lock is on, no control keys on the projector will operate except POWER. To release panel key lock, press and hold (the right key) for 3 seconds on the projector or turn this function off using the remote control.
System Language Sets the language for the On-Screen Display (OSD) menus. • Network: Allows you to make following settings: Enable Network Standby Mode Standby Settings Switch to Normal Standby Mode Allows the projector to provide the network function in standby mode when Monitor Out or Audio Pass Through is activated. Allows the projector to disable the network function after a set period of time after it enters standby mode.
Information • Native Resolution: Shows the native resolution of the projector. • Detected Resolution: Shows the native resolution of the input signal. • Source: Shows the current signal source. • Picture Mode: Shows the selected mode in the Picture menu. Information • Lamp Mode: Shows the selected mode in the Lamp Settings menu. • 3D Format: Shows the current 3D mode. • Color System: Shows input system format. • Lamp Usage Time: Shows the number of hours the lamp has been used.
Maintenance Care of the projector Cleaning the lens Clean the lens whenever you notice dirt or dust on the surface. Please be sure to turn off the projector and let it cool down completely before cleaning the lens. • Use a canister of compressed air to remove dust. • If there is dirt or smears, use lens-cleaning paper or moisten a soft cloth with lens cleaner and gently wipe the lens surface.
To obtain the lamp hour information: 1. Go to Advanced Menu - Settings > Lamp Settings and press OK. The Lamp Settings page appears. 2. Press to select Lamp Timer and press OK. The Lamp Timer information is displayed. You can also get the lamp hour information on the Information menu. Extending lamp life • Setting the Lamp Mode Go to Advanced Menu - Settings > Lamp Settings > Lamp Mode and select a suitable lamp power from among the provided modes.
Notice Replace lamp soon Equivalent lamp hour >XXXX hours Order a new lamp at www.BenQ.com It is strongly recommended that you replace the lamp at this age. The lamp is a consumable item. The lamp brightness diminishes with use. This is normal lamp behavior. You can replace the lamp whenever you notice that the brightness level has significantly diminished. Press OK to dismiss the message. Notice Replace lamp now Equivalent lamp hour > XXXX Hours Order a new lamp at www.BenQ.
3. Remove the lamp cover from the projector. • Do not turn the power on with the lamp cover open. • Do not insert your fingers between the lamp and the projector. The sharp edges inside the projector may cause injuries 4. Disconnect the lamp connector. 5. Loosen the screw(s) that secure the inner lamp. 5 6 6. Lift the handle so that it stands up. 4 4 7. Use the handle to slowly pull the lamp out of the projector.
13. Tighten the screw that secures the lamp cover. • Loose screw may cause a bad connection, which could result in malfunction. • Do not over tighten the screw. 14. .Connect the power and restart the projector. Resetting the lamp timer 15. After the startup logo, open the On-Screen Display (OSD) menu. Go to Advanced Menu - Settings > Lamp Settings and press OK. The Lamp Settings page appears. Highlight Reset Lamp Timer and press OK.
Indicators Light Status & Description Power events Stand-by mode Powering up Normal operation Normal power-down cooling Download CW start fail Lamp events Lamp error in normal operation Lamp is not lit up Lamp life exhausted Thermal events Fan 1 error (the actual fan speed is outside the desired speed) Fan 2 error (the actual fan speed is outside the desired speed) Fan 3 error (the actual fan speed is outside the desired speed) Temperature 1 error (over limited temperature) Thermal sensor 1 open error Ther
Troubleshooting The projector does not turn on. Cause There is no power from the power cord. Remedy Plug the power cord into the AC power jack on the projector, and plug the power cord into the power outlet. If the power outlet has a switch, make sure that it is switched on. Attempting to turn the projector on again during Wait until the cooling down process has completed. the cooling process. No picture Cause Remedy The video source is not turned on or connected correctly.
Specifications Projector specifications All specifications are subject to change without notice. Optical Input terminals Resolution 1024 x 768 XGA (MX731) 1280 x 800 WXGA (MW732) 1920 (H) x 1080 (V) (MH733) Computer input RGB input D-Sub 15-pin (female) x 1 Display system 1-CHIP DMD Lens F = 2.59 ~ 2.87, f = 16.88 ~ 21.88 mm Lamp 240 W lamp Electrical Power supply AC100–240V, 3.5 A, 50–60 Hz (Automatic) Power consumption 355 W (Max); < 0.
Dimensions 296 mm (W) x 120 mm (H) x 221 mm (D) 296 221 120 Unit: mm Specifications 49
Timing chart Supported timing for PC input Resolution 640 x 480 720 x 400 800 x 600 1024 x 768 1152 x 864 1024 x 576 1024 x 600 1280 x 720 1280 x 768 1280 x 800 1280 x 1024 1280 x 960 1360 x 768 1400 x 1050 1440 x 900 1600 x 1200 1680 x 1050 640 x 480@67Hz 832 x 624@75Hz 1024 x 768@75Hz 1152 x 870@75Hz Mode VGA_60 VGA_72 VGA_75 VGA_85 720 x 400_70 SVGA_60 SVGA_72 SVGA_75 SVGA_85 SVGA_120 (Reduce Blanking) XGA_60 XGA_70 XGA_75 XGA_85 XGA_120 (Reduce Blanking) 1152 x 864_75 BenQ Notebook_timing BenQ No
Supported timing for HDMI (HDCP) input • PC timings Resolution 640 x 480 720 x 400 800 x 600 1024 x 768 1152 x 864 1280 x 768 1024 x 576@60Hz 1024 x 600@65Hz 1280 x 720 1280 x 768 1280 x 800 1280 x 1024 1280 x 960 1360 x 768 1440 x 900 1400 x 1050 1600 x 1200 1680 x 1050 1920 x 1080@60Hz 1920 x 1200 640 x 480@67Hz 832 x 624@75Hz 1024 x 768@75Hz 1152 x 870@75Hz Mode VGA_60 VGA_72 VGA_75 VGA_85 720 x 400_70 SVGA_60 SVGA_72 SVGA_75 SVGA_85 SVGA_120 (Reduce Blanking) XGA_60 XGA_70 XGA_75 XGA_85 XGA_120 (
• Video timings Timing Resolution Vertical Frequency (Hz) Horizontal Frequency (kHz) Pixel Frequency (MHz) 480i 480p 576i 576p 720/50p 720/60p 1080/50i 1080/60i 1080/24P 1080/25P 1080/30P 1080/50P 1080/60P 720 x 480 720 x 480 720 x 576 720 x 576 1280 x 720 1280 x 720 1920 x 1080 1920 x 1080 1920 x 1080 1920 x 1080 1920 x 1080 1920 x 1080 1920 x 1080 59.94 59.94 50 50 50 60 50 60 24 25 30 50 60 15.73 31.47 15.63 31.25 37.5 45.00 28.13 33.75 27 28.13 33.75 56.25 67.5 27 27 27 27 74.25 74.25 74.25 74.