MP615P/MP625P Digital Projector User Manual Welcome
Table of contents Important safety instructions .........................3 Introduction........................7 Adjusting the sound.............................41 Adjusting the sound level ....................41 Personalizing the projector menu display ........................................42 Shutting down the projector ...............42 Menu operation ...................................43 Projector features .................................. 7 Shipping contents..................................
Important safety instructions Your projector is designed and tested to meet the latest standards for safety of information technology equipment. However, to ensure safe use of this product, it is important that you follow the instructions mentioned in this manual and marked on the product. Safety Instructions 1. Please read this manual before you operate your projector. Save it for future reference. 2. Do not look straight at the projector lens during operation.
Safety Instructions (Continued) 4 7. The lamp becomes extremely hot during operation. Allow the projector to cool for approximately 45 minutes prior to removing the lamp assembly for replacement. 8. Do not operate lamps beyond the rated lamp life. Excessive operation of lamps beyond the rated life could cause them to break on rare occasions. 9. Never replace the lamp assembly or any electronic components unless the projector is unplugged. Important safety instructions 10.
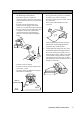
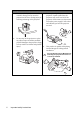
Safety Instructions (Continued) 13. Do not place this projector in any of the following environments. 14. Do not block the ventilation holes. - Do not place this projector on a blanket, bedding or any other soft surface. - Do not cover this projector with a cloth or any other item. - Do not place inflammables near the projector. - Space that is poorly ventilated or confined. Allow at least 50 cm clearance from walls and free flow of air around the projector.
Safety Instructions (Continued) 16. 18. Do not stand the projector on end vertically. Doing so may cause the projector to fall over, causing injury or resulting in damage to the projector. 17. Do not step on the projector or place any objects upon it. Besides probable physical damage to the projector, doing so may result in accidents and possible injury. 19. Do not place liquids near or on the projector. Liquids spilled into the projector may cause it to fail.
Introduction Projector features The projector integrates high-performance optical engine projection and a user-friendly design to deliver high reliability and ease of use. The projector offers the following features.
Shipping contents Carefully unpack and verify that you have all of the items shown below. If any of these items are missing, please contact your place of purchase. Standard accessories The supplied accessories will be suitable for your region, and may differ from those illustrated. *The warranty card is only supplied in some specific regions. Please consult your dealer for detailed information.
Projector exterior view 1. Front/upper side 1 2 3 4 6 7 8 9 5 Rear/lower side (MP615P) 11 10 12 14 13 15 16 2. 3. 4. 5. 6. 7. 8. 9. 10. 11. 12. 13. 14. 15. 16. 17. 18. 19. 20. 21. 22. 23. External control panel (See "Projector" on page 10 for details.
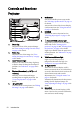
Controls and functions Projector 6. 1 2 3 9 4 5 6 4 10 7 11 8. 8 1. 2. 3. 4. 5. 10 7. Focus ring Adjusts the focus of the projected image. See "Fine-tuning the image size and clarity" on page 26 for details. Zoom ring Adjusts the size of the image. See "Finetuning the image size and clarity" on page 9. 26 for details. LAMP indicator light Indicates the status of the lamp. Lights up or flashes when the lamp has developed a 10. problem. See "Indicators" on page 59 for details.
Ceiling mounting the projector We want you to have a pleasant experience using your BenQ projector, so we need to bring this safety matter to your attention to prevent possible damage to person and property. If you intend to mount your projector on the ceiling, we strongly recommend that you use a proper fitting BenQ projector ceiling mount kit and that you ensure it is securely and safely installed.
Remote control 7. 7 1 8 2 9 10 3 10 8. 11 4 12 8 5 13 14 6 15 1. 2. I I Power Toggles the projector between standby mode and on. See "Starting up the projector" on page 24 and "Shutting down the projector" on page 42 for details. Freeze Freezes the projected image. See "Freezing the image" on page 40 for details. 9. 10. 11. 3. 4. 5. 6. 12 Starts the FAQ function. See "Utilizing FAQ function" on page 40 for details. BLANK Used to hide the screen picture.
14. Timer On Activates or displays an on-screen timer based on your own timer setting. See "Setting the presentation timer" on page 38 for details. 15. Timer Setup Enters presentation timer setting directly. See "Setting the presentation timer" on page 38 for details. Infra-Red (IR) remote control sensor is located on the front of the projector. The remote control must be held at an angle within 30 degrees perpendicular to the projector's IR remote control sensor to function correctly.
Positioning your projector Choosing a location Your room layout or personal preference will dictate which installation location you select. Take into consideration the size and position of your screen, the location of a suitable power outlet, as well as the location and distance between the projector and the rest of your equipment. Your projector is designed to be installed in one of four possible installation locations: 1.
Obtaining a preferred projected image size The distance from the projector lens to the screen, the zoom setting (if available), and the video format each factors in the projected image size. 4:3 is the native aspect ratio of this projector. To be able to project a complete 16:9 (widescreen) aspect ratio image, the projector can resize and scale a widescreen image to the projector's native aspect width.
How to determine the position of the projector for a given screen size 1. 2. Select your screen size. Refer to the table on page 17 and find the closest match to your screen size in the left columns labelled "Screen size". Using this value, look across this row to the right to find the corresponding average distance from screen value in the column labelled "Average". This is the projection distance. 3. On that same row, look across to the right column and make note of the "Vertical offset (mm)" value.
Projection dimensions Refer to "Dimensions" on page 62 for the center of lens dimensions of this projector before calculating the appropriate position. Maximum zoom Minimum zoom Screen Center of lens Vertical offset Projection distance Screen size Distance from screen (mm) Vertical offset (mm) Diagonal W H Min length Average Max length Inch mm (mm) (mm) (max. zoom) (min.
Connection When connecting a signal source to the projector, be sure to: 1. 2. 3. Turn all equipment off before making any connections. Use the correct signal cables for each source. Ensure the cables are firmly inserted. • In the connections shown below, some cables may not be included with the projector (see "Shipping contents" on page 8). They are commercially available from electronics stores. • For detailed connection methods, see pages 19-23.
Connecting a computer or monitor Connecting a computer The projector can connect to both IBM® compatibles and Macintosh® computers. A Mac adapter is needed if you are connecting legacy version Macintosh computers. To connect the projector to a notebook or desktop computer: 1. 2. 3. 4. Take the supplied VGA cable and connect one end to the D-Sub output socket of the computer. Connect the other end of the VGA cable to the COMPUTER 1 or COMPUTER 2 signal input jack on the projector.
Connecting Video source devices You need only connect the projector to a Video source device using just one of the above connecting methods, however each provides a different level of video quality.
Connecting an HDMI source device (MP625P only) The projector provides a HDMI input jack that allows you to connect it to an HDMI source device like a DVD player, a DTV tuner or a display. HDMI (High-Definition Multimedia Interface) supports uncompressed video data transmission between compatible devices like DTV tuners, DVD players and displays over a single cable. It provides pure digital viewing and listening experience.
Connecting a Component Video source device Examine your Video source device to determine if it has a set of unused Component Video output jacks available: • • If so, you can continue with this procedure. If not, you will need to reassess which method you can use to connect to the device. To connect the projector to a Component Video source device: 1. 2. 3. 4.
Connecting an S-Video/composite source device Examine your Video source device to determine if it has an unused S-Video/composite output jack available: • • • If it has both jacks, use the S-Video output jack for connection as the S-Video terminal provides better picture quality than the Video terminal. If it has either of the output jack, you can also continue with this procedure. If not, you will need to reassess which method you can use to connect to the device.
Operation Starting up the projector 1. Plug the power cord into the projector and into a power outlet. Turn on the power outlet switch (where fitted). Check that the POWER indicator light on the projector lights orange after power has been applied. • Please use the original accessories (e.g. power cable) only with the device to avoid possible dangers such as electric shock and fire.
You can also press SOURCE on the projector or remote control to select your desired input signal. See "Switching input signal" on page 31 for details. If the frequency/resolution of the input signal exceeds the projector's operating range, you will see the message 'Out of Range' displayed on a blank screen. Please change to an input signal which is compatible with the projector's resolution or set the input signal to a lower setting. See "Timing chart" on page 63 for details.
Fine-tuning the image size and clarity 1. Adjust the projected image to the size that you need using the zoom ring. 2. Then sharpen the image by rotating the focus ring. Correcting keystone Keystoning refers to the situation where the projected image is noticeably wider at either the top or bottom. It occurs when the projector is not perpendicular to the screen. To correct this, besides adjusting the height of the projector, you will need to manually correct it following one of these steps.
Using the menus The projector is equipped with On-Screen Display (OSD) menus for making various adjustments and settings. Below is the overview of the OSD menu. Main menu icon Main menu Highlight Status Sub-menu Press Menu/ Exit to the previous page or to exit. Current input signal The following example describes how to set the OSD language. 1. Press Menu/Exit on the projector or remote control to turn the OSD menu on. 3. Press to highlight Language and press / to select a preferred language. 2.
Securing the projector Using a security cable lock The projector has to be installed in a safe place to prevent theft. Otherwise, purchase a lock, such as the Kensington lock, to secure the projector. You can locate a Kensington lock slot on the rear side of the projector. See item 10 on page 9 for details. A Kensington security cable lock is usually a combination of key(s) and the lock. Refer to the lock's documentation for finding out how to use it.
password in this manual, and you absolutely do not remember it, you can use the password recall procedure. See "Entering the password recall procedure" on page 29 for details. If you enter an incorrect password 5 times in succession, the projector will automatically shut down in a short time. Entering the password recall procedure 1. 2. 3. Press and hold AUTO on the projector or remote control for 3 seconds. The projector will display a coded number on the screen.
• If the password is incorrect, the password error message displays lasting for three seconds, and the message 'INPUT PASSWORD' displays for your retry. You can press Menu/Exit to cancel the change or try another password. Though the password function is disabled, you need to keep the old password in hand should you ever need to re-activate the password function by entering the old password.
Switching input signal The projector can be connected to multiple devices at the same time. However, it can only display one full screen at a time. When starting up, the projector automatically searches for the available signals. Be sure the Quick Auto Search function in the SOURCE menu is On (which is the default of this projector) if you want the projector to automatically search for the signals. You can also manually cycle through the available input signals. 1. 2.
Magnifying and searching for details If you need to find the details on the projected picture, magnify the picture. Use the direction arrow keys for navigating the picture. • Using the remote control 1. Press Digital Zoom +/- to display the Zoom bar. 2. Press Digital Zoom + to magnify the center of the picture. Press the key repeatedly until the picture size is suitable for your need. 3. Use the directional arrows ( , , , ) on the projector or remote control to navigate the picture. 4.
In the pictures below, the black portions are inactive areas and the white portions are active areas. OSD menus can be displayed on those unused black areas. 1. Auto: Scales an image proportionally to fit the projector's native resolution in its horizontal or vertical width. This is suitable for the incoming image which is neither in 4:3 nor 16:9 and you want 16:10 picture to make most use of the screen without altering the image's aspect ratio. 2.
Optimizing the image Selecting a picture mode The projector is preset with several predefined picture modes so that you can choose one to suit your operating environment and input signal picture type. To select an operation mode that suits your need, you can follow one of the following steps. • • Press Mode/Enter on the remote control or projector repeatedly until your desired mode is selected. Go to the PICTURE > Picture Mode menu and press / to select a desired mode. The picture modes are listed below.
Using Wall Color In the situation where you are projecting onto a colored surface such as a painted wall which may not be white, the Wall Color feature can help correct the projected picture’s color to prevent possible color difference between the source and projected pictures. To use this function, go to the DISPLAY > Wall Color menu and press / to select a color which is the closest to the color of the projection surface.
2. 3. 4. T2: Makes images appear bluish white. T3: Maintains normal colorings for white. T4: Makes images appear reddish white. *About color temperatures: There are many different shades that are considered to be "white" for various purposes. One of the common methods of representing white color is known as the “color temperature”. A white color with a low color temperature appears to be reddish white. A white color with a high color temperature appears to have more blue in it.
For example, if you select Red and set its value at 0, only the saturation of pure red will be affected. Saturation is the amount of that color in a video picture. Lower settings produce less saturated colors; a setting of “0” removes that color from the image entirely. If the saturation is too high, that color will be overpowering and unrealistic. 6. 7. 8. 9. Press to highlight Gain and adjust its values to your preference by pressing / .
Setting the presentation timer The presentation timer can indicate the presentation time on the screen to help you achieve better time management when giving presentations. Follow these steps to utilize this function: 1. 2. 3. Press Timer Set up on the remote control or go to the SYSTEM SETUP: Basic > Presentation Timer menu and press Mode/Enter to display the Presentation Timer page. Highlight Timer period and decide the timer period by pressing / .
How to use the Timer On key? Timer On is a multi-functional key. • • If the presentation timer is off, pressing this key displays a confirmation message. You can decide whether to activate the timer or not by following the on-screen instruction. If the timer is already on, pressing this key displays a confirmation message. You can decide whether to restart, continue or turn off the timer by following the on-screen instruction.
Freezing the image Press on the remote control to freeze the image. The word 'FREEZE' will display in the upper left corner of the screen. To release the function, press any key (except the Page Up/Down key) on the projector or remote control. Even if an image is frozen on the screen, the pictures are running on the video or other device. If the connected devices have active audio output, you will still hear the audio even though the image is frozen on screen.
Operating in a high altitude environment We recommend you use the High Altitude Mode when your environment is between 1500 m –3000 m above sea level, and ambient temperature is between 0°C–35°C. Do not use the High Altitude Mode if your altitude is between 0 m and 1500 m and ambient temperature is between 0°C and 35°C. The projector will be over cooled, if you turn the mode on under such a condition. To activate the High Altitude Mode: 1.
Personalizing the projector menu display The On-Screen Display (OSD) menus can be set according to your preferences. The following settings do not affect the projection settings, operation, or performance. • • • • Menu display time in the SYSTEM SETUP: Advanced > Menu Settings menu sets the length of time the OSD will remain active after your last key press. The time length ranges from 5 to 30 seconds in 5-second increments. Use / to select a suitable time frame.
Menu operation Menu system Please note that the on-screen display (OSD) menus vary according to the signal type selected. Main menu 1. DISPLAY Sub-menu Options Wall Color Off/Light Yellow/Pink/Light Green/Blue/Blackboard Aspect Ratio Auto/Real/4:3/16:9 Keystone Position Phase H. Size Digital Zoom Picture Mode Dynamic/Presentation/sRGB/Cinema/User 1/User 2 Reference Mode Dynamic/Presentation/sRGB/Cinema Brightness Contrast Color Tint 2.
Presentation Timer Timer period 1~240 minutes Timer display Always/1 min/2 min/3 min/Never Timer position Top-Left/Bottom-Left/TopRight/Bottom-Right Timer counting direction Count Down/Count Up On/Off Language 4.
Quick Cooling On/Off High Altitude Mode On/Off Audio Settings Mute Lamp mode Lamp Settings On/Off Volume Normal/Economic Reset lamp timer Equivalent lamp hour 5.
Description of each menu • The default values listed in this manual, especially on pages 46-52, are for reference only. They may vary between the projectors due to the continuous improvement to the products. FUNCTION (default setting/ value) DESCRIPTION (default setting/value) Wall Color Corrects the projected picture’s color when the projection surface is not white. See "Using Wall Color" on page 35 for details.
FUNCTION (default setting/ value) DESCRIPTION (default setting/value) Pre-defined picture modes are provided so you can optimize your Picture Mode projector image set-up to suit your program type. See "Selecting a Reference Mode picture mode" on page 34 for details. Selects a picture mode that best suits your need for the image quality and further fine-tune the image based on the selections listed on the same page below. See "Setting the User 1/User 2 mode" on page 34 for details.
FUNCTION (default setting/ value) Brilliant Color Adjusts white peaking while maintaining correct color presentation. See "Adjusting Brilliant Color" on page 35 for details. 2. PICTURE menu This function is only available when User 1/2 is selected. Color Temperature See "Selecting a Color Temperature" on page 35 for details. 3D Color Management See "3D Color Management" on page 36 for details. Save Settings 3.
FUNCTION (default setting/ value) DESCRIPTION (default setting/value) Reminds the presenter to finish the presentation within a certain time frame. See "Setting the presentation timer" on page 38 for details. Timer period Sets a preferred length of time for presentation. Presentation Timer Timer display Sets whether to display the timer on screen. Timer position Sets the position where the timer displays on screen. Timer counting direction 4.
FUNCTION (default setting/ value) Quick Cooling DESCRIPTION (default setting/value) Selecting On enables the function and the projector cooling time will be shortened to a few seconds. If you attempt to restart the projector right after the quick cooling process, it may not be turned on successfully and will rerun its cooling fans. High Altitude A mode for operation in high altitude areas. See "Operating in a high altitude environment" on page 41 for details.
FUNCTION (default setting/ value) DESCRIPTION (default setting/value) Closed Caption Enable Activates the function by selecting On when the selected input signal carries closed captions. 5. SYSTEM SETUP: Advanced menu Closed Caption • Captions: An on-screen display of the dialogue, narration, and sound effects of TV programs and videos that are closed captioned (usually marked as "CC" in TV listings). Set your screen aspect ratio to 4:3.
FUNCTION (default setting/ value) FAQ-Image and Installation 6. INFORMATION menu FAQFeatures and Service DESCRIPTION (default setting/value) Displays possible solutions to problems you may encounter. Source Shows the current signal source. Picture Mode Shows the selected mode in the PICTURE menu. Current System Status Resolution Shows the native resolution of the input signal. Color System Shows input system format, NTSC, PAL, SECAM, or RGB.
Maintenance Care of the projector Your projector needs little maintenance. The only thing you need to do on a regular basis is to keep the lens and case clean. Never remove any parts of the projector except the lamp. Contact your dealer if other parts need replacing. Cleaning the lens Clean the lens whenever you notice dirt or dust on the surface. • • • Use a canister of compressed air to remove dust.
Lamp information Getting to know the lamp hour When the projector is in operation, the duration (in hours) of lamp usage is automatically calculated by the built-in timer. The method of calculating the equivalent lamp hour is as follows: Total (equivalent) lamp hour = 1 (hours used in Economic mode) + 4/3 (hours used in normal mode) See "Setting Lamp mode as Economic" below for more information on Economic mode. The lamp hour in Economic mode is calculated as 3/4 of that in Normal mode.
Timing of replacing the lamp When the Lamp indicator lights up red or a message appears suggesting it is time to replace the lamp, please install a new lamp or consult your dealer. An old lamp may cause a malfunction in the projector and in some instances the lamp may explode. The Lamp indicator light and Temperature warning light will light up if the lamp becomes too hot. See "Indicators" on page 59 for details. The following lamp warning displays will remind you to change the lamp.
Replacing the lamp • Hg - Lamp contains mercury. Manage in accordance with local disposal laws. See www.lamprecycle.org. • If lamp replacement is performed while the projector is suspended upside-down from the ceiling, make sure that no one is underneath the lamp socket to avoid any possible injury or damage to the human eyes caused by fractured lamp. • To reduce the risk of electrical shock, always turn the projector off and disconnect the power cord before changing the lamp.
3. • • Remove the lamp cover by (a) sliding the cover toward the side of the projector and (b) lifting it off. Do not turn the power on with the lamp cover removed. (b) (a) Do not insert your fingers between the lamp and the projector. The sharp edges inside the projector may cause injuries. 4. Loosen the screws that secure the lamp. 5. Lift the handle so that it stands up. Use the handle to slowly pull the lamp out of the projector.
7. Tighten the screws that secure the lamp. • Loose screw may cause a bad connection, which could result in malfunction. • Do not over tighten the screws. 8. Ensure the handle is fully laid flat and locked in place. 9. Replace the lamp cover by sliding it into place. (a) (b) 10. Tighten the screw that secures the lamp cover. • Loose screw may cause a bad connection, which could result in malfunction. • Do not over tighten the screw. 11. Restart the projector.
Indicators Light Status & Description POWER TEMP LAMP Power events Orange Off Off Stand-by mode Green Flashing Off Off Powering up Green Off Off Orange Flashing Off Off Normal operation 1. The projector needs 90 seconds to cool down as it was abnormally shut down without the normal cooling down process. Or 2. The projector needs to cool for 90 seconds after the power is turned off. Or 3. The projector has shutdown automatically. If you try to re-start the projector, it will shutdown again.
Troubleshooting The projector does not turn on. Cause Remedy There is no power from the power cable. Plug the power cord into the AC inlet on the projector, and plug the power cord into the power outlet. If the power outlet has a switch, make sure that it is switched on. Attempting to turn the projector on again during the cooling process. Wait until the cooling down process has completed. No picture Cause Remedy The video source is not turned on or connected correctly.
Specifications All specifications are subject to change without notice. Optical Control Resolution (MP625P) 1024 x 768 XGA RS-232 serial control 9 pin x 1 IR receiver x 1 USB Type B x 1 (MP615P) 800 x 600 SVGA Input terminals Display system 1-CHIP DMD Computer input RGB input D-Sub 15-pin (female) x 2 Lens F/Number F = 2.51 to 2.69, f = 21.95 to 24.18 mm Lamp 185 W lamp Electrical Power supply AC100–240V, 2.
Dimensions 264 mm (W) x 108.8 mm (H) x 211.4 mm (D) 264 211.4 108.8 72.8 72 Ceiling mount installation Ceiling mount screws: M4 x 8 (Max. L = 8 mm) 42 104.7 80 75 203 Unit: mm 100.00 84.00 102.24 116.00 82.50 69.41 71.93 132 264 62 Specifications 108.2 102.
Timing chart Supported timing for PC input Resolution 720 x 400 640 x 480 800 x 600 1024 x 768 1024 x 576 1024 x 600 1024 x 600 1280 x 800 1280 x 1024 1280 x 960 1440 x 900 1400 x 1050 1600 x 1200 640 x 480@67Hz 832 x 624@75Hz 1024 x 768@75Hz 1152 x 870@75Hz Horizontal Frequency (kHz) 31.469 31.469 37.861 37.500 43.269 37.879 48.077 46.875 53.674 48.363 56.476 60.023 68.677 35.820 37.5 41.467 49.702 62.795 71.554 63.981 79.976 91.146 60.000 85.938 55.935 65.317 75.000 35.000 49.722 60.241 68.
Supported timing for HDMI input Resolution 720 x 400 640 x 480 800 x 600 1024 x 768 1280 x 800 1280 x 1024 1280 x 960 1440 x 900 1400 x 1050 1600 x 1200 640 x 480@67Hz 832 x 624@75Hz 1024 x 768@75Hz 1152 x 870@75Hz VIDEO (HDCP) Horizontal Frequency (kHz) 31.469 31.469 37.861 37.500 43.269 37.879 48.077 46.875 53.674 48.363 56.476 60.023 68.677 49.702 62.795 71.554 63.981 79.976 91.146 60.000 85.938 55.935 65.317 75.000 35.000 49.722 60.241 68.680 31.47 31.25 45.00 37.50 33.75 28.13 67.5 56.
Supported timing for Component-YPbPr input Signal Format Horizontal Frequency (kHz) 480i(525i)@60Hz 480p(525p)@60Hz 576i(625i)@50Hz 576p(625p)@50Hz 720p(750p)@60Hz 720p(750p)@50Hz 1080i(1125i)@60Hz 1080i(1125i)@50Hz 1080p@60Hz 1080p@50Hz Vertical Frequency (Hz) 15.73 31.47 15.63 31.25 45.00 37.50 33.75 28.13 67.5 56.25 59.94 59.94 50.00 50.00 60.00 50.00 60.00 50.00 60.00 50.00 Displaying a 1080i@60Hz or 1080i@50Hz signal may result in slight image vibration.
Warranty and Copyright information Limited warranty BenQ warrants this product against any defects in material and workmanship, under normal usage and storage. Proof of purchase date will be required with any warranty claim. In the event this product is found to be defective within the warranty period, BenQ's only obligation and your exclusive remedy shall be replacement of any defective parts (labor included).
Regulation statements FCC statement CLASS B: This equipment generates, uses and can radiate radio frequency energy and, if not installed and used in accordance with the instructions, may cause harmful interference to radio communications. However, there is no guarantee that interference will not occur in a particular installation.
Accessibility Requirements for Rehabilitation Act of 1973, Section 508 BenQ’s commitment to accessible products allows us to support government in making accessible technology choices BenQ’s LCD monitors and projectors are compliant with Section 508 guidelines by including the assistive features as below: 68 • BenQ’s monitors have colored “Power” indicators. While the indicator shows green, it means that the monitor is using the full power.