PB8140 / PB8240 / PB8250 Digital Projector Installation Series User’s Manual Welcome
Copyright Copyright 2005 by BenQ Corporation. All rights reserved. No part of this publication may be reproduced, transmitted, transcribed, stored in a retrieval system or translated into any language or computer language, in any form or by any means, electronic, mechanical, magnetic, optical, chemical, manual or otherwise, without the prior written permission of this company.
Table of Contents Important Safety Instructions ............................... 1 Introduction ........................................................... 5 Projector Features .........................................................................5 Shipping Contents .........................................................................6 Optional Accessories ......................................................................................7 Projector Exterior View ..................................
Laser Pointer Operation ............................................................. 22 Mouse Function Operation ........................................................ 23 Zoom In + / Zoom Out - ............................................................ 23 Volume Adjustment ................................................................... 23 PIP (Picture In Picture) Operation ............................................ 23 Freeze ........................................................................
Supported timing for PC (including DVI-I) input ....................................47 Supported timing for YPbPr input ..............................................................47 Supported timing for Video and S-Video inputs .......................................47 Dimensions........................................................... 48 Warranty............................................................... 49 Limited Warranty ........................................................................
vi Table of Contents
Important Safety Instructions Your BenQ projector is designed and tested to meet the latest standards for safety of information technology equipment. However, to ensure safe use of this product, it is important that you follow the instructions mentioned in this manual and marked on the product. Caution • To prevent shock, do not open the cabinet. There are no user-serviceable parts inside. • Please read this user’s manual before you operate your projector. Save this user’s manual for future reference.
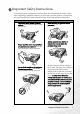
Safety Instructions 1. 2 The lamp becomes extremely hot during operation. Allow the projector to cool for approximately 45 minutes prior to removing the lamp assembly for replacement. 2. Do not operate lamps beyond the rated lamp life. Excessive operation of lamps beyond the rated life could cause them to explode on rare occasions. 3. Never replace the lamp assembly or any electronic components unless the projector is unplugged. Important Safety Instructions 4.
Safety Instructions (Continued) 7. Do not place this projector in any of the following environments. 8. Do not block the ventilation holes. - Do not place this unit on a blanket, bedding or any other soft surface. - Do not cover this unit with a cloth or any other item. - Do not place inflammables near the projector. - Space that is poorly ventilated or confined. Allow at least 50 cm clearance from walls and free flow of air around the projector.
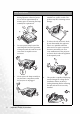
Safety Instructions (Continued) 11. Do not step on the projector or place any objects upon it. Besides probable physical damage to the projector, doing so may result in accidents and possible injury. 12. 4 Do not block the projection lens with any objects when the projector is under operation as this could cause the objects to become heated or deformed or even a fire. To temporarily turn off the lamp, press Blank on the projector or remote control. Important Safety Instructions 13.
Introduction Projector Features The projector integrates high-performance optical engine projection and a user-friendly design to deliver high reliability and ease of use.
Shipping Contents The projector is shipped with the cables required for connection to a PC and to video equipment. Carefully unpack and verify that you have all of the items shown below. If any of these items are missing, please contact your place of purchase. PB8250 Digital Proje installatio ctor n User's Mau Series nal Soft Carry Case User’s Manual 1. 00 1 Projector P / N : 5 3.
Optional Accessories 1. 2. 3. Macintosh adapter 250W / 300W lamp module Ceiling mount kit 4. 5. 6. Wireless Pro Presentation Pro DVI-I cable Projector Exterior View Front / Upper View External control panel (See page 9 for detailed information.) Projection lens adjuster Projection lens Kensington lock slot Front adjuster button AC power inlet Main power switch Air filter grill (See page 36 for detailed information.
Connector Panel S-Video jack RGB signal input DVI-I connector (PC/ YPbPr/ YCbCr) RS 232 control port For external control systems and used by service personnel.
Controls and Functions External Control Panel 13 12 10 11 9 5 3 1 2 6 1. 2. 3. 4. 5. 6. 7. Power (Refer to page 18 for more information.) Turns the projector on or off. Source (Refer to page 21 for more information.) Sequentially selects the input signal RGB, DVI, YPbPr, S-Video or Video. 3 Left Right 4 When the on-screen menu is not activated, #3 and #4 function as Keystone -/+ hot keys. Refer to page 20 for more information. 5Exit Exits and saves the menu settings.
Remote Control Description Front View LED (22) Power (18, 19) 6Down/ Menu (26) 3 Left/ Keystone 4 Right/ Keystone + (20) Auto (21) L-Click/ R-click (23) Source (21) Laser Pointer (22) Exit (26) Blank (22) Mouse Pad (23) Drag (23) Zoom in +/ Zoom out - (23) Return (23, 24) PIP Position (23) PIP Source (23) Freeze (24) Volume +/- (23) Mute (23) PIP Size (23) Preset (34) Notes on Remote Control Operation Make sure that there are no obstacles between the remote control and the IR sensors on the proje
Remote Control Effective Range Infra Red (IR) remote control sensors are located on the front and the back of the projector. The remote control must be held at an angle within 30 degrees of the projector’s IR remote control sensors to function correctly. The distance between the remote control and the sensors should not exceed 6 meters (19.5 feet). 6m Warning Messages on the Back of the Remote Control The laser beam is visible. It is necessary to depress the Laser button for continuous output.
Installing or Replacing the Batteries 1 Push and open the battery compartment lid in the direction shown. 2 Install batteries as indicated by the diagram inside the compartment. 3 Position the lid over the compartment and snap it back into place. Avoid excessive heat and humidity. There may be danger of an explosion if the batteries are incorrectly replaced. Replace only with the same or equivalent type recommended by the manufacturer.
Setting Up Your Projector Choosing a Location Your projector is designed to be installed in the four installation configurations shown here: Floor front, Ceiling front, Floor rear, Ceiling rear. Your room layout or personal preference will dictate which installation configuration you use. I. Floor front II. Ceiling front III. Floor rear IV. Ceiling rear For further information on the four configurations, please refer to page 31.
Connecting to a Laptop or Desktop Computer RGB VGA cable RGB VGA cable RGB RGB USB PC audio USB cable USB PC audio Audio cable A Mac adapter (an optional accessory) may be necessary if you are connecting to an older Macintosh computers. The USB cable is required if you intend using mouse functions on the remote control. Connecting Equipment to the Component Video Input Component Video cable RGB YPbPr AV equipment The projector is capable of displaying various High Definition TV display modes.
Connecting to Video or S-Video Devices S-Video devices S-Video cable RCA Audio/Video cable Video devices or VCR RCA Audio/Video cable If the selected video image is not displayed after the projector is turned on and the correct video source has been selected, check that the video source is turned on and operating correctly. Also check that the signal cables have been connected correctly.
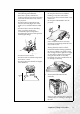
Adjusting the Height The projector is equipped with 2 quick-release adjuster feet. 1. Lift the projector up and press the adjuster button to release the adjuster. The adjuster will drop into position and be locked. 2. Screw the rear adjuster feet to fine-tune the projection angle. If the screen and the projector are not perpendicular to each other, the projected image becomes vertically trapezoidal.
Screen size chart (4:3 aspect ratio) Distance from screen feet 4 6 8 10 12 14 16 18 20 22 24 26 28 30 32 34 inch 48 72 96 120 144 168 192 216 240 264 288 312 336 360 384 408 Diagonal measurement Minimum Maximum zoom zoom feet 2.49 3.73 4.98 6.22 7.47 8.71 9.96 11.20 12.45 13.69 14.94 16.18 17.42 18.67 19.91 21.16 inch 29.9 44.8 59.7 74.7 89.6 104.5 119.5 134.4 149.4 164.3 179.2 194.2 209.1 224.0 239.0 253.9 feet 3.05 4.57 6.10 7.62 9.14 10.67 12.19 13.72 15.24 16.76 18.29 19.81 21.34 22.86 24.38 25.
Operation Start Up 1. 2. Switch all of the connected equipment on. Plug the power cord into the projector and into a wall socket. 3. 4. Turn on the wall socket switch (where fitted). Turn the main power switch on. The Power indicator lights orange. 5. Press and hold Power on the remote control or projector to start the unit. The Power indicator light flashes green when the power is turned on. 6. The start up procedure takes about 30 seconds after pressing Power.
8. continuously: “Analog RGB Searching”, “DVI-A Searching”, “DVI-D Searching”, “Analog YPbPr Searching”, “S-Video Searching”, “Composite Video Searching”. You can also press Source on the projector or remote control to select your desired input signal. For more information, refer to page 21. If the frequency/ resolution of the input signal exceeds the projector’s operating range, you will see the message “Out of Range” displayed on a blank screen. Shutdown 1. 2.
Digital Keystone Correction Keystoning refers to the situation where the projected image is noticeably wider at either the top or bottom. It occurs when the projector is not perpendicular to the screen. To correct this, besides adjusting the height of the projector, you will need to manually correct it following ONE of these steps. 1. Press 3 Left/ Right 4 (hot key) on the control panel of the projector to display the status bar labelled Keystone. Press Right 4to correct keystoning at the top of the image.
Source Selection To sequentially select input sources, press Source on the projector control panel or the remote control. It may take you a few seconds when the projector is searching for input signals. The selected source will be displayed at the bottom right of the screen for 3 seconds. Auto Adjustment In some cases, you may need to optimize the picture quality. To do this, press Auto on the control panel of the projector or on the remote control.
Blank In order to draw the audience’s full attention to the presenter, you can use Blank to hide the screen image. Press Blank again to restore the image. A word “BLANK” appear at the bottom right corner of the screen when the image is hidden. BLANK Zoom / Focusing Adjust the projected image to your desired size using the lens’ zoom ring. Then focus the image by rotating the focus ring. Refer to the screen size table on page 16.
Mouse Function Operation Connect the projector to your PC or notebook with a USB cable prior to using these functions. The Mouse Pad can take over the PC or notebook mouse function. When the displayed image is magnified, use the Mouse Pad to move around the display areas. The L-Click and R-Click act as the Left (L) and Right (R) buttons of a computer mouse. The Drag toggles between ON and OFF for the drag function of the remote mouse.
Freeze The image is frozen when Freeze is pressed. An icon will appear in the lower right corner of the screen. To release the function, press Freeze again, Return or Source (this will change the input source and release the pause function). Preset Mode Selection Press Preset to select a operation mode that suits your need. There are several operation modes available for different types of signals.
Menu Operation Menu System Please note that the OSD menus vary according to the signal type selected. Functions available when receiving different signal types...
Using the menus The projector is equipped with on-screen display (OSD) menus for making various adjustments and settings. There are 10 different menu languages. (Refer to page 33 for more details.) The following example describes the adjustment of the keystone. 1. Press Menu on the projector or remote control to turn the on-screen menu on. 4. Adjust keystone values by pressing 3 Left/ Right 4on the projector or 3 Keystone/ Keystone 4 on the remote control. 2.
1. Display Menu Analog RGB/ DVI-A/ YPbPr (480p, 576p, 720p, 1080i) signal input FUNCTION DESCRIPTION Keystone Corrects any keystoning of the image. Refer to page 20 for more information. Adjusts the brightness of the image. The higher the value, the brighter the image. And lower the setting, darker the image. Adjust this control so the black areas of the image appear just as black and that detail in the dark areas is visible.
YCbCr (480i, 576i)/ S-Video/ Video signal input 28 FUNCTION DESCRIPTION Keystone As above. Brightness As above. Contrast As above. Color Increases or decreases the color intensity of the image. Tint Adjusts the color tones of the image. The higher the value, the more reddish the image becomes. The lower the value, the more greenish the image becomes. Lamp Hour As above.
2. Image Menu Analog RGB/ DVI-A signal input FUNCTION Auto Resize DESCRIPTION Makes the best fit of the image to the screen, 1. On 2. Off 3. 16:9 Adjusts the horizontal position of the projected image. H Position -30 +30 -30 +30 Adjusts the vertical position of the projected image. V Position Color Temp Information Adjusts the white color. The higher the value, the more reddish white the image becomes. The lower the value, the more bluish white the image becomes.
YPbPr (480p, 576p, 720p, 1080i) signal input FUNCTION Ratio DESCRIPTION Users have 2 options for the image ratio. H Position 1. 4 : 3 2. 16 : 9 As above. V Position As above. Color Increases or decreases the color intensity of the image. Tint Color Temp Adjusts the color tones of the image. The higher the value, the more reddish the image becomes. The lower the value, the more greenish the image becomes. As above.
3. Source Menu FUNCTION DESCRIPTION The projector can be installed on a ceiling or behind a screen, or with one or more mirrors. Contact your dealer for the ceiling mount bracket (optional accessory) if you need to install the projector on your ceiling. • Floor front: Select this setting with the projector set on the floor and audience viewing the projected images from the front side of the screen. This is the most common setting.
Adjusts the bass level.
4. Control Menu FUNCTION DESCRIPTION Language sets the language for the OSD control menus. Language Use the 3 / 4 key to select the desired language from among English, French, German, Italian, Spanish, Russian, Traditional Chinese, Simplified Chinese, Japanese and Korean. OSD Pos. Selects a desired OSD position. OSD OSD Time Sets the length of time the OSD will remain active after your last button press. The range is from 5 to 60 seconds.
Preset modes are provided so you can optimize your projector image setup to suit your program type. PC/ DVI Signal input 1. 2. 3. 4. Preset Mode Presentation Mode: Is designed for presentations. The brightness is emphasized in this mode. Vivid Mode: Is perfect for playing games. The color saturation and brightness are well-balanced. Video Mode: Is suitable for cinematic enjoyment displaying images in their natural color.
5. PIP (Picture In Picture) Menu Your projector is capable of displaying images simultaneously from two input sources, which enhances your presentation in a more effective way. These functions are available only when the input source is PC and the PIP source is Video or S-Video. FUNCTION PIP Source DESCRIPTION Selects the source for the PIP. Press the 3 / 4 keys to scroll through the four alternatives: Off, Small, Medium, Large.
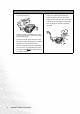
Maintenance Your projector needs little maintenance. Things you have to do on a regular basis are keep the lens clean and clean the air filter to prevent overheating. Never remove any parts of the projector except the lamp and air filter. Contact your dealer if other parts needs replacing. Cleaning the lens Clean the lens whenever you notice dirt or dust on the surface. Use a canister of compressed air to remove dust.
4. 5. Use a small vacuum cleaner designed for computers and other office equipment to clean the filters. Or use a soft brush (such as a clean artist’s paintbrush) to gently sweep the dust away. If the dirt is difficult to remove or the filters are broken, contact your place of purchase to replace them. Replace the filters then press the covers back until they click into place. If the covers are not correctly seated in place, you will be reminded by a message displayed on the screen every three minutes.
Lamp Information Use and Replacement of the Lamp When the Lamp Indicator lights up red or a message appears suggesting it is time to replace the lamp, please install a new lamp or consult your dealer. An old lamp may cause a malfunction in the projector and in some instances the lamp may explode. For more detailed information on the warning indicators, please refer to page 40. The Lamp indicator light and Temperature warning light will light up if the lamp becomes too hot.
To reduce the risk of injuries to fingers and/or compromising image quality by touching the lens, do not touch the empty lamp compartment when the lamp is removed. This lamp contains mercury. Consult your local hazardous waste regulations and dispose of this lamp in the proper manner. Step 1. Turn the power off and disconnect the projector from the wall socket. Step 2. Turn the projector over. Then loosen the screws and remove the lamp cover.
Step 7. Reset the lamp counter i. Press and hold Exit on the projector for 3 seconds to display the total used lamp time. ii. Press Menu on the projector or on the remote control to access the lamp hour timer. An adjustment message will appear. iii. Press W or X to reset lamp hours and press EXIT to leave. Temp Warning Light When the Temperature warning light is on, it is warning you of the following possible problems: 1. The internal temperature is too high. 2. Air Filters are clogged. 3.
LED Status & Description Power Temp Lamp Power events The projector has just been connected to a power outlet. O O O Stand-by mode. O O - - - (1) The projector needs 90 seconds to cool down as it was abnormally shut down without the normal cooling down process. Or - (2) The projector needs to cool for 90 seconds after the power is turned off. The Power indicator light is flashing during powering up. G - - G - - The projector is under normal operation.
R G The projector has shutdown automatically. If you try to restart the projector, it will shutdown again. Please contact your dealer for assistance. G R G The projector has shutdown automatically. If you try to restart the projector, it will shutdown again. Please contact your dealer for assistance. O R G 42 The projector has shutdown automatically. If you try to restart the projector, it will shutdown again. Please contact your dealer for assistance.
Service Information Accessories (included in the standard package) Description . . . . . . . . . . . . . . . . . . . . . . . . . . . . . . . . . . . . . . . . . . . . . . . . Part Number Power cord (US) . . . . . . . . . . . . . . . . . . . . . . . . . . . . . . . . . . . . . . . . . . . . .27.01818.000 Power cord (EU) . . . . . . . . . . . . . . . . . . . . . . . . . . . . . . . . . . . . . . . . . . . . .27.82718.281 Power cord (UK) . . . . . . . . . . . . . . . . . . . . . . . . . . . . . . . . . . . . .
Troubleshooting Common Problems & Solutions THE PROJECTOR DOES NOT TURN ON. Cause Remedy There is no power from the power cable. Plug the power cord into the AC inlet on the projector, and plug the power cord into the power outlet. If the power outlet has a switch, make sure that it is switched on. Attempting to turn the projector on again during the cooling process. Wait until the cooling down process has completed. NO PICTURE Cause Remedy The video source is not turned on or connected correctly.
Specifications Projector Specifications Technical Specifications All specifications are subject to change without notice. General Product name Model name Digital Projector PB8240 1024 x 768 XGA PB8140 800 x 600 SVGA PB8250 1024 x 768 XGA Optical Display system Lens F/Number Lamp 1-CHIP DMD F/2.4 PB8140 / PB8240 250W lamp PB8250 300W lamp Electrical Power supply Power consumption AC100 ~ 240V, 4.
Control RS-232C 9-pin x1 Environmental Requirements Operating temperature Opeating relative humidity Opeating altitude 0°C ~ 40°C at sea level 10% ~ 90% (without condensation) 6000 feet at 30°C 6000 ~ 10000 feet at 23°C 46 Specifications
Timing Chart Supported timing for PC (including DVI-I) input Resolution Horizontal Frequency (kHz) Vertical Frequency (Hz) Pixel Frequency (MHz) 37.927 31.469 37.861 37.500 43.269 37.879 48.077 46.875 53.674 48.363 56.476 60.023 68.667 63.981 85.039 59.940 72.809 75.000 85.008 60.317 72.188 75.000 85.061 60.004 70.069 75.029 84.997 60.020 35.500 25.175 31.500 31.500 36.000 40.000 50.000 49.500 56.250 65.000 75.000 78.750 94.500 108.
Dimensions Unit: mm 48 Dimensions
Warranty Limited Warranty BenQ warrants this product against any defects in material and workmanship, under normal usage and storage. Proof of purchase date will be required with any warranty claim. In the event this product is found to be defective within the warranty period, BenQ’s only obligation and your exclusive remedy shall be replacement of any defective parts (labor included). To obtain warranty service, immediately notify the dealer from which you purchased the product of any defects.
Regulation Statements FCC Statement CLASS B: This equipment generates, uses and can radiate radio frequency energy and, if not installed and used in accordance with the instructions, may cause harmful interference to radio communications. However, there is no guarantee that interference will not occur in a particular installation.