PD-reeks Lcd-scherm Gebruikershandleiding
Copyright Copyright © 2016 BenQ Corporation. Alle rechten voorbehouden. Niets uit deze documentatie mag zonder de voorafgaande schriftelijke toestemming van BenQ Corporation worden gereproduceerd, uitgezonden, overgezet, opgeslagen in een gegevensopvraagsysteem of vertaald naar welke taal of computertaal dan ook, in welke vorm of op welke wijze dan ook, hetzij elektronisch, mechanisch, magnetisch, optisch, chemisch, handmatig of op andere wijze.
• Plaats geen voorwerpen in en/of mors geen water of andere vloeistoffen op dit product. Service Probeer dit product niet zelf te repareren. Door het openen of verwijderen van de behuizing kunt u blootgesteld worden aan gevaarlijke spanningen of andere risico's. Wanneer er sprake is van enig hierboven vermeld verkeerd gebruik of van een ander ongeluk zoals het vallen of het verkeerd behandelen van het product, neem dan contact op met een geautoriseerd service center.
Inhoudsopgave Copyright ......................................................................................................................................2 Voor u begint ...............................................................................................................................6 Uw monitor leren kennen .........................................................................................................8 Vooraanzicht .................................................................
Problemen oplossen .................................................................................................................59 Veelgestelde vragen (FAQ) .................................................................................................................... 59 Meer hulp nodig? ......................................................................................................................................
Voor u begint Let er bij het uitpakken op dat u de volgende items ontvangen heeft. Indien een van de items ontbreekt of beschadigd is, neem dan contact op met uw leverancier waar u het apparaat gekocht heeft. BenQ LCD Monitor Monitorstandaard Monitorvoet Beknopte handleiding CD-rom Netsnoer (Beeld kan verschillen per product per regio.
Videokabel: DP (Optionele accessoire) Videokabel: DP naar mini-DP Videokabel: HDMI Audiokabel (Optionele accessoire) Usb-kabel Hotkey Puck • De beschikbare accessoires en de hier getoonde afbeeldingen kunnen afwijken van de daadwerkelijke inhoud en het product dat in uw regio wordt geleverd. Kabels die niet bij het product worden geleverd, kunt u apart aanschaffen. • Bewaar de doos en het verpakkingsmateriaal voor het geval dat u de monitor later nog eens moet vervoeren.
Uw monitor leren kennen Vooraanzicht 1. Lichtsensor/Eco-sensoren 2. Bedieningsknoppen 3. Knop Aan/uit 1 2 3 Achteraanzicht 4. Hotkey Puck-aansluiting 5. USB 3.0-poorten (downstream; aansluiting voor usb-apparaten) 6. USB 3.0-poort (upstream 2; aansluiting voor de pc) 7. USB 3.0-poort (upstream 1; aansluiting voor de pc) 8. Audio lijn-in 9. Opening voor kabelmanagement 10. Stroomstekker 11. Aan/uitknop 12.
PD3200Q 13 14 15 16 13. Dvi-d-aansluiting 14. HDMI-aansluiting 15. DisplayPort-aansluiting 16. Mini-DisplayPort-aansluiting 17. SD-kaartsleuf 18. USB 3.0-poorten (downstream; aansluiting voor usb-apparaten) 19. Koptelefoonstekker 20. Loslaatknop 17 18 19 20 PD3200U 14 15 16 17 18 19 20 • De ondersteunde resolutie en timing kan verschillen, afhankelijk van de productspecificaties. • Bovenstaande afbeelding kan per model verschillen. • Beeld kan verschillen per product per regio.
Verbinding De volgende verbindingsafbeeldingen dienen uitsluitend als voorbeeld. Kabels die niet bij het product worden geleverd, kunt u apart aanschaffen. Voor meer details over het maken van verbindingen, zie 13 - 16. PD3200Q PC/laptop SD-kaart USB-randapparatuur (USB 3.0) Luidsprekers USB-randapparatuur (USB 3.
PD3200U PC/laptop SD-kaart USB-randapparatuur (USB 3.0) Luidsprekers USB-randapparatuur (USB 3.
Installeren van de monitorhardware • Als uw computer ingeschakeld is, schakel deze dan uit voordat u verder gaat. Steek de stekker niet in het stopcontact of schakel de monitor niet in totdat u gevraagd wordt dit te doen. • De volgende afbeeldingen dienen slechts ter illustratie. Welke in- en uitgangen beschikbaar zijn en waar ze zitten, is afhankelijk van het gekochte model. • De ondersteunende tijd kan variëren afhankelijk van het ingangssignaal.
Bevestig de schroef aan de onderkant van de standaard zoals is geïllustreerd. En draai vervolgens de standaard linksom zodat deze naar voren wijst. 3 1 2 Richt het uiteinde van de standaardbeugel op de monitor ( 1 ) en druk beide vervolgens in elkaar totdat ze vastklikken ( 2 ). 2 1 Controleer of beide onderdelen stevig met elkaar verbonden zijn door deze zachtjes los proberen te trekken.
De HDMI-kabel aansluiten Of Sluit de stekker van de hdmi-kabel aan op de hdmi-poort op het beeldscherm. Sluit het andere uiteinde van de kabel aan op de hdmi-poort van een digitaal uitvoerapparaat. De DP-kabel aansluiten Of Sluit de stekker van de DP-kabel aan op de videoaansluiting van de monitor. Sluit het andere uiteind van de kabel aan op de videoaansluiting van de computer. Als de monitor is ingeschakeld en geen beeld zichtbaar is, koppelt u de kabel los.
U kunt een koptelefoon aansluiten op de betreffende aansluiting aan de linkerzijde van de monitor. 4. Usb-apparaten aansluiten. TUO-FIDP TUO-FIDS TUO VT Sluit de usb-kabel aan op de pc en het beeldscherm (via de upstream usb-poort aan de achterzijde). Deze upstream usb-poort zorgt voor gegevensoverdracht tussen de pc en usb-apparaten die op het beeldscherm zijn aangesloten. Sluit usb-apparaten via de andere usb-poorten (downstream) aan op het beeldscherm.
6. Sluit de Hotkey Puck aan op de monitor. Sluit de Hotkey Puck aan op de mini-USB-poort (uitsluitend voor de Hotkey Puck-verbinding) op de achterkant van de monitor. Plaats de Hotkey Puck, zoals is aangegeven, op de monitorstandaard of op een andere gewenste plek. Meer informatie over de Hotkey Puck vindt u op Hotkey Puck op pagina 31. 7. Verbind de voedingskabel met de monitor. Steek het ene uiteinde van de voedingskabel in de aansluiting aan de achterzijde van de monitor.
Schakel de aan/uitknop naast de stroomingang op AAN. Zet de monitor aan door op de aan/uit-knop op de monitor te drukken. Zet nu ook de computer aan en volg de instructies op in Haal het uiterste uit uw BenQ monitor op pagina 24 om de monitorsoftware te installeren. Voor een langere levensduur van het product, raden wij u aan de energiebeheerfunctie (powermanagement functie) van uw computer te gebruiken.
De stander van de voet loskoppelen 1. Voorbereidingen voor monitor en bureaublad/tafel. Schakel de monitor uit en verwijder de voedingskabel uit het stopcontact voordat u de voedingskabel uit de monitor neemt. Schakel de computer uit voordat u de signaalkabel loskoppelt. Voordat u de monitor met het scherm naar beneden gericht op uw bureau of tafel plaatst dient u eerst voldoende ruimte te maken en ter bescherming bijvoorbeeld een handdoek neer te leggen. Dit om de monitor en het scherm te beschermen.
Draai de standaard rechtsom totdat dit niet verder gaat. Koppel nu de voet van de stander.
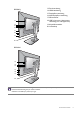
De hoogte van de monitor aanpassen Om de monitorhoogte aan te passen, pakt u de monitor aan weerszijden vast en beweegt u deze neerof opwaarts tot de gewenste hoogte is bereikt. • Plaats uw handen niet op het bovenste of onderste deel van de in hoogte verstelbare stander en ook niet langs de onderkant van de monitor. Het op- of neerwaarts bewegen van de monitor kan eventueel lichamelijk letsel veroorzaken. Houd kinderen uit de buurt van het beeldscherm als u deze handeling uitvoert.
De monitor draaien 1. Kantel het beeldscherm. Voordat het beeldscherm in een portretstand kan worden gedraaid, moet het beeldscherm 90 graden worden gedraaid. Klik om de Display Pilot Software (Beeldschermpilootsoftware) te starten (gedownload van www.BenQ.com) en vink Auto-draaien aan zodat de weergave autoamtisch meedraait met het beeldscherm. Of klik met de rechtermuisknop op het bureaublad en kies in het pop-upmenu de optie Schermresolutie.
4. Zet de monitor in de gewenste kijkhoek. Aanpassing van de kijkhoek U kunt het scherm in de gewenste hoek positioneren door het te kantelen, verschuiven en de hoogte aan te passen. Zie de productspecificaties voor meer informatie.
Het wandmontageset van de monitor gebruiken De achterkant van de LCD-monitor heeft een standaard VESA bevestiging met gaten volgens het 100mm-patroon, zodat u de monitor kunt bevestigen aan een wandmontagebeugel. Voordat u een wandmontageset bevestigt, leest u eerst de voorzorgsmaatregelen. Voorzorgsmaatregelen • Bevestig de monitor en wandmontageset aan een muur met een plat oppervlak.
Haal het uiterste uit uw BenQ monitor Om het uiterste uit uw nieuwe BenQ LCD Monitor te halen, dient u het BenQ LCD Monitor stuurprogramma te installeren. Dat vindt u op de BenQ LCD Monitor cd-rom. De te volgen procedure voor een succesvolle installatie van het BenQ LCD Monitor stuurprogramma wordt bepaald door de omstandigheden onder welke u uw BenQ LCD Monitor wilt aansluiten en installeren.
Installatie van de monitor op een nieuwe computer De volgende instructies beschrijven de procedure voor het selecteren en installeren van het BenQ LCD Monitor stuurprogramma op een nieuwe computer waarop nooit tevoren een monitor stuurprogramma geïnstalleerd is geweest. Deze instructies zijn uitsluitend van toepassing op een computer die nooit eerder gebruikt is en waarop de BenQ LCD Monitor de allereerste monitor is die op deze computer wordt aangesloten.
Aanpassen van de monitor op een bestaande computer De volgende instructies beschrijven de procedure voor het handmatig aanpassen van een bestaand monitor stuurprogramma op uw Microsoft Windows computer. Momenteel is het uit de test gekomen als compatibel met de besturingssystemen Windows 10, Windows 8 (8.1) en Windows 7.
Hoe te installeren op Windows 10 systeem 1. Open Eigenschappen voor beeldscherm. Ga naar Start, Instellingen, Apparaten, Apparaten en printers en klik in het menu met de rechterknop op de naam van uw monitor. 2. 3. 4. 5. 6. Kies Eigenschappen in het menu. Klik op het tabblad Hardware. Klik op Algemeen PnP-beeldscherm en daarna op de knop Eigenschappen. Klik op de tab Stuurprogramma en vervolgens op de knop Stuurprogramma bijwerken. Plaats de BenQ LCD Monitor cd-rom in een cd-station op de computer. 7.
Hoe te installeren op Windows 8 (8.1) systeem 1. Open Eigenschappen voor beeldscherm. Plaats de cursor rechtsonder op het scherm of druk op Windows + C op het toetsenbord om de balk Charm (Emoticon) te openen. Ga naar Instellingen, Configuratiescherm, Apparaten en printers en klik in het menu met de rechterknop op de naam van uw monitor.
Hoe te installeren op Windows 7 systeem 1. Open Eigenschappen voor beeldscherm. Ga naar Start, Configuratiescherm, Hardware en geluiden, Apparaten en printers en klik in het menu met de rechterknop op de naam van uw monitor. Eveneens kunt u met rechts op de desktop klikken en selecteren: Aan persoonlijke voorkeur aanpassen, Beeldscherm, Apparaten en printers en in het menu met de rechterknop op de naam van uw monitor klikken. 2. 3. 4. 5. 6. 7. Kies Eigenschappen in het menu. Klik op het tabblad Hardware.
Het aanpassen van de monitor Het bediedingspaneel 1 Nr. Naam 2 Beschrijving 1. Bedieningstoetsen Opent de functies of menu-items op het scherm, direct naast elke toets. 2. Aan/uittoets De monitor in- en uitschakelen. De bedieningstoetsen zitten in een touchpad en zijn voorzien van LED-indicatoren. Door aanraking van een LED-indicator, wordt de bijbehorende bedieningstoets als het ware ingedrukt.
Hotkey Puck De Hotkey Puck biedt, net als de bedieningstoetsen, een gemakkelijke en snelle manier om functies uit te voeren en de OSD-menu's te openen. Voordat u de monitor gaat gebruiken, dient u de Hotkey Puck aan te sluiten. Volg de aanwijzingen in Sluit de Hotkey Puck aan op de monitor. op pagina 16. 1 2 3 4 5 6 Nr. 1. Naam Controllertoets 1 Beschrijving • Druk op de knop om over te schakelen naar sRGB (Beeldmodus).
Nr. 5. Naam Beschrijving Navigatieknoppen • : Om omhoog te navigeren of een waarde te verhogen. ( • : Om omlaag te navigeren of een waarde te verlagen. • : Opent submenu’s. • : Keert terug naar het vorige menu. / / / ) 6. OK-toets ( ) • Activeert het sneltoetsmenu • Selecteert menu-items. Hotkey Puck is speciaal ontworpen voor de BenQ LCD Monitor en is uitsluitend beschikbaar voor compatibele modellen. Sluit de schakelaar niet op andere apparatuur met mini-USB-poorten aan.
Basale menufuncties Alle schermmenu’s (OSD-menu’s) kunnen via de bedieningstoetsen worden geopend. U kunt met het OSD-menu alle instellingen van de monitor aanpassen. 1 2 4 3 1. Druk op een bedieningstoets. U kunt ook op de -toets op de OSD-ccontroller drukken. 2. Het sneltoetsmenu wordt geopend. De drie linkertoetsen zijn aangepaste toetsen waaraan specifieke functies kunnen worden toegekend. 3. Kies (Menu) om het hoofdmenu te openen. 4.
Nr. OSD in sneltoetsmenu OSD-pictogram in hoofdmenu • Deze toets is standaard de sneltoets voor Beeldmodus. Zie De sneltoetsen aanpassen op pagina 35 om de standaardinstellingen te wijzigen. • Om omhoog te navigeren of een waarde te verhogen. • Deze toets is standaard de sneltoets voor Ingang. Zie De sneltoetsen aanpassen op pagina 35 om de standaardinstellingen te wijzigen.
De sneltoetsen aanpassen De 3 bedieningstoetsen links (ook wel aangepaste toetsen genoemd), dienen als sneltoetsen voor vooraf ingestelde functies. U kunt de standaardinstelling wijzigen en andere functies aan deze toetsen toekennen. 1. Druk op een willekeurige bedieningstoets of op de -toets op de OSD-Controller om het sneltoetsmenu te openen. Kies (Menu) om het hoofdmenu te openen. 2. Ga naar Systeem. 3. Selecteer de aangepaste toets die u wilt wijzigen. 4.
Sneltoetscombinaties om snel te schakelen Schakel de besturing om door naar de betreffende ingangsbron te schakelen en vervolgens naar de besturingstools (toetsenbord en muis). Het omschakelen van de besturing verloopt sneller als u eerst de aangepaste toetsen instelt als sneltoetsen voor Input en KVM-switch. Zie De sneltoetsen aanpassen op pagina 35 voor meer informatie.
In PBP-modus (alleen bepaalde modellen) 1. Leg de kabelverbindingen zoals is beschreven in Sluit de pc-videokabel aan. op pagina 13. 2. Schakel PBP-functie in via Scherm > PIP/PBP > Modus > PBP. Zie Videobronselectie inde modus PIP/PBP (voor modellen met PIP/PBP-functie voor) op pagina 37 voor meer informatie. 3. Selecteer KVM-switch.
3. Een lijst met beschikbare beeldmodi voor het rechtervenster wordt weergegeven. Selecteer eentje om de instelling toe te passen. 38 Het aanpassen van de monitor Beeld met de instelling van Beeld met de instelling van Beeld geavanc. > Beeldmodus Beeld geavanc.
Door het hoofmenu navigeren U kunt de OSD (On Screen Display) menu gebruiken om alle instellingen van de monitor aan te passen. Druk op een besturingstoets of op de -toets op de Hotkey Puck om het sneltoetsmenu te openen. Kies (Menu) om het hoofdmenu te openen. Zie Basale menufuncties op pagina 33 voor details. Welke menu-opties beschikbaar zijn kan variëren, afhankelijk van de invoerbron, functies en instellingen. Menu-opties die niet beschikbaar zijn, worden grijs gemaakt.
Menu Scherm Welke menu-opties beschikbaar zijn kan variëren, afhankelijk van de invoerbron, functies en instellingen. Menu-opties die niet beschikbaar zijn, worden grijs gemaakt. Toetsen die niet beschikbaar zijn, worden uitgeschakeld en de betreffende OSD-pictogrammen worden verborgen. Voor modellen zonder bepaalde functies geldt, dat de instellingen en gerelateerde items niet in het menu verschijnen.
Item Input Functie Bereik Modus Stelt de PIP- of PBP-modus in. • PIP PIP: De modus Picture-in-Picture • PBP (PIP) toont de hoofdvideobron op • UIT het scherm en de tweede bron wordt in een vensterje geplaatst. PBP: Hiermee kunnen beelden van twee verschillenden videobronnen naast elkaar worden weergegeven. UIT: Schakelt de PIP/PBP-modus uit. PIP/PBP-bron Stelt de tweede videobron in voor • HDMI 1 de modus PIP/PBP.
Menu Beeld Welke menu-opties beschikbaar zijn kan variëren, afhankelijk van de invoerbron, functies en instellingen. Menu-opties die niet beschikbaar zijn, worden grijs gemaakt. Toetsen die niet beschikbaar zijn, worden uitgeschakeld en de betreffende OSD-pictogrammen worden verborgen. Voor modellen zonder bepaalde functies geldt, dat de instellingen en gerelateerde items niet in het menu verschijnen.
Item Gamma Functie Bereik Past de intensiteit van de tint aan. De standaardwaarde • 1 is 3 (de standaardwaarde van Windows). •2 •3 •4 •5 Kleurtemperatuur Normaal Hiermee kunnen video's en foto's worden weergegeven met natuurlijke kleuren. Dit is de kleur die standaard is ingesteld. Blw. Tint Past een koele tint toe op de afbeelding en is standaard ingesteld op de standaard witte kleur van de PC-industrie.
Menu Beeld Geavanceerd Welke menu-opties beschikbaar zijn kan variëren, afhankelijk van de invoerbron, functies en instellingen. Menu-opties die niet beschikbaar zijn, worden grijs gemaakt. Toetsen die niet beschikbaar zijn, worden uitgeschakeld en de betreffende OSD-pictogrammen worden verborgen. Voor modellen zonder bepaalde functies geldt, dat de instellingen en gerelateerde items niet in het menu verschijnen. Mode: Standard Display Picture Mode Rec.
Item Functie Bereik CAD / CAM Verbetert het contrast als CAD / CAM-software wordt gebruikt. Animatie Verbetert het contrast van donkere tinten - dit 0 tot 10 vereenvoudigt het bewerken van de details bij het maken van een animatie. Standaard Voor standaard PC-toepassingen. Low Blue Light Vermindert het blauwe licht van het beeldscherm om het risico op blootstelling van blauw licht op de ogen te beperken.
Item Weergavemodus Functie Bereik Met deze functie kunt u andere beeldverhoudingen dan 16:9 weergeven zonder geometrische vervorming. De opties onder Weergavemodus veranderen naar gelang het invoersignaal. Afhankelijk van de selectie van Beeldmodus, worden verschillende opties voor Weergavemodus vooraf ingesteld. Verander indien nodig de instelling. Overscan Volledig Schaalt het ingangssignaal op om het volledig scherm te vullen. Ideaal voor beelden van 16:9. Beeldverh.
Item Hdmi RGB pc-bereik Functie Bereik Bepaalt het bereik van de kleurschalen. Kies een optie die overeenkomt met de instelling van het RGB-bereik van het aangesloten hdmi-apparaat. • Autodetec.
Menu Audio Welke menu-opties beschikbaar zijn kan variëren, afhankelijk van de invoerbron, functies en instellingen. Menu-opties die niet beschikbaar zijn, worden grijs gemaakt. Toetsen die niet beschikbaar zijn, worden uitgeschakeld en de betreffende OSD-pictogrammen worden verborgen. Voor modellen zonder bepaalde functies geldt, dat de instellingen en gerelateerde items niet in het menu verschijnen.
KVM-switchmenu Welke menu-opties beschikbaar zijn kan variëren, afhankelijk van de invoerbron, functies en instellingen. Menu-opties die niet beschikbaar zijn, worden grijs gemaakt. Toetsen die niet beschikbaar zijn, worden uitgeschakeld en de betreffende OSD-pictogrammen worden verborgen. Voor modellen zonder bepaalde functies geldt, dat de instellingen en gerelateerde items niet in het menu verschijnen.
Menu Systeem Welke menu-opties beschikbaar zijn kan variëren, afhankelijk van de invoerbron, functies en instellingen. Menu-opties die niet beschikbaar zijn, worden grijs gemaakt. Toetsen die niet beschikbaar zijn, worden uitgeschakeld en de betreffende OSD-pictogrammen worden verborgen. Voor modellen zonder bepaalde functies geldt, dat de instellingen en gerelateerde items niet in het menu verschijnen. Mode: Standard Display OSD Settings Language 5 sec. Picture Custom Key 1 Display Time 10 sec.
Item OSD-instellingen Functie Taal Bereik Stelt de taal van het OSD-menu in. • English • Français • Deutsch De taalopties op de OSD kunnen • Italiano verschillen van de opties die rechts zijn weergegeven, • Español afhankelijk van het product dat in • Polski uw regio wordt geleverd. • Česky • Magyar • SiCG/BiH/CRO • Română • Nederlands • Русский • Svenska • Português • 日本語 • 繁體中文 • 简体中文 • Tijd weergeven Past de tijdsweergave van het OSD-menu aan. • 5 sec. • 10 sec. • 15 sec. • 20 sec. • 25 sec.
Item Functie Aangepaste toets 1 Stelt de functies in die kunnen worden geopend door de aangepaste toets 1. Aangepaste toets 2 Stelt de functies in die kunnen worden geopend door de aangepaste toets 2. Aangepaste toets 3 Stelt de functies in die kunnen worden geopend door de aangepaste toets 3. Bereik • Beeldmodus • Input • DisplayPort • Mini-DisplayPort • HDMI (alleen voor PD3200Q) • HDMI1 (alleen voor PD3200U) • HDMI2 (alleen voor PD3200U) • Rec.
Item Automatisch uit Functie Bereik Stelt de tijd in waarna het beeldscherm in de energiebesparende modus automatisch wordt uitgeschakeld. • UIT • 10min. • 20min. • 30min. Resolutiemelding Stelt in of de resolutiemelding voor de aanbevolen • AAN Informatie resolutie wordt weergegeven als de monitor een nieuw ingangssignaal detecteert. • UIT Geeft de kenmerken van de huidige instellingen van de monitor weer.
Item Controllertoets 1 Controllertoets 2 Controllertoets 3 Functie Bereik Stelt de functie in of het menu dat geopend wordt • Beeldmodus met de Controllertoets 1. • Input Stelt de functie in of het menu dat geopend wordt • DisplayPort met de Controllertoets 2. • Mini-DisplayPort Stelt de functie in of het menu dat geopend wordt • HDMI (alleen voor met de Controllertoets 3. PD3200Q) • HDMI1 (alleen voor PD3200U) • HDMI2 (alleen voor PD3200U) • Rec.
Menu Ergonomie Welke menu-opties beschikbaar zijn kan variëren, afhankelijk van de invoerbron, functies en instellingen. Menu-opties die niet beschikbaar zijn, worden grijs gemaakt. Toetsen die niet beschikbaar zijn, worden uitgeschakeld en de betreffende OSD-pictogrammen worden verborgen. Voor modellen zonder bepaalde functies geldt, dat de instellingen en gerelateerde items niet in het menu verschijnen.
Item Functie Bereik Oogbescherming Het beeldscherm bevat een lichtsensor die de • AAN lichtomstandigheden rond het beeldscherm detecteert • UIT zodat automatisch de verlichting kan worden aangepast. Dit beschermt uw ogen tegen te sterk licht. Als er onvoldoende licht is, wordt de helderheid van het beeld verhoogd. Als het beeldscherm in een ruimte met weinig licht staat, wordt de helderheid van het beeld verminderd.
Menu Eco Welke menu-opties beschikbaar zijn kan variëren, afhankelijk van de invoerbron, functies en instellingen. Menu-opties die niet beschikbaar zijn, worden grijs gemaakt. Toetsen die niet beschikbaar zijn, worden uitgeschakeld en de betreffende OSD-pictogrammen worden verborgen. Voor modellen zonder bepaalde functies geldt, dat de instellingen en gerelateerde items niet in het menu verschijnen.
Item ECO-sensor Functie Bereik Het beeldscherm wordt geleverd met een nabijheidssensor • AAN (ECO-sensor genoemd), die uw aanwezigheid voor het • UIT beeldscherm binnen het ingestelde bereik detecteert. Als de sensor geen aanwezigheid detecteert, wordt het beeldscherm na 40 seconden uitgeschakeld om energie te sparen. Als het beeldscherm wordt uitgeschakeld door de ECO-sensor, knippert de aan/uittoets wit. Als de ECO-sensor 2 uur lang geen aanwezigheid detecteert, wordt het beeldscherm uitgeschakeld.
Problemen oplossen Veelgestelde vragen (FAQ) Het beeld is niet scherp. Lees de instructies onder de koppeling "Instellen van de schermresolutie" op de cd, selecteer vervolgens de juiste resolutie en beeldherhalingsfrequentie en stel e.e.a. in aan de hand van deze instructies. Is het beeld uitsluitend onscherp bij resoluties lager dan de natuurlijke (maximum) resolutie? Lees de instructies onder de koppeling "Instellen van de schermresolutie" op de cd. Selecteer de maximum resolutie.
De LED brandt wit of oranje. • Als de LED wit brandt, is het beeldscherm ingeschakeld. • Wanneer de LED wit oplicht en de mededeling Buiten bereik op het scherm verschijnt, betekent dit, dat u een weergavemodus gebruikt die deze monitor niet ondersteunt. Wijzig de instelling naar een modus die wel ondersteund wordt. Lees de sectie "Vooringestelde Weergavemodus" onder de koppeling "Instellen van de schermresolutie". • Wanneer de LED oranje oplicht, is de energiebeheermodus ingeschakeld.
Er komt geen geluid uit de aangesloten externe luidsprekers. • Trek de koptelefoon los (als de koptelefoon op het beeldscherm is aangesloten). • Controleer of lijn-uit correct is aangesloten. • Als de energievoorziening van de externe luidsprekers via usb verloopt, controleert u of de usb-verbinding correct is. • Verhoog het volume (volume is wellicht gedempt of te laag) van de externe luidsprekers. Er komt geen geluid uit de geïntegreerde luidsprekers: • Controleer of lijn-in correct is aangesloten.
Meer hulp nodig? Wanneer u na het raadplegen van deze handleiding nog steeds problemen heeft, neem dan contact op met uw dealer of ga naar de plaatselijke website via www.BenQ.com voor meer ondersteuning en de plaatselijke klantenservice.