Joybee GP1 Mini Projector User Manual Welcome
Table of contents Important safety instructions .........................3 Introduction........................7 Projector features .................................. 7 Shipping contents.................................. 8 Projector exterior view .......................... 9 Controls and functions ....................... 10 Projector .............................................. 10 Positioning your projector............................13 Obtaining a preferred projected image size .........................
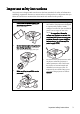
Important safety instructions Your projector is designed and tested to meet the latest standards for safety of information technology equipment. However, to ensure safe use of this product, it is important that you follow the instructions mentioned in this manual and marked on the product. Safety Instructions 1. Please read this manual before you operate your projector. Save it for future reference. 2. Do not look straight at the projector lens during operation.
Safety Instructions (Continued) 4 6. Do not operate lamps beyond the rated lamp life. Excessive operation of lamps beyond the rated life could cause them to break on rare occasions. 7. Never replace any electronic components unless the projector is unplugged. Important safety instructions 8. Do not place this product on an unstable cart, stand, or table. The product may fall, sustaining serious damage. 9. Do not attempt to disassemble this projector.
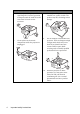
Safety Instructions (Continued) 11. Do not place this projector in any of the following environments. 12. - Space that is poorly ventilated or confined. Allow at least 50 cm clearance from walls and free flow of air around the projector. - Locations where temperatures may become excessively high, such as the inside of a car with all windows rolled up.
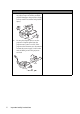
Safety Instructions (Continued) 6 15. Do not step on the projector or place any objects upon it. Besides probable physical damage to the projector, doing so may result in accidents and possible injury. 16. Do not place liquids near or on the projector. Liquids spilled into the projector may cause it to fail. If the projector does become wet, disconnect it from the power supply's wall socket and call BenQ to have the projector serviced.
Introduction Projector features The projector integrates high-performance optical engine projection and a user-friendly design to deliver high reliability and ease of use. The projector offers the following features.
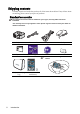
Shipping contents Carefully unpack and verify that you have all of the items shown below. If any of these items are missing, please contact your place of purchase. Standard accessories The supplied accessories will be suitable for your region, and may differ from those illustrated. *The warranty card is only supplied in some specific regions. Please consult your dealer for detailed information.
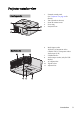
Projector exterior view 1. Front/upper side 1 4 2 2. 3. 4. 5. External control panel (See "Projector" on page 10 for details.) Vent (heated air exhaust) Front IR remote sensor Focus ring Projection lens 5 3 6. Rear/lower side 6 7 9 7. 8. 9. 10. 11.
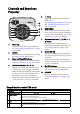
Controls and functions Projector 5. 1 7 10 2 3 4 5 6 7 9 6. 4 8 7. 1. 2. 3. 4. Focus ring Adjusts the focus of the projected image. See "Fine-tuning the image clarity" on page 25 for details. 8. BLANK Used to hide the screen picture. See "Hiding the image" on page 30 for details. Power and Ring LED indicator Indicates the power on or off and warning status. See "Indicators" on page 50 for details. Volume/Arrow keys ( /-, /+) 9. Magnifies or reduces the volume level.
Remote control 6. 4 1 2 8 3 5 6 5 10 13 7. 9 7 8. 12 11 9. 1. I I POWER Toggles the projector between standby mode and on. See "Starting up the projector" on page 20 and "Shutting down the projector" on page 32 for details. PROJECTOR 2. 3. 4. 5. FREEZE Freezes the projected image. See "Freezing the image" on page 30 for details. AUTO Automatically determines the best picture timings for the displayed image. See "Auto-adjusting the image" on page 25 for details.
Remote control effective range Infra-Red (IR) remote control sensor is located on the front of the projector. The remote control must be held at an angle within 30 degrees perpendicular to the projector's IR remote control sensor to function correctly. The distance between the remote control and the sensor should not exceed 7 meters (~ 23 feet). Appr o x. 15 ° Make sure that there are no obstacles between the remote control and the IR sensor on the projector that might obstruct the infra-red beam.
Positioning your projector Obtaining a preferred projected image size The distance from the projector lens to the screen, the zoom setting (if available), and the video format each factors in the projected image size. 4:3 is the native aspect ratio of this projector. To be able to project a complete 16:9 (widescreen) aspect ratio image, the projector can resize and scale a widescreen image to the projector's native aspect width.
Projection dimensions Refer to "Dimensions" on page 53 for the center of lens dimensions of this projector before calculating the appropriate position. 858:600 screen diagonal Screen Center of lens Projection distance Feet Inches mm Recommended projection distance from screen in mm Average 1.25 2.50 3.75 5.00 6.67 15 30 45 60 80 381 762 1143 1524 2032 600 1200 1800 2400 3200 858:600 screen diagonal There is 3% tolerance among these numbers due to optical component variations.
Connection When connecting a signal source to the projector, be sure to: 1. 2. 3. Turn all equipment off before making any connections. Use the correct signal cables for each source. Ensure the cables are firmly inserted. In the connections shown below, some cables may not be included with the projector (see "Shipping contents" on page 8). They are commercially available from electronics stores.
Connecting Video source devices You can connect your projector to various Video source devices that provide any one of the following output sockets: • Component Video • Video (composite) You need only connect the projector to a Video source device using just one of the above connecting methods, however each provides a different level of video quality.
Connecting a Component Video source device Examine your Video source device to determine if it has a set of unused Component Video output sockets available: • • If so, you can continue with this procedure. If not, you will need to reassess which method you can use to connect to the device. To connect the projector to a Component Video source device: 1.
Connecting a composite Video source device Examine your Video source device to determine if it has a set of unused composite Video output sockets available: • • If so, you can continue with this procedure. If not, you will need to reassess which method you can use to connect to the device. To connect the projector to a composite Video source device: 1. Take a Video cable and connect one end to the composite Video output socket of the Video source device. 2.
Connecting a USB Reader source device To connect the projector to a USB Reader source device: 1. 2. Connect a USB Reader source device to the USB slot on the projector. If you wish to make use of a speaker or other audio input equipment, take a suitable audio cable and connect one end to the audio input socket of the speaker, the other end to the AUDIO OUT socket of the projector. When the audio cable is connected to the AUDIO OUT terminal, the speaker output is muted.
Operation Starting up the projector 1. 2. 3. Plug the AC adapter into the DC IN socket of the projector. Plug one end of the power cord into the AC adapter. Plug the other end of the power cord into a wall socket. Turn on the wall socket switch (where fitted). Check that the Power LED indicator on the projector flashes blue slowly and Ring LED indicator lights blue after power has been applied. 1 3 2 4. 5. 6. 7. Press II Power on the projector or remote control to start the projector.
Using the menus The projector is equipped with On-Screen Display (OSD) menus for making various adjustments and settings. Below is the overview of the OSD menu. Main menu icon Main menu Status Sub-menu Highlight Press MENU/ EXIT to the previous page or to exit. Current input signal To use the OSD menus, please set them to your familiar language first. 1. Press MENU/EXIT on the projector or remote control to turn the OSD menu on. 3. Highlight Language and press / to select a preferred language. 2.
Utilizing the password function For security purposes and to help prevent unauthorized use, the projector includes an option for setting up password security. The password can be set through the On-Screen Display (OSD) menu. For details of the OSD menu operation, please refer to "Using the menus" on page 21. You will be inconvenienced if you activate the power-on lock functionality and subsequently forget the password.
Entering the password recall procedure 1. 2. 3. Press and hold AUTO on the remote control for 3 seconds. The projector will display a coded number on the screen. Write down the number and turn off your projector. Seek help from the local BenQ service center to decode the number. You may be required to provide proof of purchase documentation to verify that you are an authorized user of the projector. Changing the password 1. 2. 3. 4.
Switching input signal The projector can be connected to multiple devices at the same time. However, it can only display one full screen at a time. Be sure the Quick Auto Search function in the SOURCE menu is On (which is the default of this projector) if you want the projector to automatically search for the signals. You can also manually cycle through the available input signals. 1. 2. Press SOURCE on the projector or remote control. A source selection bar displays.
Auto-adjusting the image In some cases, you may need to optimize the picture quality. • Using the remote control Press AUTO. • Using the OSD menu 1. Press MENU/EXIT and then presss / until the DISPLAY menu is highlighted. 2. Press to highlight Auto and press MODE/ ENTER. Within 3 seconds, the built-in Intelligent Auto Adjustment function will re-adjust the values of Frequency and Clock to provide the best picture quality.
Magnifying and searching for details If you need to find the details on the projected picture, magnify the picture. Use the direction arrow keys for navigating the picture. 1. 2. 3. 4. 5. 6. Press MENU/EXIT and then press / until the DISPLAY menu is highlighted. Press to highlight Digital Zoom and press MODE/ENTER. The Zoom bar displays. Press on the projector repeatedly to magnify the picture to a desired size.
2. 3. 4. 5. Real: The image is projected as its original resolution, and resized to fit within the display area. For input signals with lower resolutions, the projected image will display smaller than if resized 4:3 picture to full screen. You could adjust the zoom setting or move the projector towards the screen to increase the image size if necessary. You may also need to refocus the projector after making these 16:9 picture adjustments.
3. 4. 5. Photo mode: Maximizes the purity of RGB colors to provide true-to-life images regardless of brightness setting. It is most suitable for viewing photos taken with an sRGB compatible and properly calibrated camera, and for viewing PC graphic and drawing applications such as AutoCAD. Movie mode: Is appropriate for playing colorful movies, video clips from digital cameras or DVs through the PC input for best viewing in a blackened (little light) environment.
Using Wall Color In the situation where you are projecting onto a colored surface such as a painted wall which may not be white, the Wall Color feature can help correct the projected picture’s color to prevent possible color difference between the source and projected pictures. To use this function, go to the DISPLAY > Wall Color menu and press / to select a color which is the closest to the color of the projection surface.
*About color temperatures: There are many different shades that are considered to be "white" for various purposes. One of the common methods of representing white color is known as the “color temperature”. A white color with a low color temperature appears to be reddish white. A white color with a high color temperature appears to have more blue in it.
Operating in a high altitude environment We recommend you use the High Altitude Mode when your environment is between 1500 m –4000 m above sea level, and temperature is between 5°C–35°C. Do not use the High Altitude Mode if your altitude is between 0 m and 1500 m and temperature is between 5°C and 35°C. The projector will be over cooled, if you turn the mode on under such a condition. To activate the High Altitude Mode: 1.
Personalizing the projector menu display The On-Screen Display (OSD) menus can be set according to your preferences. The following settings do not affect the projection settings, operation, or performance. • • • • Menu display time in the SYSTEM SETUP: Advanced > Menu Settings menu sets the length of time the OSD will remain active after your last key press. The time length ranges from 5 to 30 seconds in 5-second increments. Use / to select a suitable time frame.
Projector menu operation Please note that the on-screen display (OSD) menus vary according to the signal type selected.
Complete menu system Main menu 1. DISPLAY Sub-menu Options Wall Color Off/Light Yellow/Pink/Light Green/Blue/Blackboard Aspect Ratio Full Screen/4:3/16:9/Auto/Real Auto Keystone On/Off Keystone Auto Position Phase H. Size Digital Zoom Picture Mode Brightest/PC/Movie/Photo/ User • Reference Mode Brightest/PC/Movie/Photo/ User • Brightness 2. PICTURE • Contrast • Color • Tint • Sharpness • Color Temperature T1/T2/T3/T4 Save Settings 3.
High Altitude Mode Audio Settings On/Off Mute On/Off Volume 5. SYSTEM SETUP: Advanced Menu Settings Keypad tone On/Off Menu display time 5 sec/10 sec/15 sec/20 sec/25 sec/30 sec Menu position Center/Top-Left/Top-Right/ Bottom-Right/Bottom-Left Change password Security Settings Change Security Settings • Power on On/Off Lock Reset All Settings FAQ-Image and Installation FAQ-Features and Service Current System Status 6.
Description of each menu FUNCTION (default setting/ value) DESCRIPTION (default setting/value) Wall Color Corrects the projected picture’s color when the projection surface is not white. See "Using Wall Color" on page 29 for details. (Off) Aspect Ratio (Auto) Auto Keystone Keystone 1. DISPLAY menu (0) Auto Position There are four options to set the image's aspect ratio depending on your input signal source. See "Selecting the aspect ratio" on page 26 for details.
FUNCTION (default setting/ value) DESCRIPTION (default setting/value) Pre-defined picture modes are provided so you can optimize your Picture Mode projector image set-up to suit your program type. See "Selecting a Reference Mode Brightness 2. PICTURE menu Contrast Color Tint Sharpness Color Temperature picture mode" on page 27 for details. Selects a picture mode that most suits your need for the image quality and further fine-tune the image based on the selections listed on the same page below.
FUNCTION (default setting/ value) 3. SOURCE menu Quick Auto Search See "Switching input signal" on page 24 for details. (On) Test Pattern (Off) Language 4. SYSTEM SETUP: Basic menu Projector Position Selecting On enables the function and the projector displays the grid test pattern. It helps you adjust the image size and focus and check that the projected image is free from distortion. Sets the language for the On-Screen Display (OSD) menus. See "Using the menus" on page 21 for details.
FUNCTION (default setting/ value) DESCRIPTION (default setting/value) High Altitude A mode for operation in high altitude areas. See "Operating in a high altitude environment" on page 31 for details. Mode (Off) Mute (Off) Mutes the sound. See "Adjusting the sound" on page 31 for details. Audio Settings Volume (8) 5. SYSTEM SETUP: Advanced menu Adjust the volume level. See "Adjusting the sound" on page 31 for details. Keypad tone Sets the keypad tone.
FUNCTION (default setting/ value) FAQ-Image and Installation 6. INFORMATION menu FAQFeatures and Service DESCRIPTION (default setting/value) Displays possible solutions to problems you may encounter. Source Shows the current signal source. Picture Mode Shows the selected mode in the PICTURE menu. Current System Status Resolution Shows the native resolution of the input signal. Color System Shows input system format, NTSC, PAL, SECAM, or RGB.
Presenting From a USB Reader The projector is equipped with USB Reader features for displaying photos and movies. Entering USB Reader main screen 1. 2. Connect your USB Reader into the projector. Turn on the projector, if it is not already on. The projector will automatically search for USB Reader signal if the Quick Auto Search function in the SOURCE menu is On. You may also manually select USB Reader signal through the source selection bar. 3. Press SOURCE on the projector or remote control.
4. To stop playback, press RETURN/ . Please convert your video files by using the included ArcSoft Media Converter software. "PC-less" presentations This feature is ideal for business user to present sheets and graphics. 42 1. 2. Open your PowerPoint file. Click "File" and select "Save As". 3. Save the file in your USB drive, select "*.jpg" as file type and then click "Save". 4. 5. Insert your USB Reader into the USB Reader slot on the projector.
Using USB Reader menus The Settings from the USB Reader main screen is equipped with On-Screen Display (OSD) menus for making various adjustments and settings. Below is the overview of the Photo Setting menu. In USB Reader mode, be sure to use keys included in USB READER on the remote control for function control and menu adjustments.
To use USB Reader OSD menus, please set them to your familiar language first. 1. Press SETTING. • 2. 3. Press press 4. Press to enter options and press / to highlight a preferred language. 5. Press SELECT/ to select a preferred language. Press to return back to main menu. Press SETTING* to leave and save the settings. You can also highlight Settings and press SELECT/ to enter system settings. Use / to highlight Custom Setup menu. 6. 7.
USB Reader menu operation USB Reader menu system Please note that the on-screen display (OSD) menus vary according to the signal type selected. Main menu 1. Photo Setting Sub-menu Options Interval Time 5 Sec./10 Sec./30 Sec./1Min./3 Min./Off Transition Effect No Effect/Blind Vertical/Blind Horizontal/Color Ration Ver/ Color Ration Hor/Block 1- 9/ Fade In Fade Out/Random Slide Mode 2. Auto Play Normal/Motion Photo On/Off Movie On/Off Volume 0 - 10 OSD Language 3.
Description of each menu FUNCTION 1. Photo Setting menu (default setting/ value) DESCRIPTION (default setting/value) Interval Time (10 Sec.) Transition Effect (No Effect) Sets the length of time for display of each image. Slide Mode (Normal) Selects slide playing mode. Photo (Off) Sets to whether to activate the automatic display function after entering the "Photo" mode.
USB Reader support format Extension Detail .jpeg Baseline JPEG WxH = 14592x12288, Up to 179 Mega-pixel Support format: 444/ 440/ 422/ 420/ Grayscale max. file size = 40MB Progressive JPEG Up to 4 Mega-pixel Support format: 444/ 440/ 422/ 420/ Grayscale max. file size = 40MB Photo .bmp Up to 20 Mega-pixel Support format: 444/ 440/ 422/ 420/ Grayscale max. file size = 40MB .gif WxH = 14592x12288, Up to 179 Mega-pixel Support format: version 87a/ version 89a (except animation & interlace) max.
Movie Extension Video Codec Audio Codec Detail .avi Motion JPEG PCM Baseline JPEG: VGA @ 30fps .mpg MPEG-1 MPEG layer 2 NTSC: max. 720x480 @ 30fps PAL: max. 720x576 @ 25fps Video files can be converted by using the included ArcSoft Media Converter software.
Maintenance Care of the projector Your projector needs little maintenance. The only thing you need to do on a regular basis is to keep the lens clean. Never remove any parts of the projector except the lamp. Contact your dealer if other parts need replacing. Cleaning the lens Clean the lens whenever you notice dirt or dust on the surface. • • Use a canister of compressed air to remove dust.
Indicators Status / Problems Standby Power on Cooling Fan1 error Fan2 error Temperature error 50 Maintenance LED indicators Ring Blue Blue Blue Blue slow flash Blue slow flash Blue slow flash Key Power Blue slow flash Blue Blue fast flash Red fast flash Red slow flash Red Off On Off Off Off Off
Troubleshooting The projector does not turn on. Cause Remedy There is no power from the power cable. Plug the AC adapter into the DC IN socket on the projector, plug the power cord into the AC inlet on the AC adapter, plug the power cord into the power outlet. If the power outlet has a switch, make sure that it is switched on. Attempting to turn the projector on again during the cooling process. Wait until the cooling down process has completed.
Specifications Projector specifications All specifications are subject to change without notice. General Product name Model name Digital Projector GP1 Optical Resolution Display system Lens F/Number Lamp 858 x 600 SVGA 1-CHIP DMD F = 2, f = 17.67 mm LED Electrical Power supply Power consumption 19V DC, 4.74A, 50/60 Hz (Automatic) 60W (typical); <1W(Standby) Mechanical Dimensions Weight 136 mm (W) x 57 mm (H) x 120 mm (D) Approx. 1.
Dimensions 136 mm (W) x 57 mm (H) x 120 mm (D) 136 120 57 28.4 35.3 Timing chart Supported timing for PC input Mode Resolution Vertical Frequency (Hz) Horizontal Frequency (kHz) 60 72 75 85 70 85 56 60 72 75 85 60 70 75 85 60 60 70 75 60 60 60 67 75 75 31.50 37.90 37.50 43.30 31.50 37.90 35.20 37.90 48.10 46.90 53.70 48.40 56.50 60.00 68.70 35.82 37.50 63.80 67.50 49.70 60.00 63.98 35 49.72 60.
Warranty and Copyright information Limited warranty BenQ warrants this product against any defects in material and workmanship, under normal usage and storage. Proof of purchase date will be required with any warranty claim. In the event this product is found to be defective within the warranty period, BenQ's only obligation and your exclusive remedy shall be replacement of any defective parts (labor included).
Regulation statements FCC statement CLASS B: This equipment generates, uses and can radiate radio frequency energy and, if not installed and used in accordance with the instructions, may cause harmful interference to radio communications. However, there is no guarantee that interference will not occur in a particular installation.
Accessibility Requirements for Rehabilitation Act of 1973, Section 508 BenQ’s commitment to accessible products allows us to support government in making accessible technology choices BenQ’s LCD monitors and projectors are compliant with Section 508 guidelines by including the assistive features as below: 56 • BenQ’s monitors have colored “Power” indicators. While the indicator shows green, it means that the monitor is using the full power.