
Owners manual


Introduction 13
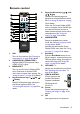
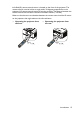
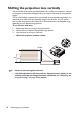
Remote control
1. ON
Turns on the projector. See "Starting up
the projector" on page 28 for details.
2. COMPUTER 1/COMPUTER 2
Displays RGB (PC)/Component video
(YPbPr/ YCbCr) signal.
3. MENU/EXIT
Turns on the On-Screen Display (OSD)
menu. Goes back to previous OSD
menu, exits and saves menu settings. See
"Using the menus" on page 33 for details.
4. Keystone/Arrow keys ( / Up, /
Down)
Displays 2D Keystone page and adjusts
the vertical keystone values. See
"Correcting 2D keystone" on page 30 for
details.
5. Keystone/Arrow keys ( / Left,
/ Right)
Displays 2D Keystone page and
adjusts the horizontal keystone values.
See "Correcting 2D keystone" on page
30 for details.
When the On-Screen Display (OSD)
menu is activated, the #4, and #5 keys
are used as directional arrows to
select the desired menu items and to
make adjusents. See "Using the
menus" on page 33 for details.
6. MODE/ENTER
Selects an available picture setup.
mode. See "Selecting a picture mode"
on page 40 for details.
Activates the selected On-Screen
Display (OSD) menu item. See "Using
the menus" on page 33 for details.
7. Eco Blank
Press the Eco Blank button to turn
off the image for a period of time with
70% lamp power saving. Press again to
restore the image. See "Hiding the
image" on page 45 for details.
8. VOLUME + / -
Adjusts the microphone’s sound level.
See "Adjusting the sound level" on
page 46 for details.
9. QUICK INSTALL
A menu shortcut that
includes Test Pattern,
Projector Installation,
2D Keystone and
Corner Fit.
10. Freeze
Freezes the projected image. See
"Freezing the image" on page 45 for
details.
11. PIP
Not operational on this projector.
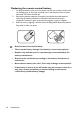
8
18
4
9
24
23
1
2
3
5
6
7
4
10
12
13
14
15
16
17
5
19
20
22
11
21