SX920/SW921/SU922 Digital Projector User Manual V 1.
English Table of contents Important safety instructions ............................3 Overview................................6 Shipping contents...................................... 6 Remote control batteries....................... 7 Remote control operation ..................... 7 Projector features .................................... 8 Projector exterior view .......................... 9 Controls and functions..........................11 Control panel ...............................................
Important safety instructions Your projector is designed and tested to meet the latest standards for safety of information technology equipment. However, to ensure safe use of this product, it is important that you follow the instructions mentioned in this manual and marked on the product. 1. Please read this user manual before you operate your projector. Keep this manual in a safe place for future reference. 2. Always place the projector on a level, horizontal surface during operation. 4.
English 5. Do not block the vents holes while the projector 9. Do not look straight into the projector lens during operation. It may harm your sight. is on (even in standby mode): - Do not cover the projector with any item; - Do not place the projector on a blanket, bedding or any other soft surface. 6. In areas where the mains power supply voltage 10. Do not operate the projector lamp beyond the may fluctuate by ±10 volts, it is recommended rated lamp life.
English 13. Never attempt to replace the lamp assembly until Moisture condensation the projector has cooled down and is unplugged Never operate the projector immediately after from the power supply. moving it from a cold location to a hot location. When the projector is exposed to such a change in temperature, moisture may condense on the crucial internal parts. To prevent the projector from possible damage, do not use the projector for at least 2 hours when there is a sudden change in temperature. 14.
English Overview Shipping contents Carefully unpack and verify that you have the items below. Some of the items may not be available depending on your region of purchase. Please check with your place of purchase. Some of the accessories may vary from region to region. The warranty card is only supplied in some specific regions. Please consult your dealer for detailed information.
1. To open the battery cover, turn the remote control over to view its back, push on the finger grip on the cover and slide it up in the direction of the arrow as illustrated. The cover will slide off. 2. Remove any existing batteries (if necessary) and install two new AAA batteries observing the battery polarities as indicated in the base of the battery compartment. Positive (+) goes to positive and negative (-) goes to negative. 3.
English Projector features • • • • • • • 8 WUXGA resolution The projector is HDTV compatible with WUXGA resolution, providing 1920 x 1200 pixels at its native resolution. (for model SU922) High picture quality The projector provides excellent picture quality due to its high resolution, excellent home theater brightness, super high contrast ratio, vivid color and rich gray-scale reproduction.
English Projector exterior view Front and upper side view 1 6 2 7 3 8 4 5 1. Control panel (See "Control panel" on page 11 for details.) 2. Lamp cover 3. Speaker Grill 4. Projection lens 5. Front IR sensor 6. LED indicator 7. Lens adjustment panel cover (See "Control panel" on page 11 for details.) 8. Vent (cold air intake) Rear view See "Connecting to video equipment" on page 19 for connection details. 9 10 11 12 13 22 23 14 15 16 17 18 19 20 21 24 25 26 9. AC Power cable inlet 10.
English Under view 27. Adjustable feet 28. Ceiling mount holes 29.
English Controls and functions Control panel 9. ECO BLANK Used to hide the screen image. 10. MODE/ENTER When On-Screen Display (OSD) is off, sequentially selects a predefined picture setting available for each input. 1 2 3 11 12 11. MENU/EXIT Toggles the On-Screen Display (OSD) menu on and off. 7 4 5 6 8 9 10 13 When OSD is on, enacts to selected OSD menu item. 14 Goes back to previous OSD menus, exits and saves any changes made using the On-Screen Display (OSD) menu. 12.
English Remote control 1 1 2 2 12 3 4 5 13 6 7 14 8 15 9 16 17 18 19 10 3 4 5 6 8 9 10 8. QUICK INSTALL Displays the quick install page. 12 13 9. FREEZE Freezes the projected image. 14 10. NETWORK SETTING Enters network settings directly. 15 16 17 18 19 11 11 This key is "TEST" for remote controls in the Japan region. Its function is the same as Quick Install. 11. Numeric buttons Enters numbers in network settings.
English Positioning your projector Choosing a location Your projector is designed to be installed in one of four possible installation locations. Your room layout or personal preference will dictate which installation location you select. Take into consideration the size and position of your screen, the location of a suitable power outlet, as well as the location and distance between the projector and the rest of your equipment. 1. Front: 3.
English Obtaining a preferred projected image size The distance from the projector lens to the screen, the zoom setting, and the video format each factors in the projected image size. The diagrams from pages 15 to 17 offer recommendations on projection distances and screen sizes. This projector is equipped with a movable lens. See "Shifting the projection lens" on page 18 for details.
English Projection dimensions Installation for a 16:10 ratio screen Ceiling Installation Floor Installation : Screen : Screen : Center of lens : Center of lens SU922/SW921 The screen aspect ratio is 16:10 and the projected picture is 16:10 • SU922 Screen dimensions Projection distance [cm] Diagonal [inch (mm)] Height [cm] Width [cm] Min distance Average Max distance Lowest/ Highest lens position [cm
English • SW921 Screen dimensions Diagonal [inch (mm)] Height [cm] Projection distance [cm] Width [cm] Min distance Average Max distance Lowest/ Highest lens position [cm] 60 (1524) 81 129 145 189 233 6.1 70 (1778) 94 151 169 221 272 7.1 80 (2032) 108 172 193 252 311 8.1 90 (2286) 121 194 218 283 349 9.1 100 (2540) 135 215 242 315 388 10.1 110 (2794) 148 237 266 346 427 11.1 120 (3048) 162 259 290 378 466 12.
Ceiling Installation Floor Installation English Installation for a 4:3 ratio screen : Screen : Screen : Center of lens : Center of lens SX920 The screen aspect ratio is 4:3 and the projected picture is 4:3 Screen dimensions Diagonal [inch (mm)] Height [cm] Projection distance [cm] Width [cm] Min distance Average Max distance Lowest/ Highest lens position [cm] 60 (1524) 91 122 172 224 275
English Shifting the projection lens The lens shift control provides flexibility for installing your projector. It allows the projector to be positioned off the center of the screen. The lens shift is expressed as a percentage of the projected image height or width. It is measured as an offset from the projected image’s vertical or horizontal center. You can shift the projection lens in vertical directions within the allowable range depending on your desired image position.
You can connect the projector to any type of video equipment, such as a DVD or Blu-ray player, digital tuner, cable or satellite decoder, video game console or digital camera. You can also connect it to a desktop PC, a laptop PC, or Apple Macintosh system. You can connect the projector to a source device using just one of the connecting methods; however, each provides a different level of video quality.
English Connecting MHL devices MHL (Mobile High-definition Link) supports uncompressed HD video (1080/30p) and audio (7.1 surround sound) transmission between compatible devices like smartphones, tablets and other mobile devices. It provides pure digital viewing and listening experience. You should use an MHL cable when making connection between the projector and MHL devices. MHL device: Smartphones, Tablets, etc. MHL cable Not all mobile devices are MHL compatible.
The audio connections are provided for informational purposes only. You can also connect the separate audio cable to a suitable audio amplifier. Audio cable or AV equipment Video cable Speakers Audio cable • If you have already made a Component Video connection between the projector and the video source device, you need not connect to this device again using a composite Video connection as this makes an unnecessary second connection of poorer picture quality.
English Connecting a computer Connect the projector to a computer with a VGA cable. Audio cable VGA cable Laptop or desktop computer Speakers Audio cable Many laptops do not turn on their external video ports when connected to a projector. Usually a key combination like Fn + F3 or CRT/LCD key turns the external display on/off. Locate a function key labeled CRT/LCD or a function key with a monitor symbol on the laptop. Press Fn and the labeled function key simultaneously.
English Using the projector Preparations 1. Plug in and turn all of the connected equipment on. 2. If not already in, plug the supplied power cable into the AC inlet on the rear of the projector. 3. Plug the power cable into a wall power outlet and turn the wall switch on. Please use the original accessories (e.g. power cable) only with the device to avoid possible dangers such as electric shock and fire. Turning the projector on Follow the steps below 1.
English Selecting an input source The projector can be connected to multiple equipment at the same time. When the projector is first turned on, it will attempt to reconnect with the input source which was in use when the projector was last shut down. To select the video source: • Using the remote control Press one of the Source keys on the remote control. • Using the OSD menu Press SOURCE and then press and press MODE/ENTER.
English Using the menus The projector is equipped with multilingual On-Screen Display (OSD) menus for making various adjustments and settings. Below is the overview of the OSD menu. The OSD screenshots below are for reference only, and may differ from the actual design. Main menu icon Main menu Picture Highlight Sub-menu Picture Mode Cinema Reference Mode Cinema Brightness 50 Contrast 50 Color 50 Tint 0 Sharpness 3 Status Advanced...
English Securing the projector Using a security cable lock The projector has to be installed in a safe place to prevent theft. Otherwise, purchase a lock, such as the Kensington lock, to secure the projector. You can locate a Kensington lock slot on the projector. See item 23 on page 9 for details. A Kensington security cable lock is usually a combination of key(s) and the lock. Refer to the lock's documentation for finding out how to use it.
If the password function is activated, you will be asked to enter the six-digit password every time you turn on the projector. If you enter the wrong password, the password error message is displayed lasting for three seconds, and the Input Password page follows. You can retry by entering another six-digit password, or if you did not record the password in this manual, and you absolutely do not remember it, you can use the password recall procedure.
English Changing the password 1. In the System Setup: Advanced > Security Settings menu, press / to highlight Change Password and press MODE/ENTER. The Change Password page is displayed. 2. Enter the old password. • • If the password is correct, the message "Input New Password" is displayed. If the password is incorrect, the password error message is displayed lasting for three seconds, and the message "Input Current Password" is displayed for your retry.
English Adjusting the projected image Adjusting the projection angle There are two adjuster feet on the bottom of the projector. These can be used if necessary to change the projection angle. Screw the feet in or out as appropriate to aim and level the projection angle. If the screen and the projector are not perpendicular to each other, the projected image becomes vertical trapezoidal. To correct this problem, see "Correcting picture distortion" on page 30 for details.
English Correcting picture distortion Keystoning occurs when the projector is not perpendicular to the screen and is where the projected picture displays visible as a trapezoid shape like either of the following: • • Two parallel sides (left and right, or top and bottom) but is noticeably wider on either side. No parallel sides. To correct the picture’s shape, you can perform the following steps. 1. Adjust the projection angle.
English Using Corner Fit function Manually adjust four corners of the image by setting the horizontal and vertical values. 1. 2. 3. Press MENU/EXIT and then press / until the DISPLAY menu is highlighted. Press to highlight Corner Fit and press MODE/ENTER. The Corner Corner Fit Fit correction page displays. Press / / / to select one corner and press MODE/ENTER. Back Enter 4. 5. 6. Press / to adjust horizontal values. Press / to adjust vertical values.
English Using the preset and user modes Selecting a preset mode The projector is preset with several pre-defined picture modes so that you can choose one to suit your operating environment and input source picture type. To select a picture mode that suits your need: • Press MODE/ENTER repeatedly until your desired mode is selected. • Using the OSD menu 1. Press MENU/EXIT and then press / until the Picture menu is highlighted. 2. Press to highlight Picture Mode. 3.
Setting the User 1/User 2 mode There are two user-definable modes if the current available picture modes are not suitable for your need. You can use one of the picture modes (except the selected User mode) as a starting point and customize the settings. 1. In the Picture menu, highlight Picture Mode and press 2. Press to highlight Reference Mode. / to select User 1 or User 2 mode. This function is only available when User 1 or User 2 mode is selected up in the Picture Mode sub-menu item. 3.
English Fine-tuning the picture quality No matter what picture mode you have selected, you are able to fine-tune those settings to fit every presentation purpose. Those adjustments will be saved to the preset mode you are at when you exit the OSD menu. Adjusting Brightness Highlight Brightness in the Picture menu and adjust the values by pressing / on the projector or remote control. 30 50 70 The higher the value, the brighter the picture. And the lower the setting, the darker the picture.
English Advanced picture quality controls There are more advanced functions in the Picture > Advanced... menu to be adjusted to your preference. To save the settings, just press MENU/EXIT to leave the OSD menu. Setting Black Level Highlight Black Level and press / on the projector or remote control to select 0 IRE or 7.5 IRE. The grayscale video signal is measured in IRE units. In some areas which use NTSC TV standard, the grayscale is measured from 7.
English Setting a preferred color temperature To set a preferred color temperature: 1. Highlight Color Temperature and select Cool, Normal, Warm or Lamp Native by pressing / on the projector or remote control. 2. Press to highlight Color Temperature Fine Tuning and press MODE/ENTER. The Color Temperature Fine Tuning page is displayed. 3. Press / to highlight the item you want to change and adjust the values by pressing / .
To adjust and store the settings: 1. In the Picture menu, highlight Advanced... and press MODE/ ENTER. Then, highlight 3D Color Management and press Yellow MODE/ENTER. The 3D Color Management page is displayed. Green Red 2. Highlight Primary Color and press / to select a color from among Red, Green, Blue, Cyan, Magenta, and Yellow. Cyan 3. Press to highlight Hue and press / to select the color range Magenta you wish to make adjustment.
English Selecting the aspect ratio The "aspect ratio" is the ratio of the image width to the image height. The default for this projector is 16:10 while digital TV and Blu-ray discs are usually in 16:9 ratio, and most analog TV signals and DVDs are in 4:3 ratio. With the advent of digital signal processing, digital display devices like this projector can dynamically stretch and scale the image output to a different aspect than that of the image input source.
SX920 English About the aspect ratio SU922/ SW921 1. Auto: Scales a picture proportionally to fit the projector's native resolution in its horizontal or vertical width. This makes the most use of the screen and maintains the aspect ratio of a picture when projecting images that are neither 4:3 nor 16:10 ratio. 2. 4:3: Scales a picture so that it is displayed in the center of the screen with a 4:3 aspect ratio.
English Setting a wall color In the situation where you are projecting onto a colored surface such as a painted wall which may not be white, the Wall Color feature can help correct the projected picture’s color to prevent possible color difference between the source and projected pictures. There are several precalibrated colors to choose from: Light Yellow, Pink, Light Green, Blue, and Blackboard. To select wall color: 1. Press MENU/EXIT and then press / until the Display menu is highlighted. 2.
The sound adjustments made (such as functions shown below) will have an effect on the projector speaker(s). Be sure you have made a correct connection to the projector audio input. See "Connecting to video equipment" on page 19 for how the audio input is connected. • Each time when you select a different source, the projector also changes the sound settings to which was last set for that particular source. • Sound adjustments cannot be made during Quick Search.
English Using the teaching templates The projector provides several preset patterns for various teaching purposes. To activate the pattern: 1. Press MENU/EXIT to open the OSD menu and press / to highlight the Display menu. 2. Press to highlight Teaching Template and press MODE/ENTER. 3. Press / to highlight Blackboard or Whiteboard. 4. Press / to select the desired pattern and press MODE/ENTER.
This projector provides two lamp modes for different purposes: Lamp mode Normal (The lamp is used in normal mode) User benefit • • • • Economic • (The lamp is used in economic mode) Suitable environment Delivering bright and clear images Large, well lit meeting rooms Suitable for high-ambient-light environments Allowing continuous and non-stop operation under or auditoriums critical situations Extending the lamp life Allowing continuous and non-stop operation under Small-mid boardrooms critical situati
English Controlling the projector through a Wired LAN environment Wired LAN allows you to manage the projector from a computer using a web browser when the computer and the projector are properly connected to the same local area network. Configuring the Wired LAN If you are in a DHCP environment: 1. Take a RJ45 cable and connect one end to the RJ45 LAN input jack of the projector and the other end to the RJ45 port.
Once you have the correct IP address for the projector and the projector is on or in standby mode, you can use any computer that is on the same local area network to control the projector. 1. Enter the address of the projector in the address bar of your browser and click Go. 2. The remote network operation page opens. This page allows you to operate the projector as if you were using the remote control or control panel on the projector.
English The tools page allows you to manage the projector, configure the LAN control settings and secure access of remote network operation on this projector. i iii ii iv v i. You can name the projector, keep track of its location and the person in charge of it. ii. You can adjust the LAN Control Settings. iii. Once set, access to the remote network operation on this projector has been passwordprotected. iv. Once set, access to the tools page has been password-protected.
English The info page displays the information and status of this projector. Press Exit to go back to the remote network operation page. For more information, visit http://www.crestron.com & www.crestron.com/getroomview.
English Operating in a high altitude environment We recommend that you activate High Altitude when your environment is higher than 1500 meters (around 4920 feet) above sea level, or whenever the projector will be used for extended periods of time (>10 hours) without shutdown. To activate High Altitude: 1. 2. 3. 4. Press MENU/EXIT and then press / until the System Setup: Advanced menu is highlighted. Press to highlight High Altitude. Press / to select On. A confirmation message is displayed.
English Turning the projector off To turn the projector off, press POWER ( II ) on the projector or OFF I I on the remote control and a warning message appears. Press POWER/OFF ( II ) again. • The Power indicator light flashes orange and the fans run for about two minutes to cool the lamp. The projector will not respond to any commands until the cooling process is complete. After turning off the projector, do NOT unplug the projector until the cooling process is complete and the fans stop running.
English On-Screen Display (OSD) menus On-Screen Display (OSD) structure Please note that the on-screen display (OSD) menus vary according to the signal type selected. Main menu Sub-menu Options Picture Mode Bright/Presentation/sRGB/Cinema/(3D)/User 1/User 2 Reference Mode Bright/Presentation/sRGB/Cinema/User 1/User 2 Brightness 0~50~100 Contrast 0~50~100 Color 0~50~100 Tint 0~50~100 Sharpness 0–15 Black Level 0 IRE/7.
Sub-menu Options Wall Color Off/Light Yellow/Pink/Light Green/Blue/ Blackboard Aspect Ratio Auto/Real/4:3/16:9/16:10 Overscan Adjustment 0/1/2/3 2D Keystone Top Left/Top Right/Bottom Left/ Bottom Right Corner Fit Display 3D Mode 3D Teaching Template 3D Sync Invert Disable/Invert Save 3D Settings 3D Settings 1/3D Settings 2/ 3D Settings 3 Apply 3D Settings 3D Settings 1/3D Settings 2/ 3D Settings 3/Off Blackboard Off/Letter Formation/Worksheet/Coordinate Chart Whiteboard Off/Letter For
English Main menu Sub-menu Options High Altitude On/Off Lamp Mode Normal/Economic Reset Lamp Timer Reset/Cancel Lamp Usage Time Lamp Settings Normal Mode Lamp Timer Economic Mode Equivalent Lamp Hour Security Settings Power On Lock On/Off Change Password 2400/4800/9600/14400/19200/38400/ 57600/115200 Baud Rate System Setup: Advanced Closed Caption Closed Caption Enable On/Off Caption Version Network Standby Settings Network Settings CC1 / CC2 / CC3 / CC4 Enable Network Standby Mode
Function Description Pre-defined picture modes are provided so you can optimize your projector picture set-up to suit your program type. See "Selecting a preset mode" on Picture Mode page 32 for details. Selects a preset mode that most suits your need for the picture quality and further fine-tune the picture based on the selections listed below. See "Setting Reference Mode the User 1/User 2 mode" on page 33 for details. Adjusts the brightness of the picture.
English Display menu Function Description Corrects the projected picture color when the projection surface is not white. Wall Color See "Setting a wall color" on page 40 for details. There are several options to set the aspect ratio depending on your input Aspect Ratio source. See "Selecting the aspect ratio" on page 38 for details. Conceals the poor picture quality in the four edges. You can also manually press / to decide how much to be concealed.
Function Quick Search HDMI Format Description Allows the projector to search automatically for input sources. If the source scan is On, the projector will scan for input sources until it acquires a signal. If the function is not activated, the projector selects the last used input source. Selects an input source type for the HDMI signal. Auto is the default and recommended setting. You can also manually select the source type. The different source types carry different standards for the brightness level.
English System Setup: Basic menu Function Language Projector Installation Description Sets the language for the On-Screen Display (OSD) menus. See "Using the menus" on page 25 for details. The projector can be installed on a ceiling or behind a screen, or with one or more mirrors. See "Choosing a location" on page 13 for details. Menu Display Time Sets the length of time the OSD will remain active after your last key press. The range is from 5 to 30 seconds in 5-second increments.
Function High Altitude English System Setup: Advanced menu Description A mode for operation in areas like high altitude or high temperature. See "Operating in a high altitude environment" on page 48 for details. Lamp Mode Selects the projector lamp power among Normal and Economic modes. See "Setting the lamp mode" on page 43 for details. Reset Lamp Timer Lamp Settings Once the lamp is renewed, select Reset to return the lamp timer to "0". See "Resetting the lamp timer" on page 64 for details.
English Network Selecting On enables the function. The projector is able to provide the network function when it is in standby mode. Monitor Out Standby Settings Selecting On enables the function. The projector can output a VGA signal when it is in standby mode and the PC jack is correctly connected to devices. See "Connecting a monitor" on page 22 for how to make the connection. Audio Pass Through Press / to choose the source that you wish to use in operation mode.
English Additional information Care of the projector Your projector needs little maintenance. The only thing you have to do on a regular basis is keep the lens clean. Never remove any parts of the projector except the lamp. Contact your dealer or local customer service center if the projector fails to operate as expected. Cleaning the lens Clean the lens whenever you notice dirt or dust on the surface.
English Lamp information Getting to know the lamp hour When the projector is in operation, the duration (in hours) of lamp usage is automatically calculated by the built-in timer. To obtain the lamp hour information: 1. Press MENU/EXIT and then press / until the System Setup: Advanced menu is highlighted. 2. Press to highlight Lamp Settings and press MODE/ENTER. The Lamp Settings page is displayed. 3. Press to highlight Lamp Timer and press MODE/ENTER. The Lamp Timer page is displayed. 4.
English Timing of replacing the lamp When the Lamp indicator lights up red or a message appears suggesting it is time to replace the lamp, please install a new lamp or consult your dealer. An old lamp may cause a malfunction in the projector and in some instances the lamp may explode. Go to http://www.BenQ.com for a replacement lamp. The Lamp indicator light and Temperature warning light will light up if the lamp becomes too hot. Turn the power off and let the projector cool for 45 minutes.
English Replacing the lamp 62 • To reduce the risk of electrical shock, always turn the projector off and disconnect the power cable before changing the lamp. • To reduce the risk of severe burns, allow the projector to cool for at least 45 minutes before replacing the lamp. • To reduce the risk of injuries to fingers and damage to internal components, use caution when removing lamp glass that has shattered into sharp pieces.
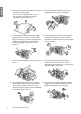
Turn the power off and disconnect the 4. projector from the power outlet. Turn off all connected equipment and disconnect all other cables. See "Turning the projector off" on page 49 for details. 2. Loosen the screw on the lamp cover. Loosen the screw that hold the lamp to the projector. Disconnect the lamp connector from the projector. English 1. 1 2 2 1 3. Remove the lamp cover. 5. Lift the handle so that it is perpendicular to the lamp.
English 6. Insert the replacement lamp. Make sure it is pushed fully and firmly in place. 7. Ensure the handle is fully locked in place. Tighten the screw securing the lamp box. 2 8. Replace the lamp cover. 9. Tighten the screws on the lamp cover. 10. Reapply power and turn the projector back on. 1 Notes • Please be careful to not over-tighten the screws. • Loose screws may cause a bad connection, which could result in malfunction.
Light TEMP LAMP Off Off Stand-by mode. Off Off Powering up. Off Off Normal operation. Off Off Normal power-down cooling.
English Troubleshooting Problem The projector does not turn on. Cause Remedy There is no power from the power cable. Plug the power cable into the AC inlet on the rear of the projector, and plug the power cable into to the power outlet. If the power outlet has a switch, make sure that it is switched on. (See page 23.) Attempting to turn the projector on again during the cooling process. Wait until the cooling down process has completed. The lamp cover is not securely attached.
English Specifications All specifications are subject to change without notice. Optical Projection system Native resolution Lens Projection screen size Lamp Single-chip DLP™ system SX920: 0.55" DLP (1024 x 768); SW921: 0.65" DLP (1280 x 800); SU922: 0.67" DLP (1920 x 1200) F = 2.45 to 3.07, f = 15.78 to 25.
English Dimensions 411.4 mm x 267.5 mm x 118.4 mm (W x D x H) 411.4 267.5 118.4 Unit: mm Ceiling mount installation 291.20 3.5 31 164.1 65.94 172.26 35.74 Ceiling mount screws: M5 (Max. L = 25 mm; Min. L = 20 mm) 289.7 75.53 549.7 407.7 582.7 Unit: mm 205.94 135 411.88 68 Additional information 267.
Supported timing for PC input Format 640 x 480 720 x 400 800 x 600 1024 x 768 1152 x 864 1024 x 576**** 1024 x 600**** 1280 x 720 1280 x 768 1280 x 800 1280 x 1024 1280 x 960 1360 x 768 1440 x 900 1400 x 1050 1600 x 1200 1680 x 1050 1920 x 1200 Resolution VGA_60* VGA_72 VGA_75 VGA_85 720 x 400_70 SVGA_60* SVGA_72 SVGA_75 SVGA_85 SVGA_120** (Reduce Blanking) XGA_60* XGA_70 XGA_75 XGA_85 XGA_120** (Reduce Blanking) 1152 x 864_75 Notebook Timing Notebook Timing 1280 x 720_60* 1280 x 768_60* WXGA_60* WXGA
English 640 x 480@67Hz (MAC13) 832 x 624@75Hz (MAC16) 1024 x 768@75Hz (MAC19) 1152 x 870@75Hz (MAC21) 1920 x 1080@60Hz 1920 x 1200@60Hz 640 x 480@67Hz 66.667 35 30.24 832 x 624@75Hz 74.546 49.722 57.28 1024 x 768@75Hz 74.93 60.241 80 1152 x 870@75Hz 75.06 68.68 100 60 67.5 148.5 59.95 74.038 154 1920 x 1080_60 (Reduce Blanking) 1920 x 1200_60 (Reduce Blanking) * Supported timing for 3D signal with Frame Sequential, Top-Bottom and Side-by-Side format.
Format Resolution Refresh rate (Hz) H. Freq. (KHz) Pixel Freq. (MHz) 480i 720 x 480* 59.94 15.73 13.5 480p 720 x 480* 59.94 31.47 27 576i 720 x 576 50 15.63 13.5 576p 720 x 576 50 31.25 27 720/50p 1280 x 720 50 37.5 74.25 720/60p 1280 x 720* 60 45 74.25 1080/50i 1920 x 1080 50 28.13 74.25 1080/60i 1920 x 1080 60 33.75 74.25 1080/24P 1920 x 1080 24 27 74.25 1080/25P 1920 x 1080 25 28.13 74.25 1080/30P 1920 x 1080 30 33.75 74.
English Warranty and Copyright information Warranty BenQ warrants this product against any defects in material and workmanship, under normal usage and storage. Proof of purchase date will be required with any warranty claim. In the event this product is found to be defective within the warranty period, BenQ’s only obligation and your exclusive remedy shall be replacement of any defective parts (labor included).