Digitale projector Gebruikershandleiding Home Entertainment-reeks I TK800 V 1.
Informatie over garantie en auteursrechten Beperkte garantie De garantie van BenQ voor dit product heeft betrekking op productie- en materiaalfouten die zich bij normaal gebruik van het apparaat voordoen. Wanneer u een beroep wilt doen op de garantie, dient u een geldig aankoopbewijs te overleggen. Wanneer dit product tijdens de garantieperiode defect raakt, is BenQ alleen verplicht de defecte onderdelen te vervangen (inclusief arbeidsloon).
Inhoud Informatie over garantie en auteursrechten ..................................................................... 2 Belangrijke veiligheidsinstructies ........................................................................................ 4 Inleiding ................................................................................................................................. 7 Inhoud van de verpakking .................................................................................................
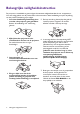
Belangrijke veiligheidsinstructies De projector is ontwikkeld en getest volgens de nieuwste veiligheidsstandaards voor ict-apparatuur. Voor een veilig gebruik van dit product dient u de instructies in deze handleiding en op de verpakking van het product nauwkeurig op te volgen. 1. Lees deze handleiding aandachtig door voordat u de projector gaat gebruiken. Bewaar de handleiding voor toekomstig gebruik. 5. De lamp wordt erg heet tijdens het gebruik.
8. Gebruik de lamp niet langer dan de voorgeschreven levensduur. Als u de lamp toch langer gebruikt, kan deze in zeldzame gevallen breken. 9. Zorg dat de stekker van de projector uit het stopcontact is verwijderd voordat u de lamp of elektronische onderdelen vervangt. 12. Blokkeer het ventilatierooster niet. - Plaats deze projector niet op een deken, beddengoed of op een ander zacht oppervlak. - Bedek deze projector niet met een doek of met andere voorwerpen.
16. Wanneer u de projector gebruikt, neemt u mogelijk warme lucht en een bepaalde geur waar bij het ventilatierooster. Dit is een normaal verschijnsel. 17. Plaats geen vloeistoffen in de buurt van of op de projector. Als er vloeistof in de projector wordt gemorst, werkt deze mogelijk niet meer. Als de projector nat wordt, trekt u de stekker uit het stopcontact en belt u BenQ voor reparaties. Risicogroep 2 1.
Inleiding Inhoud van de verpakking Pak alles voorzichtig uit en controleer of u alle onderstaande items aanwezig zijn. Wanneer een of meerdere van deze items ontbreken, dient u contact op te nemen met de leverancier. Standaardaccessoires Projector Afstandsbediening met batterijen Netsnoer Cd met gebruikershandleiding Garantiekaart* Digital Quick Projector Start Guide Snelgids • De meegeleverde accessoires zijn geschikt voor uw regio, maar verschillen mogelijk van die in de afbeeldingen.
Buitenkant van de projector 7 8 1 10 11 2 12 1314 15 16 17 9 3 3 4 5 6 3 20 19 18 3 3 3 20 20 20 20 3 20 3 20 20 1. Lampdeksel 14. USB Mini-B-poort (voor firmware-upgrades) 2. Ventilatie (luchtuitlaat) 15. RS-232-besturingspoort In combinatie met een pc of geautomatiseerde thuisbioscoop. 3. Verstelvoetjes 4. Projectielens 5. IR-sensor voor afstandsbediening 6. Lensklep 7. Extern besturingspaneel Zie Bedieningselementen en functies op pagina 9. 8.
Bedieningselementen en functies Projector en afstandsbediening Alle toetsindrukken die in dit document zijn beschreven, zijn beschikbaar op de afstandsbediening of op de projector. 1 2 6 7 8 9 10 3 4 5 1. POWER-indicator/TEMP (waarschuwingslampje temperatuur)/LAMP-indicator Zie Indicatoren op pagina 39. 2. AAN/UIT Dit zet de projector aan of op stand-by. ON/ OFF Dit zet de projector aan of op stand-by. 3. OK Hiermee bevestigt u het geselecteerde menu-item in het On-Screen Display (OSD)-menu. 4.
. MODE, PIC MODE 18. Kies een beschikbare beeldinstellingsmodus. 11. LIGHT Zet de verlichting van de afstandsbediening een aantal seconden aan. Druk, terwijl de verlichting aan is, op een andere toets om de verlichting aan te houden. Druk nogmaals op de toets om de verlichting uit te schakelen. 12. 3D Geeft het 3D-menu weer. 13. LIGHT MODE Selecteert een geschikt lampvermogen uit de beschikbare modi. 14. DYNAMIC IRIS De functie is niet beschikbaar op dit model. 15.
De projector plaatsen Het kiezen van een plek Voordat u een plek voor de projector kiest, houdt u rekening met de volgende zaken: • Formaat en positie van het scherm • Plek van het stopcontact • Locatie en afstand tussen de projctor en de rest van de apparatuur U kunt de projector op de volgende manieren installeren. 1. Voorkant 3. Plafond achter Selecteer deze instelling als u de projector op de tafel en voor het scherm installeert.
De gewenste beeldgrootte van de projectie instellen De afstand van de lens van de projector tot het scherm, de zoominstellingen en het videoformaat zijn allemaal factoren die de grootte van het geprojecteerde beeld bepalen. Projectieafmetingen • De beeldverhouding van het scherm is 16:9 en van het geprojecteerde beeld 16:9 16:9 schermdiagonaal Scherm Midden van de lens H B Verticale afstand Schermgrootte Diagonaal Projectieafstand Afstand tot scherm (mm) H (mm) B (mm) Min lengte (max.
• Voor een optimale projectiekwaliteit wordt aangeraden om de projectie uit te voeren met de volgende waarden in de niet-grijze cellen. De waarden in de grijze cellen dienen slechts ter referentie. • Alle maten zijn benaderingen en kunnen afwijken van de daadwerkelijke formaten. BenQ beveelt bij een permanente plaatsing van de projector aan om de projectiegrootte en -afstand eerst ter plaatse met de projector fysiek te testen, zodat u rekening kunt houden met de optische eigenschappen van deze projector.
Het geprojecteerde beeld aanpassen De projectiehoek aanpassen Wanneer de projector niet op een horizontaal oppervlak wordt geplaatst of het scherm en de projector niet loodrecht op elkaar staan, wordt het geprojecteerde beeld trapeziumvormig weergegeven. Zo past u de projectiehoek aan: 1. Druk op de verstellerknop en til de voorkant van de projector op. Zodra het beeld op de gewenste plek is gepositioneerd, laat u de verstellerknop los om de voet vast te zetten op z'n positie. 2.
Keystone corrigeren Keystone verwijst naar de situatie waarin het geprojecteerde beeld een trapezoïde vorm aanneemt als onder een hoek wordt geprojecteerd. • Corrigeer dit als volgt automatisch: 1. Druk op / op de projector of op / / op de afstandsbediening. 2. Als de correctiepagina Keystone verschijnt, houdt u de MODE-toets op de projector twee seconden ingedrukt om het keystoneprobleem automatisch te corrigeren. • Corrigeer dit als volgt handmatig: 1.
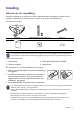
Aansluitingen Volg deze instructies om apparatuur op de projector aan te sluiten: 1. Schakel alle apparatuur uit voordat deze aansluit. 2. Gebruik de juiste signaalkabels voor elke bron. 3. Zorg dat de kabels goed zijn geplaatst.
PC Goed Audioapparaten aansluiten De projector heeft ingebouwde mono-luidspreker(s) met enkele basisfuncties voor het geluid bij zakelijke presentaties. Deze zijn niet ontworpen, noch bedoel voor het leveren van stereogeluid zoals dit verwacht kan worden in home-theater- of home-cinematoepassingen. Eventuele stereo-geluidssignalen worden omgezet naar monogeluid voor de luidsprekers van de projector. De geïntegreerde luidsprekers worden gedempt als de AUDIO OUT-aansluiting is aangesloten.
Bediening De projector opstarten 1. Sluit het netsnoer aan. Schakel het stopcontact in (indien nodig). De Powerindicator op de projector brandt oranje zodra de stroom is ingeschakeld. 2. Druk op op de projector of op op de afstandsbediening om de projector te starten. De powerindicator knippert groen en blijft groen als de projector is ingeschakeld. Het opstarten duurt ongeveer 30 seconden. In de latere fase van het opstarten wordt het opstartlogo weergegeven.
4. Als u om een wachtwoord wordt gevraagd, drukt u op de pijltoetsen om een wachtwoord van 6 cijfers in te voeren. Zie De wachtwoordbeveiliging gebruiken op pagina 21. 5. Schakel alle aangesloten apparatuur in. 6. De projector zoekt naar ingangssignalen. Het huidige ingangssignaal dat gescand wordt verschijnt. Als de projector geen goed signaal waarneemt, blijft het bericht "Geen signaal" op het scherm staan totdat er een ingangssignaal wordt gevonden.
De menu's gebruiken De projector beschikt over schermmenu's (OSD) waarin u de instellingen kunt aanpassen. Onderstaande OSD-afbeeldingen dienen slechts ter referentie en kunnen afwijken van de daadwerkelijke OSD. Hieronder ziet u een overzicht van het OSD-menu. 1 2 1 Hoofdmenupictogram 4 Huidig ingangssignaal 2 Hoofdmenu 5 Status 6 Druk op BACK om terug naar de vorige pagina te gaan of af te sluiten. BEELD Beeldmodus Gebruikermod.
De projector beveiligen Een veiligheidskabelslot gebruiken De projector moet op een veilige plek worden geïnstalleerd om diefstal te voorkomen. Of schaf een slot aan, bijvoorbeeld een Kensington-slot, om de projector te beveiligen. U ziet aan de achterkant van de projector een sleuf voor een Kensingtonslot. Zie item 19 op pagina 8. Een Kensington veiligheidskabelslot is meestal een combinatie van sleutel(s) en slot. Zie de documentatie van het slot voor meer informatie over het gebruik.
De procedure voor het oproepen van het wachtwoord starten 1. Houd OK 3 seconden ingedrukt. De projector laat op het scherm een code zien. 2. Schrijf het nummer op en schakel de projector uit. 3. Neem contact op met de klantenservice van BenQ in uw land om het nummer te decoderen. Mogelijk wordt u gevraagd om een bewijs van aankoop te overleggen om te controleren of u bevoegd bent de projector te gebruiken. WACHTWOORD OPROEPEN Noteer de code en neem contact op met de BenQ-klantenservice.
Schakelen tussen ingangssignalen De projector kan tegelijkertijd op verschillende apparaten worden aangesloten. De beelden van deze apparaten kunnen echter niet tegelijkertijd op volledig scherm worden weergegeven. Tijdens het opstarten zoekt de projector automatisch beschikbare signalen. Zorg dat de functie SYSTEEMINSTLL: BASIS > Auto-ingang in het menu is ingesteld op Aan als u wilt dat de projector automatisch signalen zoekt. Bron HDMI1 HDMI2 De ingang selecteren: PC 1. Druk op SOURCE.
Menubewerkingen De schermmenu (OSD)'s verschillen afhankelijk van het geselecteerde signaaltype en het projectormodel. De menu-items zijn beschikbaar wanneer de projector minstens één goed signaal detecteert. Wanneer geen apparatuur op de projector is aangesloten of geen signaal wordt waargenomen, zijn beperkte menuopties beschikbaar.
6. Druk op OK en BACK om terug te keren naar het menu BEELD. 7. Druk op om de items in het submenu die u wilt veranderen te selecteren en pas de waardes aan door op / te drukken. De aanpassingen worden opgenomen in de geselecteerde gebruikersmodus. • Gebr.mod.naam wz Kies dit om de namen van de aangepaste beeldmodi te wijzigen (User 1 of User 2). De nieuwe naam kan maximaal 9 tekens bevatten, waaronder letters (A-Z, a-z), cijfers (0-9), en spatie (_). Gebruikermod. 1. Ga naar BEELD > Beeldmodus.
• HDR-helderheid De projector kan het helderheidsniveau van het beeld automatisch aanpassen op basis van het ingangssignaal. U kunt het helderheidsniveau ook handmatig instellen om een de beeldkwaliteit te verbeteren. Bij een hogere waarde wordt het beeld helderder. Bij een lagere waarde wordt het beeld donkerder. • Kleurtemperatuur Er zijn diverse voorinstellingen voor kleurtemperatuur beschikbaar. De beschikbare instellingen variëren op basis van het geselecteerde signaaltype.
Verzadiging is de hoeveelheid van die kleur in een videobeeld. Lagere instellingen produceren minder verzadigde kleuren; een instelling van "0" verwijdert de betreffende kleur volledig uit het beeld. Als de verzadiging te hoog is, wordt de betreffende kleur te sterk en onrealistisch. • Kleurgamma Kleurgamma verwijst het kleurbereik dat door een apparaat kan worden weergegeven. Er worden verschillende standaarden gebruikt met verschillende niveaus voor kleurgamma, zoals CIE 1976, sRGB, Adobe RGB, NTSC, enz.
• Horizontale afmeting: Stelt de horizontale breedte van het beeld in. • Fase: Hiermee past u de klokfase aan om vervorming van het beeld te verminderen. PC-tuning • Auto: Past de fase en frequentie automatisch aan. Deze functies zijn alleen beschikbaar als het pc-signaal is geselecteerd. • 3D Kies Aan om deze functie in te schakelen.
HDR De projector ondersteunt HDR-beeldbronnen. De projector kan automatisch het dynamische bereik van de bron detecteren en instellingen optimaliseren om inhoud onder verschillende belichtingsomstandigheden weer te geven. Als u overschakelt naar HDR, kan Beeldmodus niet ondertussen worden gewijzigd. Als het ingangssignaal niet met dynamisch bereik wordt gedefinieerd, kunt u in plaats hiervan ook handmatig HDR of SDR kiezen.
Als u de projector op een hoogte van 1500 - 3000 m boven zeeniveau gebruikt, en de temperatuur tussen 0ºC - 30ºC ligt, wordt aanbevolen de Hoogtemodus te gebruiken. Tijdens het gebruik van de "Hoogtemodus" wordt er wellicht meer geluid geproduceerd omdat de ventilatoren sneller moeten draaien voor een betere koeling en optimale prestaties.
• Geluidmod. Geluid • Effectmodus: Deze functie gebruikt de MaxxAudio-technologie voor geluidsverbetering. Deze maakt gebruik van algoritmes van Waves voor geweldige effecten van hoge en lage tonen, om u een indrukwekkende audiobeleving te bieden. De volgende vooraf ingestelde geluidmodi zijn beschikbaar: Standaard, Bioscoop, Muziek, Game, Sport, Football en Gebr. Met de modus Gebr kunt u de geluidsinstellingen aanpassen.
SYSTEEMINSTLL: GEAVANCEERD menu Lampinstellingen • Lamptimer herst.: Zie De lamptimer instellen op nul op pagina 38. • Lamptimer: Zie Het aantal lampuren onderzoeken op pagina 35. • HDMI-bereik Selecteert een geschikt RGB-kleurbereik om de kleurgetrouwheid te corrigeren. • Auto: Selecteert automatisch een geschikt kleurbereik voor het inkomende HDMI-signaal. • Vol: Maakt gebruik van het volledige bereik RGB 0-255. • Beperkt: Maakt gebruik van het beperkte bereik RGB 16-235.
Led-indicator U kunt de led-waarschuwingslampjes uitschakelen. Dit voorkomt lichtstoring als u beelden bekijkt in een donkere ruimte. Zet alle instellingen terug op de fabrieksinstellingen. Instll. herstellen De volgende instellingen blijven behouden: Beeldmodus, Gebruikermod.beheer, Helderheid, Contrast, Kleur, Tint, Scherpte, Geavanceerd, Projectorpositie, Geluid, Wijzig bronn. en Wachtwoord. INFORMATIE menu • Bron: Geeft de huidige signaalbron weer.
Onderhoud Onderhoud van de projector De lens reinigen Reinig de lens als u vuil of stof op het oppervlak ziet. Schakel de projector uit en laat de projector volledig afkoelen voordat u de lens reinigt. • Verwijder stof met een fles met gecomprimeerde lucht. • Bij vuil of vlekken gebruikt u papier voor het reinigen van cameralenzen of bevochtigt u een zachte doek met reinigingsvloeistof voor cameralenzen en veegt u het oppervlak van de lens voorzichtig schoon.
Informatie over de lamp Het aantal lampuren onderzoeken Als de projector wordt gebruikt, wordt de gebruiksduur van de lamp (lampuren) automatisch berekend door de ingebouwde timer.
De timing van de lampvervanging Als de Lampindicator rood oplicht of als een bericht op het scherm wordt weergegeven dat aangeeft dat u de lamp dient te vervangen, neemt u contact op met de verkoper of gaat u naar http://www.BenQ.com voordat u een nieuwe lamp plaatst. Een oude lamp kan storing in de projector veroorzaken. In sommige gevallen kan de lamp ontploffen.
De lamp vervangen • Om het risico van een elektrische schok te vermijden, dient u altijd de projector uit te schakelen en de stekker van het netsnoer uit het stopcontact te verwijderen alvorens u de lamp gaat vervangen. • Om de kans op brandwonden te verkleinen, dient u de projector gedurende ten minste 45 minuten te laten afkoelen alvorens u de lamp vervangt.
7. Trek de lamp langzaam aan de hendel uit de projector. • Als u te snel trekt, kan de lamp breken waardoor glasscherven in de projector terecht kunnen komen. • Plaats de lamp niet in de buurt van water, binnen het bereik van kinderen, of bij ontvlambare stoffen. • Steek uw handen niet in de projector nadat de lamp is verwijderd. De scherpe randen aan de binnenkant van de projector kunnen u verwonden.
Indicatoren Lampje Status en beschrijving Situaties gerelateerd aan de stroomtoevoer Stand-bymodus Opstarten Normale werking Afkoelen bij normaal uitschakelen Downloaden Starten van kleurwiel is mislukt Herstellen van schaler mislukt (alleen videoprojector) Levensduur van de lamp/lichtbron is verstreken Lampklep is niet gesloten Inbranden AAN Inbranden UIT Situaties gerelateerd aan de lamp Fout bij lamp/lichtbron bij normaal gebruik Lamp/lichtbron brandt niet Situaties gerelateerd aan de temperatuur Storin
Problemen oplossen U kunt de projector niet inschakelen. Oorzaak Oplossing Het netsnoer levert geen stroom. Stop het ene uiteinde van het netsnoer in de netsnoeraansluiting op de projector en het andere uiteinde in het stopcontact. Zorg dat het stopcontact is ingeschakeld (indien van toepassing). Tijdens het afkoelproces is geprobeerd de projector weer in te schakelen. Wacht tot de projector volledig is afgekoeld.
Specificaties Specificaties van de projector Alle specificaties kunnen zonder voorafgaande kennisgeving worden gewijzigd. Optisch Ingangen Resolutie 3840 x 2160 met XPR 1920 x 1080 zonder XPR Computeringang RGB-ingang D-sub 15-pin (contrastekker) x 1 Weergavesysteem 1-CHIP DMD Video-ingangssignaal Digitaal HDMI (1.4a, HDCP 1,4) x 1; HDMI (2.0a, HDCP 2.
Afmetingen 353 mm (B) x 135 mm (H) x 272 mm (D) 353 272 135 Eenheid: mm 42 Specificaties
Timing-diagram Ondersteunde timing voor PC-signaal VernieuwingsH-frequentie (kHz) frequentie (Hz) Resolutie Modus 720 x 400 720 x 400_70 70,087 31,469 28,3221 VGA_60 59,940 31,469 25,175 VGA_72 72,809 37,861 31,500 VGA_75 75,000 37,500 31,500 VGA_85 85,008 43,269 36,000 SVGA_60 60,317 37,879 40,000 SVGA_72 72,188 48,077 50,000 SVGA_75 75,000 46,875 49,500 640 x 480 800 x 600 Klok (MHz) SVGA_85 85,061 53,674 56,250 SVGA_120 (Reduced Blanking) 119,854 77,425 83,00
1920 x 1080@60 Hz 1920 x 1200@60 Hz 1920 x 1080 (VESA) 1920 x 1080_60 1920 x 1200_60 (Reduced Blanking) 1920 x 1080_60 (voor Auditorium-model) 60 67,5 148,5 59,95 74,038 154 59,963 67,158 173 Bovenstaande timingen worden eventueel niet ondersteund vanwege beperkingen van EDID-bestanden of beperkingen van de videokaart. Wellicht kunnen bepaalde timingen niet worden gekozen.
1920 x 1080_60 (voor Auditorium-model) 1920 x 1080_120 (Alleen 1920 x 1080@120 Hz ondersteuning voor HDMI 2.0) 3840 x 2160_30 3840 x 2160 Voor 4K2K-model 3840 x 2160_60 Voor 4K2K-model 3840 x 2160 (Alleen ondersteuning voor HDMI 2.0) 1920 x 1080 (VESA) 59,963 67,158 173 120,000 135,000 297 30 67,5 297 60 135 594 Bovenstaande timingen worden eventueel niet ondersteund vanwege beperkingen van EDID-bestanden of beperkingen van de videokaart. Wellicht kunnen bepaalde timingen niet worden gekozen.