W500 LCD Projector Home Entertainment Series User Manual Welcome
English Table of contents Important safety instructions ............................................................................. 5 Introduction ........................................................................................................ 8 Projector features .......................................................................................8 Shipping contents ......................................................................................9 Standard accessories ....................
Speeding up the process of source search ..................................................................26 English Adjusting the projected image .................................................................. 26 Adjusting the projection angle ....................................................................................26 Fine-tuning the image size and clarity .......................................................................26 Correcting two-dimensional keystone .........................
Indicators ..................................................................................................................... 47 English Troubleshooting .................................................................................................. 49 Specifications ....................................................................................................... 50 Projector specifications ..............................................................................50 Optical ................
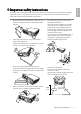
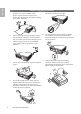
English Important safety instructions Your BenQ projector is designed and tested to meet the latest standards for safety of information technology equipment. However, to ensure safe use of this product, it is important that you follow the instructions mentioned in this manual and marked on the product. Safety instructions 1. 2. Please read this user manual before you operate your 4. Do not place the projector in any of the projector.
English Safety instructions (continued) 5. 6 9. Do not block the ventilation holes whilst the projector is on (even in standby mode): - Do not cover the projector with any item; - Do not place the projector on a blanket, bedding or any other soft surface. 6. In areas where the mains power supply voltage may fluctuate by ±10 volts, it is recommended that you connect your projector through a power stabilizer, surge protector or uninterruptible power supply (UPS) as appropriate to your situation. 7.
English Safety instructions (continued) 12. Never attempt to replace the lamp assembly until 15. the projector has cooled down and is unplugged from the power supply. 13. Do not attempt to disassemble this projector. There are dangerous high voltages inside which may cause death if you should come into contact with live parts. The only user serviceable parts are the lamp and air filters which have their own removable covers or access panels. See page 42.
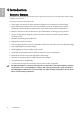
English Introduction Projector features The projector integrates high-performance optical engine projection and a user-friendly design to deliver high reliability and ease of use. The projector offers the following features.
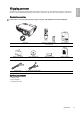
English Shipping contents The projector is shipped with the cables required for connection to a video and PC equipment. Some of the items may not be available depending on your region of purchase. Please check with your place of purchase. Standard accessories Some of the accessories may vary from region to region, and may differ from those illustrated.
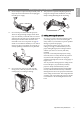
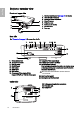
English Projector exterior view Front and upper side 1 2 2 3 6 4 5 7 1. 2. 3. 4. 5. 6. 7. 8. External control panel (See page 11 for details) Vent (heated air exhaust) Focus and Zoom adjustment Front IR sensor Projection lens Inlet (cool air intake) Len shift lever Lens cap 8 Rear side See "Connection" on page 19 for connection details. 11 12 13 14 15 16 17 18 19 20 10 21 9 9. 10. 11. 12. 13. 14. 15. 16.
English Controls and functions Projector 1 2 4 5 6 3 9 10 6 7 11 6 12 8 6 1. Focus ring 7. Adjusts the focus of the projected image. See "Finetuning the image size and clarity" on page 26 for details. MODE Sequentially selects a predefined picture setting available for each input. See "1. Selecting a picture mode" on page 28 for details. 2. Zoom ring 8. ENTER Adjusts the size of the image.
English Remote control 1. 1 POWER Turns the projector on or off. See pages 23, 34 and 47 for details. 2. Source buttons (COMP1, COMP2, VIDEO, HDMI, D-SUB, S-VIDEO) Selects an input source for display. See "Switching input signal" on page 25 for details. 2 3. Aspect buttons (ANA (Anamorphic), 4:3, LB (Letterbox), WIDE, REAL) Selects the display aspect ratio. See "3. Selecting the aspect ratio" on page 29 4 for details. 3 6 5 7 4.
Replacing the remote control batteries • Do not mix old batteries with new ones, or mix different types of batteries. • Avoid leaving the remote control and batteries in an excessive heat or humid environment like the kitchen, bathroom, sauna, sunroom, or in a closed car. • Dispose of used batteries according to the battery manufacturer’s instructions and local environment regulations for your region.
English Positioning your projector Choosing a location Your projector is designed to be installed in one of four possible installation locations: 1. Floor in front of screen; 2. Ceiling in front of screen; 3. Floor at rear of screen; or 4. Ceiling at rear of screen. Your room layout or personal preference will dictate which installation location you select.
English Obtaining a preferred projected picture size The distance from the projector lens to the screen, the zoom setting, and the video format each factors in the projected image size. BenQ has provided separate tables of dimensions for both 16:9 and 4:3 screen ratios to assist you in determining the ideal location for your projector.
English column is 4356 mm. Looking across this row shows that a 3048 mm (30.48 m) screen is required. If you can only obtain imperial sized screens, the screen size is 10' (120") diagonally.
Ceiling Installation Floor Installation Ceiling Projection Distance Diagonal English Installation for a 4:3 ratio screen Diagonal Image Height Screen Offset Center of the lens Center of the lens Offset Screen Projection Distance Image Height Floor 4:3 (standard) ratio screen dimension table Screen Dimensions Diagonal Feet Inches 3.3 4.2 5.0 5.8 6.7 7.5 8.3 9.2 10.0 10.8 11.7 12.5 13.3 14.2 15.0 15.8 16.
English Shifting the projection lens The lens shift lever at the front side of the projector provides flexibility for installing your projector. It allows the projector to be positioned off axis from screen center. The lens shift (offset) is expressed as a percentage of the projected image height or width. It is measured as an offset from the projected image's vertical or horizontal center. The W500 is equipped with + 110% vertical lens shift and + 48.8% horizontal shift.
You can connect the projector to any type of video equipment, such as a VCR, DVD player, digital tuner, cable or satellite decoder, video game console or digital camera. You can also connect it to a desktop or laptop PC or Apple Macintosh system. The projector can be connected to multiple video equipment at the same time by using different cables. All you need to do is select the appropriate input for the projector to display. When connecting a signal source to the projector, be sure to: 1.
English Connecting Video source devices You can connect your projector to various Video source devices that provide any one of the following output sockets: • HDMI • Component Video • S-Video • Video (composite) You need only connect the projector to a Video source device using just one of the above connecting methods, however each provides a different level of video quality.
The final connection path should be like that shown in the following diagram: English HDMI device: DVD player, digital tuner, etc. From audio output terminals To audio input terminals HDMI cable • It is not recommended to establish the connection via a DVI to HDMI cable. The weight of the DVI to HDMI adapter may be pulling down on the HDMI port, causing it to become loose over time.
English Connecting an S-video or a composite Video source device Examine your Video source device to determine if it has an unused S-Video or composite Video output socket available: • If so, you can continue with this procedure. • If not, you will need to reassess which method you can use to connect to the device.
English Using the projector Start up 1. Plug the power cord into the projector and into a wall socket. Turn on the wall socket switch (where fitted). Check that the Power indicator on the projector lights orange after power has been applied. The power cable used in the illustration may look different to the power cable type used in your region. Use only the power cable as supplied with the projector, and which is suitable for your region. 2. Remove the lens cap.
English Utilizing the password function For security purposes and to help prevent unauthorized use, the projector includes an option for setting up password security. The password can be set through the On-Screen Display (OSD) menu. For details of the OSD menu operation, please refer to "Using the menus" on page 36. You will be inconvenienced if you activate the password functionality and subsequently forget the password.
1. Open the OSD menu and go to the Advanced Setup > Password menu. Press ENTER. 2. Highlight Change Password. Press ENTER. 3. The message 'INPUT CURRENT PASSWORD' displays. Enter the old password. i. If the password is correct, another message 'INPUT NEW PASSWORD' displays. ii. If the password is incorrect, the password error message displays lasting for three seconds, and the message 'INPUT CURRENT PASSWORD' displays for your retry.
English Speeding up the process of source search You can speed up the process of source search by blocking source(s) not in use. 1. 2. 3. 4. 5. Go to the Advanced Setup > Source Block menu and press ENTER. Highlight the input source with cUp ordDown. Decide whether to Search or Skip it during input signal detection with eLeft orfRight. Repeat Step 2 and 3 until you are satisfied with the settings. Press EXIT/MENU to exit and save the settings. Blocking all sources at the same time is not allowed.
English • Press one of the Keystone/Arrow buttons ( / , / , / , / ) on 2D Keystone the projector or remote control to display the 2D Keystone correction page. Press the button whose keystone icon is similar to the adjustment you are about to make. For example, the Up button ( / ) will widen the upper side and reduce the bottom side of the picture. Continue pressing the same button or press the other buttons until you are satisfied with the shape. • Press MENU on the projector or remote control.
To correct the image's shape, you can perform the following steps. English 1. Press MENU on the projector or remote control. Go to the Display > Keystone menu and highlight Pincushion Correction. 2. Press eLeft orfRight repeatedly to adjust the image until you are satisfied with the shape. The values on the adjustment bar of the page change while pressing. When the values reach their maximum or minimum with repeated button presses, the image's shape will stop changing.
Setting the User 1/User 2/User 3 modes 1. 2. 3. 4. 5. Go to the Picture--Basic > Picture Mode menu. Press eLeft orfRight to select User 1, User 2 or User 3. Press dDown to highlight Load Settings From and press ENTER. Press cUp ordDown to highlight a picture mode that is closest to your need and press ENTER. Press EXIT to go back to the previous page and press dDown to select a menu item to be changed and adjust the value with eLeft orfRight. 6.
In the pictures below, the black portions are inactive areas and the white portions are active areas. English 1. Anamorphic: (displayed as "ANA" on the remote control) Scales an image so that it is displayed in the center of the screen with a 16:9 aspect ratio. 2. 4:3: Scales an image so that it is displayed in the center of the screen with a 4:3 aspect ratio. 3.
English Adjusting picture clarity 1. Go to the Picture--Advanced menu and highlight Clarity Control. 2. Press ENTER. 3. Press cUp ordDown to highlight one of the following functions and press eLeft orfRight to adjust the setting. • Noise Reduction: Reduces electrical image noise. The higher the setting, the less the noise. • Detail Enhancement: The higher the setting, the more details the image reveals. • Luma Transmission: Enhances contour details.
English Color management In most installation situations, color management will not be necessary, such as in classroom, meeting room, or lounge room situations where lights remain on, or where building external windows allow daylight into the room. Only in permanent installations with controlled lighting levels such as boardrooms, lecture theaters, or home theaters, should color management be considered.
English Operating in a high altitude environment We recommend that you use the High Altitude Mode when your environment is higher than 3200 feet above sea level, or is hotter than 40°C. To activate High Altitude Mode: 1. 2. 3. 4. Press MENU to turn the OSD menu on and press eLeft orfRight to select Advanced Setup. Press cUp ordDown to highlight High Altitude Mode. Press eLeft orfRight to select On. A confirmation message displays. Highlight Yes and press ENTER.
English Personalizing the projector menu display The On Screen Display (OSD) menus can be set according to your preferences. These settings do not affect the projection settings, operation, or performance. • Language in the System Setup menu sets your familiar language for the on-screen menus. • You can select the projector’s Background Color from black, blue or purple in the System Setup menu.
English Menus On Screen Display (OSD) structure Picture--Basic Picture--Advanced Picture Mode Load Settings From Brightness Contrast Color Tint Sharpness Reset Picture Settings Rename User Mode Black level Clarity Control Color Temp. Color Temp.
Information English Source Picture Mode Resolution Lamp Hours Nor. Lamp Hours Eco. Lamp Rest Rate Dust Filter Hour If there is no equipment connected or no signal detected, limited menu items are accessible. Using the menus The projector is equipped with on-screen display (OSD) menus for making various adjustments and settings. There are 17 different menu languages. See page 39 for more details. Below is the overview of the English OSD menu.
English Picture--Basic menu The Picture--Basic menu allows you to adjust the finer details of the projected image quality. Before making adjustments, you are suggested to choose a desired picture mode in this menu which has set some certain values in order to meet different lighting environment and presentation purposes. FUNCTION (default setting / value) Picture Mode DESCRIPTION Picture modes are provided so you can optimize your projector image set-up to suit your program type. See "1.
English Picture--Advanced menu The Picture--Advanced menu allows you to adjust the finer details of the projected image quality. FUNCTION (default setting / value) DESCRIPTION Black Level (0 IRE) See "Setting black level" on page 30 for details. Clarity Control See "Adjusting picture clarity" on page 31 for details. Color Temp. See "Selecting a color temperature" on page 31 for details. Color Temp. Fine Tuning See "Setting a preferred color temperature" on page 31 for details.
PC & Component YPBPR Tuning Displays the Pan page for searching the details of the projected image by using the directional arrow buttons on the projector or remote control after the image is magnified. See "Searching for details on the projected image" on page 33 for details. The following settings are only available with a PC or DTV RGB signal selected. • H. Size (0): Adjusts the frequency of the sampling clock that captures the input signal. • Phase (0): Adjusts the phase of the clock.
English Advanced Setup menu FUNCTION (default setting / value) DESCRIPTION • Lamp Settings Lamp Power (Normal): Press eLeft orfRight on the projector or remote control to set Normal or Economic as the power type of your projection. Using Eco mode reduces system noise and reduces power consumption by 20%. If this mode is activated, the light output will be reduced and result in darker projected images. Setting the projector in Economic mode extends the lamp timer automatic shutdown feature.
Returns all settings to the factory preset values. English Reset All Settings The following settings will still remain: Phase, Projector Position, Language, Password and High Altitude Mode. Information menu FUNCTION (default setting / value) DESCRIPTION Source Shows the current signal source. Picture Mode Shows the selected mode in the Picture--Basic menu. Resolution Shows the resolution of the input signal. Lamp Hours Nor. Shows the total time of the lamp has been used in normal mode.
English Maintenance Care of the projector Your projector needs little maintenance. The only thing you have to do on a regular basis is keep the lens clean and clean or replace the air filter. Never remove any parts of the projector except the lamp or the air filter. Contact your dealer or local BenQ Customer Service Centre if the projector fails to operate as expected. Cleaning the lens Clean the lens whenever you notice dirt or dust on the surface.
To clean the filter: Shut down the projector if turned on and wait until the fans stop running. 2. Disconnect the projector from any cables. 3. Turn the projector over. Draw the dust filter grill from the bottom side of the projector. 4. Use a small vacuum cleaner (designed for computers and other office equipment) or use a soft brush (such as a clean artist’s paintbrush) to vacuum or sweep the dust away. • If the dirt is difficult to remove or the filter is broken, you should replace it. 5.
English Lamp Information Calculation of lamp hour When the projector is in operation, the duration (in hours) of lamp usage is automatically calculated by the built-in timer. The method of calculating the equivalent lamp hour is as follows: Total (equivalent) lamp hour = 1 (hours used in Economic mode) +3/2 (hours used in normal mode) See "Lamp Settings" on page 40 for more information on Economic mode. The lamp hour in Economic mode is calculated as 2/3 of that in normal mode.
NOTICE: Lamp-usage time exceeded If this warning message displays, the projector will shut down in 40 seconds. The lamp MUST be replaced before the projector will operate normally. English WARNING Replace lamp (refer to User's Manual) then reset lamp timer OK Replacing the lamp • To reduce the risk of electrical shock, always turn the projector off and disconnect the power cord before changing the lamp.
5. English Lift the handle so that it stands up. Use the handle to slowly pull the lamp out of the projector. • Pulling it too quickly may cause the lamp to break and scatter broken glass in the projector. To reduce the risk of injuries to fingers and damage to internal components, use caution when removing lamp glass that has shattered. • Do not place the lamp in locations where water might splash on it, children can reach it, near or above heat sources, or near flammable materials.
When the Temperature warning light is on, it is warning you of the following possible problems: 1. The internal temperature is too high. 2. The fans are not working. Turn the projector off and contact qualified service personnel for further help. For more detailed information, please refer to "Indicators" on page 47.
English Light Status & Description Power Temp Lamp Thermal events 48 - R - - R R - R G R O R R R R R G R R O G R R G R G G R O O R R O R G O R O - G R - G G Maintenance The projector has shutdown automatically. If you try to restart the projector, it will shutdown again. Please contact your dealer for assistance.
English Troubleshooting THE PROJECTOR DOES NOT TURN ON. Cause There is no power from the power cable. Remedy Plug the power cord into the AC inlet on the projector, and plug the power cord into the power outlet. If the power outlet has a switch, make sure that it is switched on. Attempting to turn the projector on again during Wait until the cooling down process has completed. the cooling process. NO PICTURE Cause The video source is not turned on or connected correctly.
English Specifications Projector specifications All specifications are subject to change without notice. Optical Projection system DMD chip Lens Projection screen size Lamp Three-panels LCD system. 0.55" LCD (1280 x 720) 1.2x zoom 23.5" ~ 300" 140W Electrical Video Signal Data Signal Max. number of display colors NTSC / NTSC4.
English Timing chart 'V' denotes the type of input that this timing can support. Format Resolution Refresh rate(Hz) H. Freq. (KHz) Pixel Freq. (MHz) Comp. 1/2 S-Video/ Video D-Sub HDMI 720 x 400 720 x 400 70 31.469 28.322 - - V V 60 31.5 25.175 - - V V 72 37.9 31.5 - - V V 75 37.5 31.5 - - V V 85 43.3 36 - - V V 60 37.9 40 - - V V 72 48.1 50 - - V V 75 46.9 49.5 - - V V 85 53.7 56.25 - - V V 60 48.4 65 - - V V 70 56.
English 52 Format Resolution Refresh rate(Hz) H. Freq. (KHz) Pixel Freq. (MHz) Comp. 1/2 S-Video/ Video D-Sub HDMI NTSC 3.58 - 59.94 / 60 15.734/ 15.75 3.58 - V - - NTSC 4.43 - 59.94 / 60 15.734/ 15.75 4.43 - V - - PAL-B/G - 50 15.625 4.43 - V - - PAL M - 59.94 / 60 15.734/ 15.75 3.58 - V - - PAL N - 50 15.625 3.58 - V - - PAL 60 - 59.94 / 60 15.734/ 15.75 4.43 - V - - 480/60i 720 x 487 59.94 / 60 15.734/ 15.
English Warranty and Copyright information Copyright Copyright © 2007 by BenQ Corporation. All rights reserved. No part of this publication may be reproduced, transmitted, transcribed, stored in a retrieval system or translated into any language or computer language, in any form or by any means, electronic, mechanical, magnetic, optical, chemical, manual or otherwise, without the prior written permission of BenQ Corporation.
English Regulation statements FCC statement CLASS B: This equipment generates, uses and can radiate radio frequency energy and, if not installed and used in accordance with the instructions, may cause harmful interference to radio communications. However, there is no guarantee that interference will not occur in a particular installation.