
User Manual


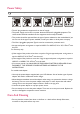


Table Of Contents
- Copyright
- Disclaimer
- Power Safety
- Getting started
- Getting to know your monitor
- How to assemble your monitor hardware
- Getting the most from your BenQ monitor
- How to adjust your monitor
- The control panel
- Basic menu operation
- Controlling the display with Display Pilot (XL2411 only)
- Initial setup for playing games
- Picture optimization (XL2411 only)
- Customizing the hot keys
- Setting up your own game mode
- Downloading more game modes using Game Mode Loader (XL2411 only)
- Adjusting display mode
- Using Smart Scaling
- Using Instant Mode
- Navigating the main menu
- Troubleshooting

10 How to assemble your monitor hardware
How to assemble your monitor hardware
• If the computer is turned on you must turn it off before continuing.
Do not plug-in or turn-on the power to the monitor until instructed to do so.
• The following illustrations are for your reference only. Available input and output ports may vary depending on
your purchased model.
1. Attach the monitor base.
Please be careful to prevent damage to the monitor. Placing the screen surface on an object like a stapler or a
mouse will crack the glass or damage the LCD substrate voiding your warranty. Sliding or scraping the monitor
around on your desk will scratch or damage the monitor surround and controls.
Protect the monitor and screen by clearing a flat open area on your desk and placing a soft item
like the monitor packaging bag on the desk for padding.
Gently lay the screen face down on a flat clean padded surface.
While holding the monitor firmly against the desk,
pull the monitor stand arm upwards clear of the
monitor.
Orient and align the stand base socket with the end
of the stand arm, then push them together. Tighten
the thumbscrew on the bottom of the monitor
base as illustrated.
Gently attempt to pull them back apart to check
that they have properly engaged.
1
2