
Instructions


1. WARNINGS AND SAFETY INSTRUCTIONS
▪ Never open the power supply case. The electronic components inside the case generate a high
voltage that is dangerous to humans.
▪ A power supply must only be opened by an authorised technician!
▪ Caution! Only use the supplied cable set. Using cables that were not included (e.g. cables of older
power supply unit series) may lead to defects!
▪ The warranty shall be void if the power supply is opened by an unauthorised technician and/
or the warranty seal is broken. Never handle the power supply with wet or damp hands when
in operation. Never insert objects into the openings/fans of the power supply. Operation is only
permitted indoors! Outdoor use may lead to severe damage.
▪ Do not carry out work on the power supply if it is connected to the mains. Always turn the mains
switch to off and pull out the mains plug.
▪ In the event of a short circuit in the device, remove the mains cable and do not use the device.
▪ If there are traces of smoke, damaged cables and exposure to liquids, the power supply must
immediately be disconnected from the mains and must not be used.
▪ Do not operate the PC directly next to a heater or another source of heat, as this reduces the
lifespan of all components and may lead to failures.
▪ Ensure that there is sufficient ventilation in the PC case, for example by adding additional fans.
▪ Should you want to clean your power supply, disconnect it completely from the mains and do not
use damp cloths or cleaning detergent. Clean the power supply from the outside using a dry cloth.
▪ Allow one hour before using the power supply after it has been in an ambient air environment as
otherwise condensation water could accumulate in the power supply.
2. COMPATIBILITY
be quiet! System Power 9 power supplies are compatible with current power supply and mother-
board specification, such as: Intel ATX12V Power Supply Design Guide Version 2.4 (and downward
compatible to V2.31 /V2.3 / V 2.01 / V 2.0), ATX System Design Guide Version 2.2 and Version 2.1,
BTX Version 1.0a, EPS 12V V2.92 (550-700W), Intel C6/C7, Energy Star 6.1, ErP ready.
3. INSTALLING YOUR NEW POWER SUPPLY
You must read the item “Warnings/safety instructions” before beginning installation. You will need a
screwdriver to fit the power supply in your PC. Only use the screws supplied with the power supply,
as these have the suitable thread.
First remove your old power supply. To do this, proceed as follows:
1. Carefully disconnect your PC from any power sources and pull out all cables connected to the PC.
2. Open the PC case also following the manufacturer’s instructions.
3. Disconnect all plugs from the motherboard and all other components, such as a HDD or optical drive.
Ensure that there are no plugs from the old power supply connected to any of the components.
4. Now remove the screws on the rear of the power supply and take it out carefully. Make especially sure
that no cables get caught in the components and damage them.
Installing your be quiet! System Power 9 power supply:
5. Place the power supply in the space provided in the case and mount it to the rear with the four
screws provided. Do not use excessive force.
6. Plug the 20/24 pin connector into the socket provided on the motherboard. If you have a 24 pin
connector, put the remaining 4 pins in the right position before plugging the connector into the socket.
If using a 20 pin connector, simply leave the additional 4 pins on the side.
7. Now connect the 4 pin connector, also called the P4 connector, into the socket provided on the mother-
board. This connector is going to supply your PC with additional power.
4. DIMENSIONS & INCLUDED ACCESSORIES
Dimensions of Power Supply: 140mm x 150mm x 86mm
This item is delivered with: mains lead, operating manual, screws for installing the power supply.
5. MANUFACTURER’S DATA & WARRANTY
Our warranty conditions apply, which can be viewed on the internet on www.bequiet.com.
Your original purchase receipt and serial number will be required before warranty
performance is rendered. Please keep it in a safe place.
Listan GmbH & Co.KG . Biedenkamp 3a . 21509 Glinde . Germany
For further information, you can contact us via e-mail: service@bequiet.com.
6. LEGAL NOTICE, COPYRIGHT
Copyright © Listan GmbH & Co. KG 2017. All rights reserved.
Please note the following:
▪ The content of this documentation may not be copied, transmitted, distributed or stored in any
form, whether in whole or in part, without the prior written approval of Listan.
▪ be quiet! is a registered trademark of Listan GmbH & Co. KG. Other product and company names
mentioned in this documentation may be trademarks or trade names of their respective owners.
▪ In accordance with its policy, Listan continually develops its products further. Listan therefore
reserves the right to make changes and improvements to any of the products described in this
documentation without prior notice.
▪ Listan is under no circumstances responsible for the loss of data and income or for any specific,
incidental, indirect or direct damage, however this may be incurred.
The content of this documentation is presented in its most updated form. Listan neither expressly nor
implicitly assumes any liability for the accuracy or completeness of the content of this documentati-
on, including, but not limited to the implicit guarantee of market suitability and the appropriateness
for a certain purpose, unless applicable laws or case law prescribe such liability.
Listan reserves the right to make changes to this documentation or to withdraw the documentation
at any time without prior notice.
1. WARNUNGEN UND SICHERHEITSHINWEISE
▪ Öffnen Sie niemals die Abdeckung des Netzteils, die dort verbauten elektronischen Bauteile
erzeugen gefährliche Hochspannungen.
▪ Ein Netzteil darf nur von autorisiertem Fachpersonal geöffnet werden!
▪ Achtung: Verwenden Sie nur den mitgelieferten Kabelsatz! Das Verwenden von nicht
mitgelieferten Kabeln (z.B. Kabel älterer Netzteilserien) kann zu einem Defekt führen!
▪ Durch das Öffnen des Netzteils ohne Fachpersonal oder durch ein beschädigtes Garantiesiegel
erlischt die Garantie. Nehmen Sie niemals das Gerät mit feuchten Händen in Betrieb. Stecken
Sie keine Gegenstände in die Öffnungen/Gebläse des Netzteiles. Das Netzteil ist für die Inbe-
triebnahme in Innenräumen vorgesehen. Der Außeneinsatz kann zu schweren Beschädigungen
des Netzteils führen.
▪ Führen Sie keine Arbeiten am Netzteil durch, wenn sich dieses unter Netzspannung befindet.
Netzschalter auf „0“ stellen und/oder den Netzstecker herausziehen.
▪ Bei einem Kurzschluss im Gerät, entfernen Sie das Netzkabel und nehmen Sie das Netzteil nicht
erneut in Betrieb.
▪ Bei Rauchspuren, beschädigten Kabeln und Einwirkung von Flüssigkeiten ist das Netzteil sofort
vom Stromnetz zu trennen und danach nicht mehr in Betrieb zu nehmen.
▪ Stellen Sie sicher, dass Ihr PC nicht direkt neben einer Heizung oder einer anderen Wärmequelle
betrieben wird. Dies führt zu Betriebsfehlern oder einer Beeinträchtigung der Lebensdauer des
Netzteils.
▪ Sorgen Sie für eine ausreichende Belüftung Ihres Computergehäuses, z.B. durch zusätzliche Lüfter
▪ Wenn Sie Ihr Netzteil reinigen, trennen Sie das Netzteil komplett vom Stromnetz und benutzen
Sie keine feuchten Tücher oder Reinigungsmittel. Reinigen Sie das Netzteil nur von außen mit
Hilfe eines trockenen Tuches.
▪ Nehmen Sie das Netzteil erst nach einer Stunde in Raumluftumgebung in Betrieb, da sich
anderenfalls Kondenswasser im Netzteil bilden könnte.
2. KOMPATIBILITÄT
Die be quiet! Netzteile der System Power 9 Serie sind mit allen aktuell gängigen Netzteil- sowie
Mainboard-Spezifikationen kompatibel wie u.a.: Intel ATX 12V Power Supply Design Guide Version
2.4 (sowie abwärtskompatibel zu V2.31, V2.3, V2.2, V2.01, V2.0), ATX System Design Guide Version
2.2 und Version 2.1, BTX Version 1.0a, EPS 12V V2.92 (550-700W), Intel C6/C7, Energy Star 6.1, ErP ready.
3. INSTALLATION IHRES NEUEN NETZTEILS
Lesen Sie bitte den Punkt „Warnungen und Sicherheitshinweise“ bevor Sie mit der Installation
beginnen. Zum Einbau des Netzteils in Ihren PC benötigen Sie einen Schraubendreher. Benutzen Sie nur
die mitgelieferten Schrauben aus dem Lieferumfang, da diese über das richtige Gewinde verfügen.
Bauen Sie Ihr altes Netzteil zunächst aus. Verfahren Sie hierfür wie folgt:
1. Trennen Sie Ihren PC von allen vorhandenen Stromquellen und ziehen Sie alle am PC angeschlossenen
Kabel vorsichtig ab.
2. Öffnen Sie das PC-Gehäuse und achten Sie dabei auf die Anleitung des Herstellers.
3. Trennen Sie alle Stecker vom Mainboard sowie allen weiteren Komponenten wie HDD oder optischen
Laufwerken. Achten Sie bitte darauf, dass kein Stecker des alten Netzteiles mit einer Komponente
verbunden ist.
4. Entfernen Sie die Schrauben an der Rückseite des Netzteiles und entnehmen Sie das Netzteil vor-
sichtig aus dem PC-Gehäuse. Achten Sie besonders darauf, dass sich keine Kabel an Komponenten
verfangen und diese beschädigen.
Der Einbau Ihres be quiet! System Power 9 Netzteiles:
5. Setzen Sie das Netzteil nun an den vorgesehenen Platz im PC-Gehäuse und schrauben Sie es an der
Rückseite mit den vier mitgelieferten Schrauben fest. Verwenden Sie keine übermäßige Kraft.
6. Stecken Sie den 20/24-Pin Stecker in die vorgesehene Buchse am Mainboard. Wenn Sie über einen
24-Pin Anschluss verfügen, dann bringen Sie die zusätzlichen vier Pins in die richtige Position, bevor
Sie den Stecker in die Buchse am Mainboard stecken. Beim Einsatz eines Mainboards mit einem
20-Pin Stecker klappen Sie die zusätzlichen vier Pins einfach zur Seite.
7. Nun stecken Sie den 12V-P4 oder P8-Stecker für die CPU in die vorgesehene Buchse auf dem
Mainboard.
4. ABMESSUNGEN & ZUBEHÖR
Abmessungen des Netzteils: 140mm x 150mm x 86mm
Im Lieferumfang des Netzteils ist enthalten: Kabelsatz für Kabelmanagement, Kaltgerätekabel, Bedie-
nungsanleitung, Kabelbinder, Schrauben zur Netzteilbefestigung.
5. HERSTELLERANGABEN & GARANTIE
Ausführliche Garantiebedingungen finden Sie im Internet unter bequiet.com.
Um Garantieleistungen in Anspruch nehmen zu können, benötigen Sie Ihren Originalkaufbeleg und die
Seriennummer.
Listan GmbH & Co.KG . Biedenkamp 3a . 21509 Glinde . Deutschland
Für weitere Informationen, wenden Sie sich per E-Mail an: service@bequiet.com
6. COPYRIGHT
Copyright © Listan GmbH & Co. KG 2017. Alle Rechte vorbehalten.
Bitte beachten Sie folgendes:
▪ Der Inhalt dieser Dokumentation darf ohne vorherige schriftliche Genehmigung durch Listan in keiner
Form, weder ganz noch teilweise, vervielfältigt, weitergegeben, verbreitet oder gespeichert werden.
▪ be quiet! ist eine eingetragene Marke der Firma Listan GmbH & Co. KG. Andere in dieser Dokumen-
tation erwähnten Produkte- und Firmennamen können Marken oder Handelsnamen ihrer jeweiligen
Eigentümer sein.
▪ Listan entwickelt entsprechend ihrer Politik die Produkte ständig weiter. Listan behält sich deshalb das
Recht vor, ohne vorherige Ankündigungen jedem der in dieser Dokumentation beschriebenen Produkte
Änderungen und Verbesserungen vorzunehmen.
▪ Listan ist unter keinen Umständen verantwortlich für den Verlust von Daten und Einkünften
oder für jedweder besonderen, beiläufigen, mittelbaren oder unmittelbaren Schäden, wie immer
diese auch zustande gekommen sind.
▪ Der Inhalt dieser Dokumentation wird so präsentiert, wie er aktuell vorliegt. Listan übernimmt weder
ausdrücklich noch stillschweigend irgendeine Gewährleistung für die Richtigkeit oder Vollständigkeit
des Inhalts dieser Dokumentation, einschließlich, aber nicht beschränkt auf die stillschweigende Ga-
rantie der Markttauglichkeit und der Eignung für einen bestimmten Zweck, es sei denn, anwendbare
Gesetze oder Rechtssprechung schreiben zwingend eine Haftung vor.
Listan behält sich das Recht vor, jederzeit ohne vorherige Ankündigung Änderungen an dieser Dokumen-
tation vorzunehmen oder die Dokumentation zurückzuziehen.
1. CONSIGNES DE SÉCURITÉ
▪ Veillez à ne jamais ouvrir votre bloc d’alimentation. Les composants électroniques qui se trouvent
à l’intérieur peuvent être soumis à de hautes tensions et mettre en danger votre sécurité.
▪ Seul du personnel habilité et qualifié est autorisé à ouvrir un bloc d’alimentation.
▪ Utilisez uniquement les câbles fournis avec votre alimentation. L’usage de tout autre câble peut
s‘avérer dangereux pour votre alimentation.
▪ L’ouverture du bloc d’alimentation entraîne l’annulation de la garantie. Ne jamais manipuler un
bloc d’alimentation avec les mains humides ou mouillées. Ne pas insérer d’objet dans les orifices
ou dans le ventilateur de l’alimentation. Votre bloc d’alimentation a été conçu pour fonctionner en
intérieur uniquement. L’utilisation en extérieur peut conduire à de sérieuses défaillances.
▪ Ne manipulez pas votre bloc d’alimentation lorsqu’il est branché sur secteur. Veillez à mettre
l’interrupteur du bloc en position «O» et/ou débranchez la prise secteur.
▪ En cas de court-circuit, veuillez débrancher votre bloc d’alimentation et ne pas la remettre en
marche.
▪ En cas de fumée, de câbles défectueux ou d‘exposition à des liquides, veuillez débrancher l‘ali-
mentation immédiatement.
▪ Veuillez ne pas placer votre PC à proximité d‘une source de chaleur, cela réduirait considérable-
ment la durée de vie de vos composants et de votre alimentation.
▪ Veuillez vous assurer que votre PC est suffisamment ventilé en utilisant, si nécessaire, des ven-
tilateurs additionnels.
▪ Si vous souhaitez nettoyer votre bloc d’alimentation, veuillez le débrancher. Il est fortement dé-
conseillé d’utiliser un chiffon humide ou des produits de nettoyage. Nettoyez uniquement l’exté-
rieur du bloc d’alimentation à l’aide d’un chiffon sec.
▪ Avant la première utilisation de votre bloc d’alimentation, il est recommandé de le laisser à
température ambiante une heure avant de le mettre en marche. Cela permettra d’éviter toute
condensation à l’intérieur de votre bloc.
2. COMPATIBILITÉ
Les blocs d’alimentation System Power 9 sont compatibles avec la plupart des spécifications des
cartes mères et des alimentations : Intel ATX 12V Power Supply Design Guide Version 2.4 (et rétro
compatibles avec V2.31, V2.3, V2.01, V2.0), ATX System Design Guide Version 2.2 et Version 2.1,
BTX Version 1.0a, EPS 12V V2.92 (550-700W), Intel C6/C7 Status pour les nouvelles générations de
processeurs, Programme Energy Star 6.1 & Directive ErP ready.
3. INSTALLATION DE VOTRE NOUVEAU BLOC D’ALIMENTATION
Nous vous invitons à lire le paragraphe « Consignes de sécurité» en préambule à l’installation de
votre bloc d’alimentation. Vous aurez besoin d’un tournevis pour effectuer l’installation de votre bloc
d’alimentation. Utilisez exclusivement les vis livrées avec votre bloc car elles présentent le filetage
requis.
Veuillez commencer par démonter votre ancien bloc d’alimentation, en suivant les re-
commandations ci-dessous :
1. Débranchez le PC et déconnectez avec précaution tous les câbles reliés au PC.
2. Ouvrez le boîtier du PC en respectant les instructions du fabricant.
3. Débranchez les connecteurs de la carte mère et des autres composants tels que les disques durs.
Veillez à ce qu’aucun connecteur de l’ancienne alimentation ne soit relié à un composant.
4. Retirez les vis se trouvant à l’arrière de l’alimentation et sortez-la avec précaution du boîtier PC. Veillez
à ce qu’aucun câble ne se prenne dans les composants et ne les endommage.
Montage de votre bloc d’alimentation System Power 9 :
5. Placez le bloc d’alimentation à l’emplacement prévu dans le boîtier et fixez-le sur la face arrière, à
l’aide des quatre vis fournies. Veillez à n’exercer aucune pression excessive.
6. Branchez le connecteur 20/24 broches dans la fiche correspondant à la carte mère. Si la
carte mère est équipée en 24 broches, mettez les quatre broches additionnelles dans la position cor-
recte et branchez. En cas d’utilisation d’une carte mère à connecteur 20 broches, rabattez simplement
les 4 broches surnuméraires sur le côté.
7. Branchez ensuite le connecteur P4 dans le connecteur prévu à cet effet sur la carte mère. Ce connec-
teur permet de donner de la puissance additionnelle à votre PC.
4. DIMENSIONS ET ACCESSOIRES
Dimensions du bloc d‘alimentation : 140 x 150 x 86 mm
Votre bloc d’alimentation est livré avec les accessoires suivants : un cordon secteur, un manuel
d’utilisation et des vis pour la fixation du bloc d’alimentation.
5. INFORMATIONS CONSTRUCTEUR & GARANTIE
Pour consulter les conditions de garantie, nous vous invitons à vous rendre sur notre site
www.bequiet.com
Pour la prise en charge de la garantie, merci de nous fournir une copie du justificatif d’achat et le
numéro de série de l‘alimentation concernée.
Listan GmbH & Co. KG – Biedenkamp 3a – 21509 Glinde – Allemagne
Pour plus d‘informations : service@be-quiet.fr
6. DROITS D’AUTEUR
Copyright © Listan GmbH & Co. KG 2017. Tous droits réservés.
▪ Le contenu de la présente documentation ne peut être reproduit, distribué, diffusé ou enregistré
d’aucune manière que ce soit, ni en tout ni en partie, sans l’autorisation préalable écrite de Listan
GmbH & Co. KG.
▪ be quiet! est une marque déposée de la société Listan GmbH & Co. KG. Les autres noms de
produits et de sociétés mentionnés dans la présente documentation peuvent être des marques
ou des noms commerciaux appartenant à leurs propriétaires respectifs.
▪ Listan procède au développement continu de ses produits conformément à sa politique. Par
conséquent, Listan se réserve le droit de procéder à des modifications et améliorations de
chacun des produits décrits dans la présente documentation, sans aucun préavis.
▪ Listan décline toute responsabilité en cas de pertes de données et de revenus, de dommages
particuliers, accessoires, directs ou indirects, quels qu’ils soient, et quelle qu’en soit l’origine.
▪ La présente documentation décrit le produit sous sa forme actuelle. Listan décline toute
responsabilité expresse ou tacite pour l’exactitude et l’intégralité du contenu de la présente
documentation, y compris, sans s’y limiter, de la garantie tacite de l’aptitude à la commer-
cialisation et à un usage défini, sauf dans les cas où la législation applicable ou la jurisprudence
exigent une telle responsabilité.
Listan se réserve le droit de procéder à tout moment et sans avis préalable à des modifications de
la présente documentation, ou à son retrait.
SYSTEM POWER 9
USER MANUAL | |
400W
500W
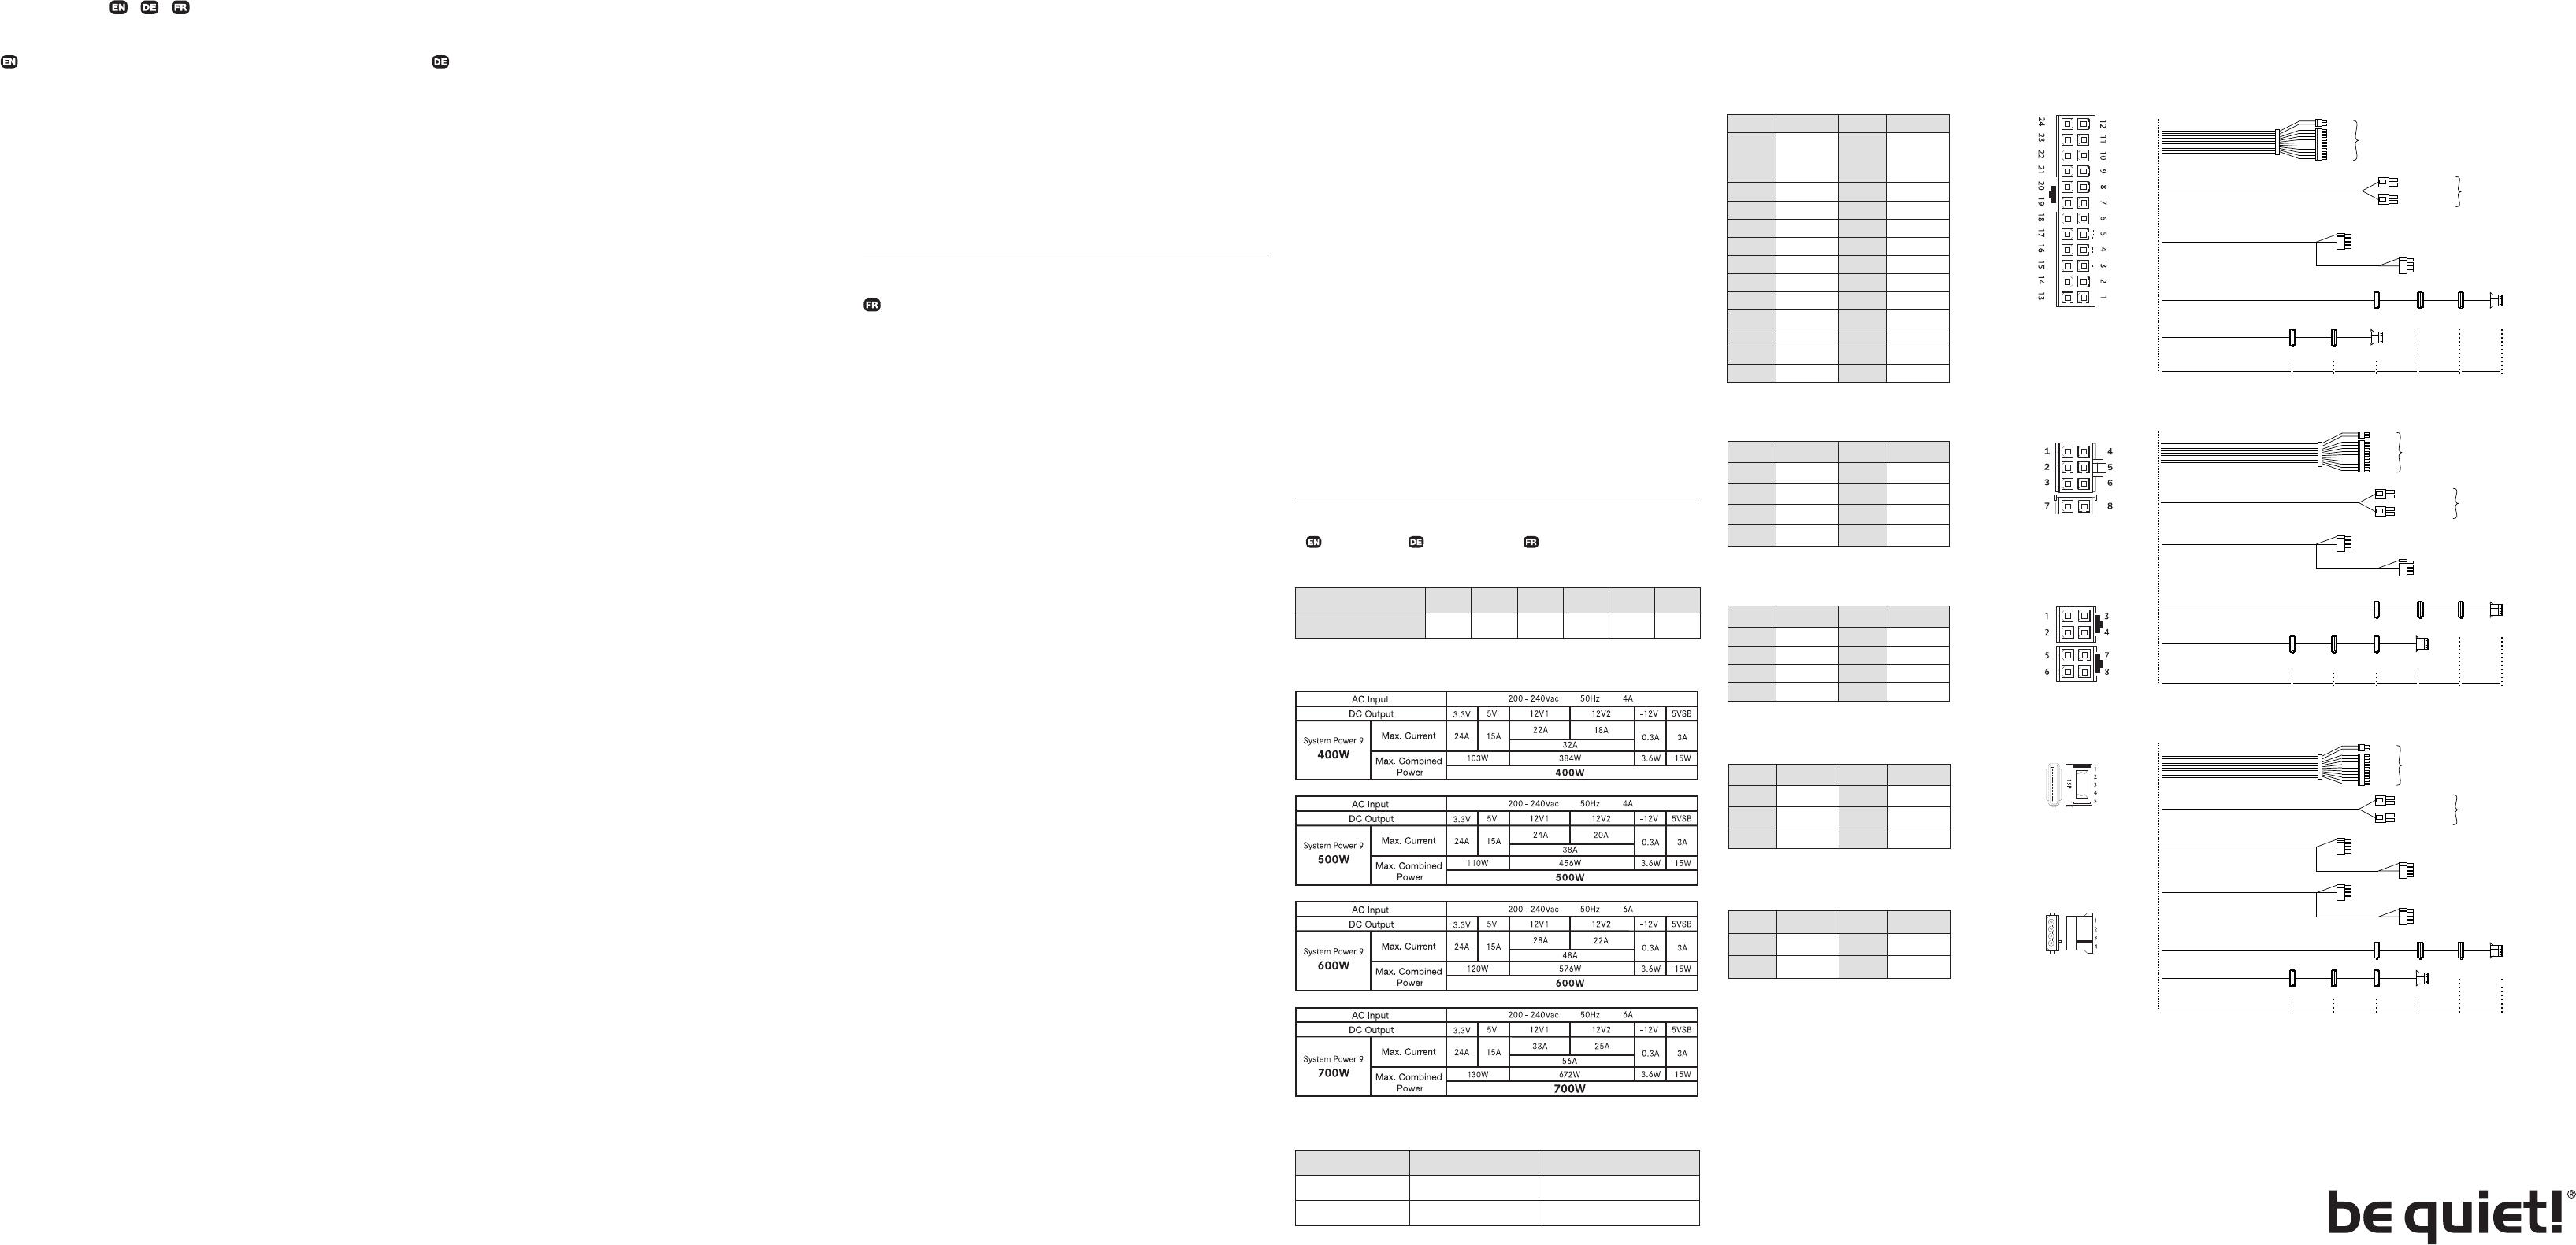
24 pin ATX power connector | 24 Pin ATX Anschluss | Connecteur ATX 24 pin
DISTRIBUTION AND PIN ASSIGNMENT | AUFTEILUNG UND STECKERBELEGUNG
RÉPARTITION ET ATTRIBUTION DES BROCHES
Pin Signal Pin Signal
1 +3.3VDC 13
+3.3VDC
+3.3Vdef.
sense
2 +3.3VDC 14 -12VDC
3 COM 15 COM
4 +5VDC 16 PS_ON/OFF
5 COM 17 COM
6 +5VDC 18 COM
7 COM 19 COM
8 PWR_OK 20
9 +5VSB 21 +5VDC
10 +12VDC 22 +5VDC
11 +12VDC 23 +5VDC
12 +3.3VDC 24 COM
PCI express VGA connector | PCI Express VGA Anschluss | Connecteur VGA PCIe
+12V power connector | 12V-Anschluss | Connecteur 12 V
Pin Signal Pin Signal
1 +12VDC 4 COM
2 +12VDC 5 COM
3 +12VDC 6 COM
7 COM 8 COM
Pin Signal Pin Signal
1 COM 3 +12VDC
2 COM 4 +12VDC
5 COM 7 +12VDC
6 COM 8 +12VDC
20-pin
4-pin
PCIe (6+2-pin)
PCIe (6+2-pin)
12V P4-connector
12V P4-connector
450 mm
350mm
120mm 120mm 120mm
120mm 120mm
HDD
S-ATA
S-ATA S-ATA
550mm
500mm
150mm
600mm
HDD
S-ATA S-ATA
12V P8-connector
24-pin
20-pin
4-pin
PCIe (6+2-pin)
PCIe (6+2-pin)
12V P4-connector
12V P4-connector
120mm 120mm 120mm 120mm 120mm
HDD
S-ATA
S-ATA S-ATA
550mm
HDD
S-ATA S-ATA S-ATA
12V P8-connector
24-pin
500mm
150mm
350mm
600mm
550mm
20-pin
4-pin
PCIe (6+2-pin)
PCIe (6+2-pin)
PCIe (6+2-pin)
PCIe (6+2-pin)
12V P4-connector
12V P4-connector
600 mm
550 mm
500 mm
150 mm
150 mm
500 mm
350mm
120mm 120mm 120mm
120mm 120mm
HDD
S-ATA
S-ATA S-ATA
550mm
HDD
S-ATA S-ATA S-ATA
12V P8-connector
24-pin
600W
700W
Peripheral Devices | Peripheriegeräte | Connecteurs périphérique
SATA power connector | SATA-Anschluss | Connecteur SATA
Pin Signal Pin Signal
1 3.3V 4 COM
2 COM 5 +12VDC
3 +5VDC
Pin Signal Pin Signal
1 +5VDC 3 COM
2 COM 4 +12VDC
7. TECHNICAL DATA TECHNISCHE DATEN DONNÉES TECHNIQUES
MINIMAL LOAD | MINIMALER VERBRAUCH | CHARGES MINIMALES
DC OUTPUT 3.3V 5V 12V1 12V2 -12V 5VSB
400W - 700W 0A 0A 0A 0A 0A 0A
POWERLABEL | POWERLABEL | TABLEAU RÉCAPITULATIF
OPERATING CONDITIONS | BETRIEBSBEDINGUNGEN | CONDITIONS DE FONCTIONNEMENT
Environment Temperature Rel. Humidity
Operation 0 ~ 40°C up to 85% (non-condensing)
Storage -40 ~ 70°C up to 98% (non-condensing)
CONNECTIVITY AND CABLE LENGTH | ANSCHLUSSMÖGLICHKEITEN UND KABELLÄNGEN
CONNECTIQUE ET LONGUEUR DES CÂBLES
Glinde, August 2017