
User guide


11
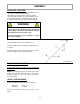
ASSEMBLY
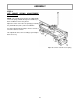
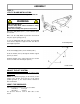
Attach the snowblower to the subframe as shown.
Make sure the snowblower is pushed in until locked
into place by the springs (item 4).
Lift the snowblower by pushing down the lift pedal,
and locking it in the raised position. Turn the tension
arm (item 1) towards the back. Hook the chain (item
2) (of the helper spring) to the spring bracket (item 3)
of the left support.
Turn the tension arm towards the front to apply
tension on the spring.
Lower the snowblower.
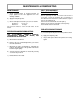
Install V-belt and belt guard
STEP 5
SNOWBLOWER INSTALLATION:
Refer to Snowblower owner’s manual, parts breakdown
section for their identification.
WARNING
FOR YOUR SECURITY:
Read the Snowblower’s owner's manual for
safety precautions and rules.
Follow the assembly and operation instructions.
WARNING
TO PREVENT INJURIES:
Stop the motor.
Apply parking brake.
Remove the ignition key.
Disconnect the wire from the spark plug(s) and
keep away from spark plug(s) to prevent accidental
starting.
CAUTION
Never use the snowblower without the belt guard.
CAUTION
The belt tension arm is spring loaded & needs to be
held firmly while displacing to prevent injury
.
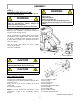
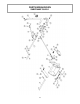
BELT INSTALLATION:
Remove the belt guard.
Install the belt around the pulleys as shown.
Install the belt on the drive mechanism pulley (item 5)
under the tractor.
Apply tension on the belt by pulling up the belt
tension arm.
Reinstall the belt guard.
NOTE: See belt replacement instructions in the
maintenance section of the snowblower owner’s
manual.
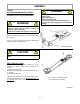
Install snowblower
Item 1: Snowblower pulley
Item 2: V pulley
Item 3: Tension arm
Item 4: Flat pulley
Item 5: Drive mechanism pulley
Item 6: Flat pulley
Item 7: Engine pulley
Item 8: Snowblower belt
Item 9: Drive mechanism belt