Instruction Manual
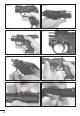
Fig. 9 Fig. 10 Fig. 11 Fig. 12 Fig. 13 Fig. 14 Fig. 15 2 Fig.
ENGLISH Illustrations on pages 2, 11, 12, 44, 45, and 46 ALWAYS KEEP THIS MANUAL WITH YOUR FIREARM. INCLUDE IT WITH THE PISTOL WHEN IT CHANGES OWNERSHIP OR WHEN IT IS LOANED OR PRESENTED TO ANOTHER PERSON.
CONTENTS Page BASIC SAFETY RULES 5 DESCRIPTION 13 SAFETY FEATURES 13 OPERATIONAL FEATURES 15 ERGONOMIC, MODULAR FEATURES 18 SPECIFICATIONS AND TECHNICAL DATA 20 GENERAL OPERATION 21 LOAD CHECK 21 BARREL OBSTRUCTIONS CHECK 23 FIELD STRIPPING 23 REASSEMBLY 24 AMMUNITION 25 LOADING 26 UNLOADING 29 FIRING 31 MAINTENANCE 35 HOW TO REPLACE THE BACK-STRAP ON THE GRIP 37 HOW TO REPLACE THE MAGAZINE RELEASE BUTTON 38 HOW TO REVERSE THE MAGAZINE RELEASE BUTTON 39 STORAGE 40 TRO
BASIC SAFETY RULES ! WARNING: PLEASE READ THIS MANUAL BEFORE HANDLING YOUR FIREARM. ! WARNING: FIREARMS CAN BE DANGEROUS AND CAN POTENTIALLY CAUSE SERIOUS INJURY, DAMAGE TO PROPERTY OR DEATH, IF HANDLED IMPROPERLY. THE FOLLOWING SAFETY RULES ARE AN IMPORTANT REMINDER THAT FIREARM SAFETY IS YOUR RESPONSIBILITY. 1. NEVER POINT A FIREARM AT SOMETHING THAT IS NOT SAFE TO SHOOT. Never let the muzzle of a firearm point at any part of your body or at another person.
Removing or unloading the magazine will not guarantee that a firearm is unloaded or cannot fire. Shotguns and rifles can be checked by cycling or removing all rounds and by then opening and inspecting the chamber so that a visual inspection of the chamber for any remaining rounds can be made. 3. STORE YOUR FIREARM SO THAT CHILDREN CANNOT GAIN ACCESS TO IT. It is your responsibility to ensure that children under the age of 18 or other unauthorized persons do not gain access to your firearm.
4. NEVER SHOOT AT WATER OR AT A HARD SURFACE. Shooting at the surface of water or at a rock or other hard surface increases the chance of ricochets or fragmentation of the bullet or shot, which can result in the projectile striking an unintended or peripheral target. 5. KNOW THE SAFETY FEATURES OF THE FIREARM YOU ARE USING, BUT REMEMBER: SAFETY DEVICES ARE NOT A SUBSTITUTE FOR SAFE HANDLING PROCEDURES. Never rely solely on a safety device to prevent an accident.
and unload the firearm. Make sure the chamber and barrel are free from any obstruction, like a bullet blocked inside the barrel due to defective or improper ammunition. 7. USE PROPER AMMUNITION. Only use factory-loaded, new ammunition manufactured to industry specifications: CIP (Europe and elsewhere), SAAMI® (U.S.A.). Be certain that each round you use is in the proper caliber or gauge and type for the particular firearm.
and physically check to see that the magazine, loading mechanism and chamber are unloaded, and action is open before handing it to another person. Never take a firearm from another person unless it is unloaded, visually and physically checked to confirm it is unloaded, and the action is open. 10. AVOID ALCOHOLIC BEVERAGES OR JUDGMENT/REFLEX IMPAIRING MEDICATION WHEN SHOOTING. Do not drink and shoot.
WARNING: It is YOUR responsibility to know and abide by Federal, State and Local laws governing the sale, transportation and use of firearms in your area. WARNING: This firearm has the capability of taking your life or the life of someone else! Always be extremely careful with your firearm. An accident is almost always the result of not following basic firearm safety rules. ! ! Especially for U.S.
H P C B H A D E M I F N O L G Mod. F Fig. 1 A E D M N Mod. F 11 O Fig.
Mod. G Mod. D Fig. 3 hammer decocked, safety disengaged Fig. 4 hammer decocked, safety engaged Fig. 5 hammer half-cocked, safety disengaged Fig. 6 hammer cocked, safety disengaged Fig. 7 Fig.
DESCRIPTION The new Beretta PX4 Storm Sub-Compact pistol is the most advanced expression of technological and aesthetic features in a semiautomatic sidearm. Built around a modular concept that a pistol can be adapted to different needs and modes of operation, without compromising ergonomics and the renowned Beretta reliability and performance, the PX4 Storm Sub-Compact emphasizes power, ease of handling, performance and reliability.
Px4 Storm D (Fig. 4): Double action only. Without manual safetyhammer decocking. The spurless hammer, after each shot, returns to the decocked position. Automatic firing pin block safety. Manual safety/hammer decocking lever (model F only) (Fig. 1-2/A).
OPERATIONAL FEATURES NOTICE: The numbers in the figures refer to the photos on pages 11 and 12. Semiautomatic firing. Px4 Storm Beretta pistols will automatically reload after each round is fired, as long as there are cartridges in the magazine. Barrel locking system (Fig. 2/E) The barrel and slide are locked together as a unit at time of discharge.
completely and then release it to strike the firing pin (double action). Cocked hammer (Fig. 8): By pulling the hammer rearward completely you will feel and hear the hammer (click) into the fullcocked position. The hammer is now in the firing position. The pull on the trigger will release the hammer immediately to strike the firing pin (single action). Double action only (model D). The pull on the trigger will first cock the hammer completely and then release it to strike the firing pin in the same motion.
Skeletonized hammer (models F and G) (Fig. 1-2/D). The distinctive hammer is significantly faster and lighter. Interchangeable, luminescent Superluminova® sights (Fig. 1/H). The high definition 3-dot sight system is coated in Superluminova®, a special photosensitive material. Short exposure to any kind of light, is enough to ensure long lasting luminescence of up to 30 minutes. Rear and front sights can be removed for replacement with other types of sights.
ERGONOMIC, MODULAR FEATURES NOTICE: The numbers in the figures refer to the photos on pages 11 and 12. Technopolymer frame (Fig. 1/C). By using corrosion-resistant fiberglass reinforced technopolymer , Beretta has developed a light and technically advanced pistol with an extremely modern, ergonomic line. The rounded, snag free surfaces of the pistol ensure trouble-free insertion and holster extraction.
Newly designed slide (Fig. smooth and offer snag-proof from its holster. The front facilitate slide operation and 1/P). The sides of the slide are insertion and removal of the pistol and rear serrations on the slide safety control in moist conditions. Removable and interchangeable hammer unit mechanism. The hammer mechanism of the Px4 Storm pistol has been designed as an independent group that can be extracted from the frame without the use of special tools.
SPECIFICATIONS AND TECHNICAL DATA Model: Caliber: Magazine Capacity: Rifling Pitch: Rifling General Operation: Locking System: Sights: Frame: Slide: Barrel: Action: Hammer: Safety: Overall Length: Barrel Length: Overall Width: Grip Width: Overall Height: Sight Radius: Weight unloaded: PX4 Storm Sub-Compact 9mmx19 (Parabellum or Luger), 9mmx21 IMI or .40 S&W 13 rounds (9mm), 10 rounds (.40 S&W) 9.84 in/ 250mm (9mm), 15.75 in/400mm (.40 S&W) R.H.
GENERAL OPERATION The Beretta PX4 Storm Sub-Compact pistol is a semiautomatic firearm using a cam operated, tilt-barrel, locking system. When the pistol is fired, the recoil energy causes the slide-barrel assembly to move to the rear. After a short distance, the barrel is forced downward by the operation of the cam and locking block ramp interface.
WARNING: Keep your finger OFF THE TRIGGER and the barrel pointed in a SAFE direction. ! • Remove the magazine by pushing the magazine release button (Fig. 9). • Retract the slide. Visually inspect the cartridge chamber to ensure that it is empty. The chamber is empty when no cartridge is visible when looking into the open chamber (Fig. 10). Releasing the slide when a magazine is not in the pistol will automatically close the slide. Always keep your finger away from the ejection port.
BARREL OBSTRUCTIONS CHECK If you believe the barrel might be obstructed, disassemble pistol and look down barrel. Check the barrel to be sure there are no obstructions in the chamber and bore. Catastrophic failure can result if another cartridge is fired into an obstructed barrel. • Follow the field stripping operations in the following paragraph and disassemble the pistol.
frame (see Fig. 14). The recoil spring assembly can now be lifted out of the slide. Tilt the barrel by grasping the cam lug and remove the barrel from the slide. (See Fig. 15 and 16) CAUTION: No further disassembly is recommended unless done by a competent gunsmith. REASSEMBLY NOTICE: The numbers in the figures refer to the photos on page 44. Reassemble the pistol following the Field Stripping procedure in reverse order. • Reassemble by inserting the barrel into the slide.
AMMUNITION AMMUNITION (CARTRIDGE) NOTICE: Beretta specifically disclaims responsibility for any damage or injury occurring with, or as the result of, the use of faulty, non-standard, “remanufactured,” hand-loaded or reloaded ammunition, or cartridges other than those for which the firearm was originally chambered. Serious damage or injury, even death, could result from the use of incorrect ammunition, from firing against bore obstructions and from propellant overloads.
result in damage to the firing pin. “Snap caps” (inert chamber inserts that allow a firearm to be dry-fired without damaging the action) are available at most gun stores for those who wish to practice firing without live ammunition. CAUTION: If you want to practice shooting your pistol without using live ammunition (called “dry firing”), insert an appropriate “snap cap” into the chamber to cushion the fall of the firing pin and reduce the chance of firing pin breakage.
of the magazine. Press the cartridge down onto the follower and slide the cartridge completely under the lips until it is lodged fully inside the magazine body (Fig. 19). • Repeat process until magazine is fully loaded. The holes on the back of the magazine allow for visual counting of cartridges. CAUTION: Do not try to force more than the maximum number of rounds indicated for your particular pistol into the magazine. An overloaded magazine may not function properly.
the way in order to cover the red warning dot (Fig. 6). The red dot is visible when the manual safety is disengaged and the firearm is ready to fire (Fig. 5). • Retract the slide. The slide remains open when an empty magazine is inserted or if the slide catch is pushed upwards. • Insert the round in the chamber through the ejection port (Fig. 20). • Press the slide catch to close the slide (Fig. 11). WARNING: The model F pistol is now CHAMBER LOADED WITH HAMMER DECOCKED AND SAFETY ENGAGED (Fig. 6).
• Remove the magazine from the pistol by depressing the magazine release button. • Insert one more cartridge into the magazine. • Completely push the loaded magazine into the pistol grip to insure catch engagement. ! WARNING: THE FIREARM YOU ARE HANDLING IS LOADED WITH A LIVE ROUND IN THE CHAMBER. Keep your finger away from the trigger whenever you do not intend to fire. UNLOADING ! WARNING: Always unload the firearm whenever you do not intend to shoot.
WARNING: If you are ejecting unfired cartridges, use extreme care to be sure they are ejected onto an appropriate surface. Never attempt to catch cartridges or fired cartridge cases as they fall. WARNING: Never allow anything to come in contact with the primer of unfired ammunition. Doing so could cause the ammunition to explode. ! ! • When sure that the chamber is empty and the cartridge has been ejected, release the slide.
FIRING ! WARNING: Beretta assumes no responsibility for any injury or property damage resulting from improper or careless handling, intentional or accidental discharge of the firearm. ! WARNING: Be certain the firearm is pointed in a SAFE direction. Never put your finger on the trigger unless you intend to shoot. Never disengage the manual safety lever (model F) unless you intend to shoot. ! WARNING: Always wear high-quality eye and ear protection when firing any firearm.
WHEN YOU ARE READY TO FIRE: • Disengage the manual safety by pushing the safety lever up all the way (F model). Rotating the lever in this way restores the connection between the trigger and the sear. The red warning dot indicates that the safety is off when the safety lever is rotated completely upward (Fig. 5, 7 and 8). Models G and D are always in position TO FIRE! WARNING: THE PISTOL IS NOW READY TO FIRE. • Place your index finger inside the trigger guard.
trigger whenever you do not intend to fire and engage the manual safety if present. • When the last round has been fired the slide remains open (Fig. 21). • To fire again, remove the empty magazine and insert a loaded one. • Press the slide catch to close the slide and to load the chamber (Fig. 11). ! WARNING: THE HAMMER IS COCKED (models F and G). When you have completed shooting, remove the magazine, check that the firing chamber is empty and close the slide by pressing the slide catch.
WARNING: If another cartridge is fired into an obstructed barrel, catastrophic failure can result. ! If, while firing, you hear a change in the sound of a fired cartridge, or feel a change in the amount of recoil, or detect any other irregularity: CEASE FIRING IMMEDIATELY! • Keep the firearm pointed in a SAFE direction. A “squib load” may have occurred. A “squib” occurs when a cartridge fires, but with insufficient force to drive the bullet out of the barrel.
MAINTENANCE The firearm should be cleaned as soon as possible after firing or at least once every month. Use only high-quality, commercially available firearm cleaning solvents and cleaning equipment. Field strip the pistol as indicated in the appropriate section of this manual. ! WARNING: Excess oil and grease obstructing the bore, even partially, is very dangerous when firing and may cause barrel rupture and serious injury to the shooter and bystanders. Never spray or apply oil to the cartridges.
RECOIL SPRING AND SPRING GUIDE ASSEMBLY • Lightly oil the recoil spring and the spring guide assembly with gun oil. After extensive use it may be necessary to first clean these parts using a cleaning brush and gun oil. FRAME • Clean the frame surfaces with a soft, dry cloth. • Using a cloth lightly soaked in gun oil, clean the areas of the hammer, the ejector, and the slide rails. If necessary, use a cleaning brush. • Carefully dry the parts and lightly oil the slide rails on the frame.
HOW TO REPLACE THE BACK-STRAP ON THE GRIP ! WARNING: Make sure the pistol is unloaded. If not, unload it following the unloading instructions in the manual. NOTICE: It is advisable to perform field stripping and assembly operations over a table to catch components should they drop. NOTICE: The numbers in the figures refer to the photos on pages 44 and 45. • Remove the magazine. • Using a flat screwdriver, partially lift the "U-shaped" back-strap retaining spring from the lower part of the grip (Fig.
HOW TO REPLACE THE MAGAZINE RELEASE BUTTON WARNING: Make sure the pistol is unloaded. If not, unload it following the “UNLOADING THE PISTOL” procedure. ! CAUTION: Before proceeding with the disassembly of the parts, closely observe and memorize the position of the components to make assembly easier. CAUTION: These operations should be carried out by a competent gunsmith. NOTICE: It is advisable to perform field stripping and assembly operations over a table to catch components should they drop.
HOW TO REVERSE THE MAGAZINE RELEASE BUTTON ! WARNING: Make sure the pistol is unloaded. If not, unload it following the “UNLOADING THE PISTOL” procedure. CAUTION: Before proceeding with the disassembly of the components, closely observe and memorize the location of the components to make assembly easier. CAUTION: These operations should be carried out by a competent gunsmith. NOTICE: It is advisable to perform field stripping and assembly operations over a table to catch components should they drop.
• Check that the magazine release button functions correctly with an empty magazine inserted into the grip. STORAGE WARNING: Always store the pistol UNLOADED, magazine empty, manual safety engaged (model F) and the hammer decocked WARNING: Always store your firearm so that children cannot gain access to it. To reduce the risk of accidents involving children, unload your firearm, lock it and store the ammunition in a separate locked location.
TROUBLESHOOTING ! 41 MALFUNCTION PROBABLE CAUSE REMEDY Mis-introduction of a cartridge into the chamber Defective cartridge Inspect and replace cartridge Mis-fire Defective cartridge Pull the trigger once more or replace cartridge Mis-extraction or defective extraction Dirty cartridge chamber Clean and lubricate cartridge chamber Defective or dirty ammunition Replace or clean cartridges Dirt under the extractor Clean the extractor seat WARNING: Do not attempt to make repairs to any firear
ACCESSORIES Each pistol is supplied with one extra magazine (two total). Each pistol is supplied with three grip backstraps to tailor the pistol to each user’s hand size (one mounted on the pistol and two accessory) Each pistol is supplied with a magazine loader. Four additional rear sight heights are available to change the point-of-impact based on ammunition selected. A lanyard loop is available to accept a retention lanyard in those situations that require one.
NOTES: SERIAL NUMBER: _____________________________________ DATE PURCHASED: ____________________________________ PURCHASE PRICE: ____________________________________ DEALER INFORMATION: ________________________________ 43
Fig. 18 Fig. 17 Fig. 19 Fig. 20 Fig. 21 Fig. 22 Fig. 23 Fig.
Fig. 25 Fig. 26 Fig. 27 Fig. 28 Fig. 29 Fig. 30 Fig. 31 Fig.
Fig. 33 46 Fig.
The illustrations and descriptions given in this brochure are intended as a general guide only, and must not be taken as binding. The Company, therefore, reserves the right to make, at any moment and without prior notice, any changes it thinks necessary to improve its models or to meet any requirements of manufacturing or commercial nature.
Beretta USA Corp. 17601 Beretta Drive Accokeek, MD 20607 1-800-Beretta www.berettausa.