Bedienungsanleitung Kammer-Vakuumgerät Art.-Nr.
Inhalt 1: Gebrauch 2: Modelldaten 3: Bedienelemente und Einstellungen 4: Vor dem Gebrauch 5: Bedienungsanleitung 6: Wichtige Sicherheitshinweise 7: Anschlussdiagramm 8: Abdeckung Zeichnung 9: Kammer Zeichnung 10: Basis Zeichnung Stellen Sie sicher, dass das Gerät nur an einer geerdeten Steckdose angeschlossen wird Mitgeliefertes Zubehör: 500 ml Vakuumpumpenöl, 1 Öl-Nachfüllflasche (siehe 10.22 und 10.23 auf Seite 10, Einfüllöffnung und Schauglas), 1 Rolle Ersatz-Siegeldrahtdraht (siehe 9.
1. Bedienung und Ausführung 1,1 Bedienung Dieses Vakuum-Kammergerät ist hervorragend geeignet, unterschiedlichste Dinge wie Korn, Fleisch, Medizin oder andere Produkte, die geschützt werden sollen, zu vakuumieren. Es ist leicht zu bedienen und schützt Ihr Gut vor Feuchtigkeit, vor Verderben und anderen Umwelteinflüssen. 1,2 Der Gebrauch ist sehr einfach. Alle Funktionsschritte sind Programmüberwacht.
3. Bedieneinheit und Programmierung Abbildung 1 3,1 Einstellen des Vakuumgerätes nur bei geöffnetem Deckel möglich. 3,1,1 Bringen Sie den seitlichen Ein- und Ausschalter auf Stellung „1“. Das Display zeigt jetzt „--„ Die Maschine ist jetzt im Standby-Modus. 3,1,2 Drücken Sie den „SET“ Knopf einmal und die Vakuumanzeige wird aufleuchten. Stellen Sie die Vakuumzeit durch Pfeil-rauf-runter zwischen 0 - 99 Sekunden ein. Wenn Sie die Pfeiltasten festhalten, verstellen Sie die Zeit im 1 Sekunden-Takt.
Sicherheitshinweise 4,4 Grundsätzliche Hinweise. Lesen Sie die gesamte Bedienungsanleitung. Fehlbedienungen können zum Stromschlag, Feuer und/oder Personenschäden führen. 1) Arbeitsbereich a) Halten Sie den Arbeitsbereich sauber und gut ausgeleuchtet. Unsaubere und schlecht beleuchtete Flächen laden zu Unfällen ein!! b) Arbeiten Sie niemals mit dem Gerät in der Nähe von brennbaren Flüssigkeiten, Gasen oder Staub. Elektrische Geräte verursachen Funken, die zur Entzündung von Staub oder Gasen führen können.
Der Gebrauch 5,1 Schließen Sie das Gerät an eine geerdete Steckdose an. 5.2 Drücken Sie den Deckel herunter und der Motor beginnt zu pumpen. Die Einschweißtemperatur und die Zeit sollte nicht zu hoch eingestellt werden um ein Durchschmelzen des Siegeldrahtes (siehe 9.2 Seite 9) zu verhindern (die Einschweißzeit von niedrig (low) langsam nach hoch (high) einstellen.
Anschlußdiagramm Abbildung 3 7
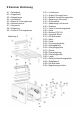
Abdeckung Zeichnung Abbildung 4 8.1 = Deckel 8.2 = M6 Kopfschraube 8.3 = Unterlegscheibe oben 8.4 = Unterlegscheibe unten 8.5 = Gummidichtring 8.6 = Schweißbandhalter 8.
Kammer Zeichnung 9.1 = Teflonband 9.2 = Siegeldraht 9.3 = Siegelstange 9.4 = Kupferblatt 9.5 = Block für Führungskissen 9.6 = Vakuumkammer 9.7 = Abgasrohr 9.8 = Siegelring 9.9 = Feder für Führungskissen 9.10 = Luftkammer 9.11 = Kupfer Führungskissen 9.12 = Bakelite Unterstützungsplatte 9.13 = Siegelring Luftkammer 9.14 = Gummiplatte 9.15 = Abdeckung Luftkammer 9.16 = Gehäuse 9.17 = Linke Unterstützungsplatte 9.18 = Feder 9.19 = Breaker DZ47-60 9.20 = Anschluß Strom 9.21 = M5 Schrauben 9.22 = Welle 9.
Basis Zeichnung Abbildung 6 22 23 10.1 10.2 10.3 10.4 10.5 10.6 10.7 10.8 10.9 10.10 = = = = = = = = = = Vakuum Pumpenfilter Sicherungsventil Vakuumpumpe Verbindungsteil Volt Einstell-Terminal Kontroll Transformatorr Befestigungshalter Feder Stange Versiegelungs Transformator 10.11 = Feder 10.12 = Wechselstrom Anschluß 10.13 = Kombi Magnetventil 10.14 = M10 Mutter 10.15 = Anschluß-Terminal 10.16 = Feder 10.17 = M6 Mutter 10.18 = Gummifuß 10.19 = M6 Schraube 10.20 = M10 Schraube 10.
Operation manual Table-style vacuum packing machine Art.-No.
Contents 1: Use & Feature 2: Model & Specification 3: Control Panel and Settings 4: Prepare bevor using 5: Operation Procedure 6: Other Cautions 7: Circuit Diagram 8: Vacuum Lid Breakdown 9: Vacuum Chamber Breakdown 10: Base Plate Breakdown 11: Troubleshooting 12: Spare Parts List Ensure that the machine is properly grounded before operation.
1. Use und Feature 1,1 Use DZ 260-PD series vacuum packaging machine possesses the advantages of superior function, easy operation, simple maintenance, wide application etc. It applies to the soft packing material such as composite film or aluminium-plastic composite film and so on. It can pack grain, food, fruit, seed, medicine, chemica product, elektronic product, precision instrument and meter, rare expensive metal solid etc in liquid, powder or paste shape.
3. Bedieneinheit und Programmierung Figure 1 3,1 Adjust/Set Timing Controls 3,1,1 Turn power switch (air switch) ”ON”, ”- -” shows on instrument board, wich mesns the machine is in the state of stand.by. 3,1,2 Press the ”SET” button once and you will notice the ”Vacuum” indicator will light. Adjust the vacuum time ”up” or ”down” by using the ”∆” or ”∇”. The time setting range is from 0 to 99 seconds. Hold ”∆” or ”∇” to increase or decrease the value with the speed of 1 values/second.
3,1,8 Press ”SET” button to enter the state of voltage selection. There are tree grades of sealing voltage, that is, ”high”, ”middle” and ”low”. Every time you press ”SET” button, the display will indicate one voltage grade accordingly. The indicator will illuminate in orange color. 4. Prepare before Use 4,1 Read operation manual carefully before using machine. 4,2 According to relevant regulation, fill the vacuum pump with HFV-32 highspeed vacuum pump oil or N32 engine oil before starting the machine.
After finishing the above work, the machine is ready for working. As vacuum lid is pressed down, the start switch closes and the machine starts to work as following procedures automatically. a. The vacuum pump begins to work and draw air from vacuum chamber. Vacuum time starts to time. b. The lid is closed to form an airtight system with vacuum chamber. The working chamber produces subatmospheric pressure. c.
6. Other Cautions 1). One surface of silicone seal pad is cross hatch plane and the other surfacecan be installed with types for printing label. 2). Press the emergency stop button if it`s urgent to stop the machine during peration, then vacuum lid will open automatically and the machine will back to state of stand-by. 3). Cut off the power when the machine is not in use. 4). The external power line`s sectional area should be larger than the advance wire`s sectional area. 5).
11 Troubleshooting 11,1 Troubleshooting of vacuum system Malfunktion Vacuum pump can not extract air Vacuum chamber can not reach the ultimate vacuum degree. The vacuum lid cannot be opened as the air can not go info working chamber. Vacuum degree is normal, while there is still gas remained in the pouch. Cause Pump has not been startet yet. Vacuum lid is open Vacuum time is demaged Valve between pump and vacuum chamber is not open. Pump can not reach the ultimate vacuum degree. Pipe leaks.
11,3 Troubleshooting of single-stage rotary vane vacuum pump Malfunktion Ultimate vacuum can not be reached by pump Cause The oil is spoiled. No sufficient oil in the tank. The oil tube leaks. The air suction tube is not sealed well. The pump cannot be started. The starting or working current of pump is too high. Temperature is too high when pump is working The pump is jammed while working. Pump makes abnormal noise while running. There are smoke or oil-drops from exhaust nozzle.
11,4 Troubleshooting of sealing mechanism Malfunktion Fail to achieve sealing Cause The Wrong sealing voltage selected. The seal wire is loose. Solution Choose right sealing voltage. Replace Check and connect Check and replace Check and replace Refer to table 11-2 Check and repair Adjust The pressure for sealing is insufficient. Cooling time is short. Increase time The real wire is broken. Short circuit occurs to seal wire.
12 Spare Parts List Description Foam tape Seal wire Teflon tape Operation manual Unit Roll Pc Pc Pc Quantity 1 1 1 1 Note: 1. This operation manual is only used for reference, if there is any unconformity, please contact technical department of our company. 2. There ar no additional instructions for some different mechanisms in the above-mentined models. 3. The operation manual and parts list are subject to change without prior notice.