(D) Bedienungsanleitung Solar Panel Art.-Nr. 31884 Einführung: Die Betriebsanleitung ist Bestandteil dieses Produkts. Sie enthält wichtige Informationen zu Sicherheit, Verwendung und Entsorgung. Bevor Sie das Produkt verwenden, machen Sie sich mit allen Betriebs- und Sicherheitshinweisen vertraut. Verwenden Sie dieses Produkt nur wie beschrieben und nur für die genannten Anwendungsbereiche. Diese Dokumentation ist urheberrechtlich geschützt.
Produktübersicht 1. Energieabsorptionsglas 2. Kontrollleuchte 3. Stativschlitz 4. 6V Ausgangsschnittstelle 5. 5V Eingabeschnittstelle 6.
Spezifikation • • • • • • • • • • • • • • Maximale Solar-Ladeenergie: 1,5W Maximale Strom-Ladung: 300 mA Eingebaute 1500mAh Lithium-Batterie Externer Ladeeingang: DC 5V / 500mA Maximale Ausgabe: DC 6V / 1500mA Batterieladedauer: Der Ladevorgang kann an einem Tag bei ausreichender Sonneneinstrahlung abgeschlossen werden. Max. 9418 Fotos am Tag oder 3741 Fotos in der Nacht möglich Max. 2716 Videoclips am Tag oder 458 Videoclips in der Nacht.
Bedienung Einführung Installieren Sie können das Solarpanel an einem Baum durch ein Gurtband befestigen. Oder mit einer Halterung an ebenen Flächen. 1.Das Solarpanel mit einem Gurtband oder Halterung befestigen. 2.Das Solarpanel sollte dort platziert werden, wo es genug Sonnenlicht bekommt und keine Äste mit Blättern das Sonnenlicht abhalten. Das Energieabsorptionsglas muss zum Sonnenlicht ausgerichtet sein. 3.
Schließen Sie den Adapter zum Laden an Schließen Sie die Jagdkamera an, um die Stromversorgung zu unterstützen 5
LED Kontrollleuchte Das LED Licht zeigt an in welchem Modus sich das Solar Panel befindet. 1. Das Licht ist blau, das Panel ist betriebsbereit. 2. Das Licht ist rot, wenn das Solar Panel über den Adapter oder das Sonnenlicht geladen wird. 3. Der Ladevorgang ist beendet, das Licht erlischt.
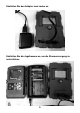
Verwendung der Wandaufhängung Sie können das Solar Panel mithilfe der Wandaufhängung an einer Wand oder einem Baum befestigen. Bevor Sie die Wandaufhängung installieren, sollten Sie sicherstellen, dass alle Schrauben festgedreht wurden. Bauteile 1.
Einbauschritte • Markieren Sie die Bohrlöcher, indem Sie den Fuß der Wandaufhängung an die gewünschte Einbaustelle halten und die Position der Bohrlöcher markieren. • Verwenden Sie einen Bohrer mit einem 6 mm Bohraufsatz um die erforderlichen Löcher zu bohren, installieren Sie dann die Dübel bündig mit der Wand. • Schrauben Sie die Wandaufhängung mithilfe der mitgelieferten Schrauben an die Wand.
(GB) Operating Instructions Solar Panel Item No. 31884 Introduction: The operating instructions are part of this product. It contains important information about safety, use and disposal. Before using the product, familiarize yourself with all operating and safety instructions. Use this product only as described and only for the stated areas of application. This documentation is protected by copyright.
Product Overview 1. Energy absorption glass 2. Indicator light 3. Tripod slot 4. 6V output interface 5. 5V input interface 6.
Specification: • Solar maximum charge power:1.5W • Solar maximum charge electrical current:300mA • Built-in 1500mAh lithium battery • External charging input:DC 5V/500mA • Maximum output:DC 6V/1500mA • Battery life: Charging can be completed in one day under the condition of enough sunlight. • Support to take 9418 photos in the daytime or 3741 photos in the night. • Support to record 2716 video clips in the daytime or 458 video clips in the night.
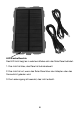
Operation Introduction Installing You can fix the solar panel to a tree by the bandage. Or fix it to flat surfaces by bracket. 1.You should mount the solar panel via bandage or bracket in advance. 2.The solar panel should be placed in where has enough sunlight, no barrier and shelter. And the energy absorption glass has to face to the sunlight. 3.Place the solar panel in where above the ground or platform to avoid being inundated by rain. 4.
Connect the adapter to charge Connect the hunting camera to support power 13
LED Indicator Light The LED light indicates in which mode the solar panel is located. 1. The solar panel glass faces to light, the indicator light will be blue. Now the panel is working. 2. When charging the solar panel via adapter or sunlight, the indicator light will keep red. 3. After charging completed, the light goes out.
Using the wall bracket You can mount the solar panel on a wall or tree by the supplied wall bracket. Before mounting the wall bracket you should ensure that all existing screws are tight. Components 1.
Install Steps • Mark the drill holes by holding the foot of the wall bracket at the desired mounting location and marking the hole positions. • Use a drill with a 6 mm drill bit to drill the required holes and insert the plugs and insert the wall plugs flush with the wall. • Screw the wall bracket to the wall using the supplied screws . • Mount the solar panel on the tripod screw and screw the solar panel a little way on (about three turns).
(F) Instructions d'utilisation panneau solaire Ref. Art. 31884 Introduction Le mode d’emploi fait partie intégrante de ce produit. Il contient des informations importantes concernant la sécurité, l’utilisation et la mise au rebut. Familiarisez-vous avec toutes les consignes d’utilisation et de sécurité avant d’utiliser le produit. N’utilisez ce produit qu’en respectant les instructions données et pour les seuls domaines d’application cités. Cette documentation est protégée par le copyright.
Présentation du produit 1. Verre d'absorption d'énergie 2. Voyant lumineux 3. Fente de trépied 4. interface de sortie 6V 5. interface d'entrée 5V 6.
Spécification • • • • • • • • • • • • • Puissance de charge solaire maximale: 1.5W Charge de courant maximale: 300 mA Batterie au lithium 1500mAh intégrée Entrée de charge externe: DC 5V / 500mA Sortie maximale: DC 6V / 1500mA Durée de charge de la batterie: La charge peut être effectuée en une journée suffisamment de rayonnement solaire peut être complété. Maximum de 9418 photos par jour ou de 3741 photos pendant la nuit possible 2716 clips vidéo maximum par jour ou 458 clips vidéo la nuit.
Introduction à l'opération installer Vous pouvez attacher le panneau solaire à un arbre à travers une sangle. Ou avec un support sur des surfaces planes. 1. Fixez le panneau solaire avec une sangle ou un support. 2. Le panneau solaire devrait être placé là où il y a assez de lumière du soleil et aucune branche avec des feuilles n'écarterait la lumière du soleil. Le verre d'absorption d'énergie doit être aligné avec la lumière du soleil. 3.
Connectez l'adaptateur pour charger Connectez la caméra de chasse à l'alimentation soutien 21
Voyant LED Le voyant LED indique le mode dans lequel se trouve le panneau solaire. 1. La lumière est bleue, le panneau est prêt à l'emploi. 2. La lumière est rouge lorsque le panneau solaire via l'adaptateur ou le La lumière du soleil est en train d'être chargée. 3. Le processus de charge est terminé, la lumière s'éteint.
Utiliser le support mural Vous pouvez monter la panneau solaire sur un mur ou sur un arbre en utilisant le support mural fourni. Avant de monter le support mural, vous devez vous assurer que toutes les vis fournies sont bien serrées.
Étapes de l'installation • Marquer les trous de perçage en tenant le pied du support mural à l'emplacement de montage souhaité, et marquer la position des trous. • Utiliser une mèche de forage de 6 mm afin de percer les trous requis, et insérer dans le mur les chevilles compatibles. • Visser le support mural au mur, en utilisant les vis fournies. • Monter la panneau solaire sur la vis du trépied, et visser la panneau solaire sans aller à fond (à peu près trois tours).
(NL) Gebruiksaanwijzing zonnepaneel Art.nr. 31884 Inleiding De gebruiksaanwijzing is onderdeel van dit product. Ze bevat belangrijke informatie over veiligheid, gebruik en afvoer. Voordat u het product in gebruik neemt, dient u zich met alle gebruiks- en veiligheidsaanwijzingen vertrouwd te maken. Gebruik dit product alleen zoals beschreven en alleen voor de genoemde toepassingsgebieden. Deze documentatie is auteursrechtelijk beschermd.
Productoverzicht 1. Energieabsorptieglas 2. Indicatielampje 3. Statiefsleuf 4. 6V-uitvoerinterface 5. 5V-invoerinterface 6.
Specificatie • • • • • • • • • • • • • • Maximaal vermogen voor opladen van de zonne-energie: 1,5 W Maximale stroomlading: 300 mA Ingebouwde 1500mAh lithiumbatterij Externe laadinvoer: DC 5V / 500mA Maximale output: DC 6V / 1500mA Laadduur batterij: opladen kan op één dag voldoende zonnestraling kan worden voltooid. Maximaal 9418 foto's per dag of 3741 foto's tijdens de nacht mogelijk Maximaal 2716 videoclips per dag of 458 videoclips in de nacht.
Operatie introductie installeren U kunt het zonnepaneel via een band aan een boom bevestigen. Of met een beugel op vlakke oppervlakken. 1.Bevestig het zonnepaneel met een riem of beugel. 2.Het zonnepaneel moet worden geplaatst waar het voldoende zonlicht krijgt en geen takken met bladeren het zonlicht buiten houden. Het energieabsorptieglas moet op één lijn liggen met zonlicht. 3. Plaats het zonnepaneel op een plaats waar het niet door regen kan worden overstroomd. 4.
Sluit de adapter aan om op te laden Sluit de jachtcamera aan op de voeding ondersteuning 29
LED-indicatielampje Het LED-lampje geeft aan in welke modus het zonnepaneel zich bevindt. 1. Het licht is blauw, het paneel is klaar voor gebruik. 2. Het licht is rood als het zonnepaneel via de adapter of de Zonlicht wordt opgeladen. 3. Het laadproces is voltooid, het lampje gaat uit.
Gebruik van de muurbeugel U kunt de zonnepaneel bevestigen aan de muur of een boom met de meegeleverde muurbeugel. Alvorens de muurbeugel te bevestigen, dient u te controleren of alle aanwezige schroeven stevig vast zitten.
Installatie • Markeer de boorgaten door de voet van de muurbeugel op de gewenste plek te houden en de positie van de gaten te markeren. • Boor de gaten met een boormachine voorzien van een 6 mm-boor en plaats de pluggen volledig verzonken in de muur. • Schroef de muurbeugel aan de muur met de meegeleverde bouten/schroeven. • Plaats de zonnepaneel op de statief-schroef en draai deze ongeveer drie slagen vast. • Draai de zonnepaneel in de gewenste richting en zet hem vast met de vergrendeling.