IMPORTANT CHANGES TO OWNERS AND OPERATORS MANUAL FOR MODELS 808 AND 818 SLICERS SHARPENER MAINTENANCE Snorkel has redesigned the Models 808 and 818 slicers to allow easy removal of the sharpener assembly for cleaning and maintenance. The following changes replace the sharpener maintenance instructions on pages 12, 13 and 14 of the enclosed Owners and Operators Manual: Page 12, item #1 should read: To remove the sharpener, grasp the top handle and lift until it stops.
WARNING SHARP KNIFE BLADE TO AVOID SERIOUS PERSONAL INJURY FOLLOW ALL THE INSTRUCTIONS IN THIS MANUAL AND 1. NEVER TOUCH THIS MACHINE WITHOUT TRAINING AND AUTHORIZATION BY YOUR SUPERVISOR. * MACHINE MUST BE on sol Id LEVEL SUPPORT. GUARDS MUST BE IN PLACE BEFORE PLUGGING IN AND TURNING ON MACHINE. ALWAYS USE THREE PRONGED PLUG PROVIDED. ALWAYS USE FOOD PUSHER NOT YOUR HAND. NEVER TOUCH ROTATING KNIFE. KEEP HANDS, ARMS, HAIR AND LOOSE CLOTHING CLEAR OF ALL MOVING PARTS. 8.
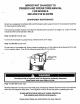
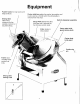
Equipment » Pusher hooks for long loaves and ( large products. Pusher slide bar guides the pusher into position and is also used as a handle when the slicing table is removed from the slicer. Slicing table holds meat, cheese and other suitable products for accurate slicing. Built-in sharpener assembly Gauge Plate determines slice thickness and is adjusted by the thickness control knob.
Pusher slide bar guides the pusher into position and Si icing table holds meat, is also used as a handle when the slicing table is cheese and other suitable removed from the slicer. products for accurate slicing. Gauge plate determines slice thickness and is adjusted by the thickness control! knob. Built-in sharpener assembly Slicing Table handles q ] : used for pushing the Si ice deflector ey 2 5 meat table back and R 8 forth. THIS IS THE : ONLY PART OF THE SLICER TOUCHED WHILE SLINGING MANUALLY.
A B. C. INSTALLATION GENERAL SAFE OPERATION REQUIRES PROPER INSTALLATION AND A PROPER WORK AREA, 1. Slicers should be installed in area having adequate fighting. 2. Operator should have adequate space to move freely in the work area. MACHINE MUST BE INSTALLED AND OPERATED ON SOLID LEVEL SUPPORT. 3. Installation should be made by an authorized Terkel Serviceman who will demonstrate the slicer and register it for warranty. This will also help insure prompt service in the future.
2. Inspect fo insure all parts have been provided, and center plate knife guard and switch guard are In place. (Refer to Pages 3 and 4} 3. Remove one of the short shipping legs and replace with one of the 4" legs (4575~ ( 00178}, tighten and install a rubber foot. 4. Once one 4" leg is in place, proceed to install the other three ONE AT A TIME, NSF REGULATIONS REQUIRE THE MODEL 818 SLICER TO BE MOUNTED ON 4" LEGS 5. Install a rubber foot on each leg. 6.
2. To release the product pusher (4675-00662) from beneath the product table: a: Grasp the product pusher knob (2275-00043) and b. Pull the pusher gently up from the rest position toward upper end of slicing table, then ©. Swing the pusher up from behind the slicing table and onto the slicing table, d. Lows the pusher gently until it rests at bottom of slicing table. 3. Put a few drops of the sample Terkel Food Machine Oil {4675-00182) supplied with the slicer on the product pusher slide bar.
TESTING PRIOR TO OPERATION A, GENERAL 1. Make sure ON-OFF switch is in the OFF position, and machine is unplugged. 2. Check to see that the CENTER PLATE KNIFE GUARD and sharpener assembly are in proper position. 3. Turn thickness control knob as far to the RIGHT as possible. This positions the gauge plate so that the knife haled is not exposed during testing. WARNING: TO AVOID SERIOUS PERSONAL INJURY NEVER TOUCH SHARP KNIFE BLADE. 4.
C. AUTOMATIC OPERATION — MODEL 818 1. See Paragraph A on page 8. 2. With ON-OFF switch in the OFF position: Push shift lever toward L.O with left hand; move slicing t table handle with the right hand until you feel it engage. WARNING: THE NEXT STEP WILL CAUSE SLICING TABLE TO MOVE AUTOMATICALLY. 3 Remove right hand from slicing table handle and switch machine ON. This engages the 45 slices per minute dong stroke, for slicing large products. 4. Switch machine QFF, WAIT FOR KNIFE TO STOP ROTATING.
A, GENERAL B. THICKNESS ADJUSTMENT 1. OPERATING INSTRUCTIONS WARNING SHARP KNIFE BLADE TO AVOID SERIOUS PERSONAL INJURY NEVER touch rotating knife blade. Keep HANDS CLEAR of all MOVING PARTS. Use SLING TABLE HANDLE not your hand, Always TURN OFF QLR RO TRV E1 =S Always TURN thickness control knee as far to the right as possible when NOT IN USE, TURN OFF and UNPLUG machine before CLEANING or SERVICING. Place predict to be sliced on slicing table.
2. The numbers on the knob will help you set the slicer to the thickness that's *just right” for a product. The numbers and thickness may vary slightly from one machine . to the next, If you're slicing meat or cheese for cus{ timers, you can ask them how thick they want it, and | adjust the slicer to meet their request. 3. For manual operation, switch power ON and grasp slicing table handle, moving table back and forth. 4, LET SLICES DROP FROM THE KNIFE.
1. THE SHARPENING STONES DIRTY STONES CANNOT SHARPEN! If the sharpening stones have become coated with food fats because someone has neglected to clean the knife blade before sharpening, they should be replaced. Coated and dirty stones will never sharpen effectively. .
WARNING: THE N 2. Do not push on the release clip. Simply rotate the sharpener unlit the release clip is aligned with the slot on the machine frame. Then lift the sharpener assembly off the machine. 3. Unscrew the locking knob (834-5023). The sharpens and its cover will come apart. Clean the cover with water and detergent. Carefully clean around the stones. 4, Check the stones. If they do not turn freely, the sharpener stone shaft must be cleaned and ogled. (USE TERKEL OIL).
5. Oil sharpener shafts. Place a few drops of Terkel oil on each shaft. Move the sharpening lever back and forth to make sure that the stones move in and out easily. Oil threads on knob and shaft. 6. Assemble sharpener. Make sure halt the sharpener fits info the two guide pins inside its cover and tighten the locking knob. 7. Oil mounting post. 8.
CLEANING AND SANITIZING WARNING THE SHARP KNIFE BLADE IS EXPOS DURING SEVERAL CLEANING STEP; TO AVOID SERIOUS PERSONAL INJURY: Make sure ON-OFF switch is in OFF postilion. G slicer from pullet. control knob all the way to RIGHT to close gauge Place PUSHER in its STORED and locked position. ONLY recommended cleaning equipment and materials. . DISASSEMBLY 1. Pull slicing table toward you. Place pusher in'stored and locked position. Loosen the slicing table locking knob. Remove slicing table.
THE NEXT STEPS WILL SE THE KNIFE, . Hold the center plate/knife guard with both hands. DO NOT PUT THE FINGERS OF YOUR HANDS UNDER THE GUARD. Hold only by the knobs. . Lift center plate/knife guard off the positioning pin. . Unscrew the sharpener knob (834-05023). Remove top knife guard/sharpener cover. Leave sharpener in place. . Push the slice deflector reseals (4575-00107) (assembly) button down. Push deflector down to release top pin, then lift deflector free.
10, Clean and sanitize removed parts. Wash these parts in hot water with detergent or put parts through dishwasher, rinse in hot water and rinse again in sanitizing solution. Let the parts air dry. REMEMBER: THE KNIFE IS EXPOSED HANDS AND ARMS CLEAR OF THE BLy 11. Clean slicer base using a cloth and cleaning solution. Rinse with hot water.
B. CLEANING THE KNIFE WARNING: THE KNIFE BLADE IS EXPOSED DURING THESE CLEANING The stainless steel knife will corrode if not properly cleaned and maintained. To properly clean the knife: 1. 10. Clean the back of the knife box area with the Glean front side of knife using wet sponge or wet towel. To avoid contact with cutting edge, WIPE FROM CENTER TO OUTER EDGE. Tum the knife from the backside with left hand. Clean backside of knife. Rotate knife downward with sponge or towel.
C. REASSEMBLY 1. Reassemble removable parts that have been cleaned and sanitized. REMEMBER: THE KNIFE BLADE IS EXPOSED KEEP HANDS AND ARMS CLEAR OF THE BLADE. Top knife guard/sharpener cover. Place knife guard over exposed knife with left hand. Align thumb nut with screw threads and tighten. Unit will self align. Center plates knife guard. GRASP PLATE WITH LEFT HAND ON TOP KNOB, RIGHT HAND ON BOTTOM KNOB. Align elongated hole into stationary pin. Bring plate forward, align thumb nut with screw pin.
5. Place the pusher in the stored and locked position, then replace slicing table. Hold the slicing table with both hands and lower it CAREFULLY in place. 6. Tighten the locking knob. 7. -Qil pusher shaft-Move the pusher up and.down and coat the rod with-a-thin film-of Terkel oil. WARNING: TO PREVENT PRODUCT CONTAMINATION, USE ONLY USDA AUTHORIZED OIL. D. SANITIZING 1. After cleaning, the slicer MUST BE SANITIZED to kill germs and bacteria. 2. Use only an APPROVED SANITIZING SOLUTION.
SHARPENING A, GENERAL 1. The knife should be sharpened at least once a day when the slicer is cleaned and sanitized. 2. You should also sharpen the knife whenever you notice wavy slices or excess scrap. 8. The knife must be cleaned before sharpening. See Page 18. WARNING: TO AVOID SERIOUS INJURY — KEEP HANDS AWAY FROM BLADE. SHARPEN 818 ONLY IN NEUTRAL B. SHARPENING INSTRUCTIONS 1. Make sure ON-OFF switch is in the OFF position, 2. Set speed selector 1o ‘N (neutral) on-Model 18 Automatic Slicer. 3.
8. Lift the sharpener with left hand and rotate into sharpening position and lower with ONE STONE on each side of blade. 9. Look underneath the sharpener cover to locate the sharpening lever. Place your left thumb on the sharpener cover for. control and-pull the sharpening fever with your left index finger until it stops. 10. Turn slicer on with right hand. Hold fever for approx( : tamely 10 seconds. Release the sharpener lever par. Halley for anther second.
CLEANING AND SANITIZING AFTER SHARPENING WARNING THE SHARP KNIFE BLADE IS EXPOSED DURING IS SR BTN AVOID SERIOUS PERSONAL INJURY: Make sure ON-OFF switch is in OFF position. UNPLUG slicer from outlet. TURN thickness control knob all the way to RIGHT to clo Use ONLY recommended clinician and mater 1. Unscrew the locking knee of the center plate knife guard (3475-00374). WARNING: THE NEXT STEPS WILL EXPOSE THE =N 2. Hold the center plateful guard with both hands.
4. Unscrew the sharpener knob (834-05023). Remove top knife guard/sharpener cover. Leave sharpener in place. 5. Push the slice deflector release, (4575-00107) (assembly) button down. Remove sics deflector. Push deflector down to release top pin, then jilt deflector free. 6. Clean and sanitize removed parts {o remove . sharpening dust. Wash these parts in hot water with detergent or put parts through dishwasher, rinse in hot water and rinse again in sanitizing ? solution. Let the parts air dry.
B. CLEANING THE KNIFE POSED DURING THESE:CLEANING STEPS; The stainless stew! knife will corrode if not properly cleaned and maintained. To properly clean the knife: 1. Clean front side of knife using wet sponge or wet towel. To avoid contact with cutting edge, WIPE FROM CENTER TO OUTER EDGE. Turn the knife from the backside with left hand. 2. Clean backside of knife. Rotate knife. downward with.sponge or towel. Then wipe with upward motion. Repeat until clean. 3. Sanitize and allow to dry. 4.
REASSEMBLY Reassemble been.sanitized. WARNING: THE KN HA =] 721 1. Top knife/sharpener cover. Place knife guard over exposed knife with left hand. Align thumb nut with craw threads and tighten. Unit will eff align. 2. Center plate/knife guard. GRASP PLATE WITH LEFT HAND ON TOP KNOB, RIGHT HAND ON BOTTOM KNOB. Align elongated hole into stationary pin. Bring plate forward, align thumb nut with screw pin and tighten. Guard will self align. 3. Replace slice detector.
4. Place the pusher in the stored and locked position before reinstalling. Replace slicing table. Hold the slicing table with both hands and lower it CAREFULLY in place. 5. Tighten the locking knob. 8. Oil pusher shaft. Move the pusher up and down the shaft and coat the rod with a thin film of Terkel oil. WARNING: TO PREVENT PRODUCT [Qe MUY AUTHORIZED OIL. D. SANITIZING 1. After cleaning, the slicer MUST BE SANITIZED to kill germs and bacteria, 2. Use only an APPROVED SANITIZING SOLUTION.
ACCESSORIES VEGETABLE CHUTE (4675-0189) A vegetable chute is available to replace the slicing table. To install the vegetable chute, loosen the slicing table locking knob and remove the slicing table. Loosen the locking knob {2275-00042) on the vegetable chute and fit it to the machine the same way as the slicing table. Tighten locking knob. Before operating check to see that there is approximately 1/16” clearance between the end of the vegetable chute.
TRAYS There are two trays available for use with either the 808 or 818 slicer. The receiving tray is a shallow lipped tray 1o receive the product and hold small quantities of juices (hot beef, tomatoes, etc.). The tray is contour moiled to the receiving area of the machine to hold it steady during operation. The slaw tray (3875-00031) is a deep tray to receive a large quantity of product and retain the juices.
TROUBLESHOOTING if your slicer should fail to function, there are a few things you can check before calling a serviceman. KNIFE NOT SHARPENING 1. Are sharpening procedures being followed exactly as shown in this manual? 2. Are sharpener stones clean? If not, replace them according to instruction given in SHARPENER MAINTENANCE section 3. Are sharpening stones severely wom and not making contact with the blade? If so, replace them according to instruction given in Sharpener Maintenance section. 4.
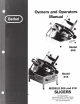
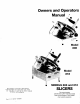
REPAIR PARTS/REPAIR SERVICE Please contact your nearest Designated Terkel Service Location for any repair parts and/or repair services required on your Terkel Slicer. Additional information may be obtained from: Service Support Center Terkel Incorporated One Terkel Drive Teleport, Indiana 46350 Phone: MODEL 808 SLICER SPECIFICATIONS OPERATION: Gravity feed, semi-automatic MOTOR: 1/3 h.p., 115 volt, 80 cycle, single phase, A.C.