
Owner`s manual


Mastering
Your
BERNINA
®
BERNINA
®
/bernette
®
Sewing Machines
MASTERING YOUR BERNINA
®
/bernette
®
SEWING MACHINE 8/05
90
Notes
©2005 BERNINA® of America, Inc. Permission to copy granted only to Authorized BERNINA
®
Dealers
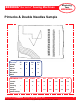
Fabric ................................................................ cotton organdy, 6” x 8”
Notions .............................................. 6” length of heirloom insertion lace
Needle ......................................................................... Wing size 100/16
................................................................................ Double Wing
Thread ...................... two spools embroidery thread or 60 weight cotton
Presser Foot.............................. BERNINA
®
Clear Foot #34/#34C or
.................... BERNINA
®
Open Embroidery Foot #20/#20C
....................................................bernette
®
clear satin stitch foot
Stitch ...................... straight, blindstitch, decorative stitches as desired
Needle Position .............................................................................. center
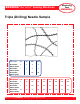
Wing Needle/Double Wing Needle
Single Wing Needle
Insert Wing needle. If available, engage the Wing Needle Limitation
function or Security Program (Wing needle option). This alters the stitch
width so that the “wings” of the needle will not hit the presser foot; also
constrains stitches to the center needle position.
Position lace on top of organdy. Select pin stitch or blanket stitch (if not
available, select a narrow zigzag stitch with SW = 2mm). Stitch along
one edge of lace, engaging the Mirror Image function if necessary and
available. Sew along remaining edge, again engaging Mirror Image –
or turning fabric – as needed. Carefully trim fabric from under lace.
Frame lace insertion with three of the stitches suggested in the chart.
Double Wing Needle
Insert Double Wing needle. Select straight stitch. Engage Double Wing
Needle Limitation/Security function if available. Adjust stitch length
to 3mm. Stitch across the fabric on the bias (diagonal). At end, carefully
pivot and sew back along first line of stitching, with “wing” portion of
Double needle entering holes created by the first line of stitching.
Frame center row with two additional lines of stitching:
- 1st row - blindstitch - sew in one direction, pivot, and stitch back
to create a “chain” effect
- 2nd row - decorative straight stitch motif, such as a scallop
Carefully remove the stabilizer following the manufacturer’s directions.
Trim and mount the sample.
Wing Needle Tips:
When selecting stitches to
use with a Wing or Double
Wing Needle, look for multi-
motion stitches where the
needle enters the same hole
multiple times.
Stitching on the diagonal
(bias) of the fabric allows
holes created by the Wing
needle to open more easily.
To help support fabric and
stitching, temporarily bond a
layer of heavy, water-soluble
stabilizer to wrong side of
fabric using a temporary
spray adhesive.