
Installation, Use and Care Manual


WARNING
Before starting any cleaning operation disconnect the appliance from the power
supply removing the plug or acting on the master switch.
Introduction
The purpose of these instructions is to explain the technical details of your hood and
its use. Since these instructions concern more than one hood model, they may refer to
components that are not part of the hood that is being installed.
The hood must be used to exhaust cooking fumes outside the room. The air
connections can vary from country to country.
We reserve the right to modify the product without any notice, still aiming at improving
the appliance.
INSTALLATION INSTRUCTIONS
GENERAL INFORMATION
This hood is fit to be installed on the wall above a hob.
It can be used in Exhaust and Filter version.
Installation
The hood must be installed at the center with respect to the hob.
The minimum distance between the cooktop and the lower part of the hood is
25 "19/32 (650mm).
Warning: the room must be sufficiently ventilated when the chimney hood is used
contemporaneously with other appliances burning gas or other combustible materials.
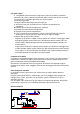
Hood wall mounting
1) Set the distance between the hob and the hood (Fig. 1).
2) Fix the hood to the wall (Fig. 5/L) using the two screws and the two wall plugs
supplied (Fig. 5/L).
3) Mount the reduction connector 4’’47/64 – 5’’29/32 (120/150mm) (Fig.5 O)
if the exhaust pipe is 5’’ 59/64 (Ø125mm)
4) Fix the hood body with two screws and two wall plugs (Fig.5/N) into the lower part
of the hood (Fig.5/M).
Exhaust version
Preferably use a pipe 5’’29/32 (Ø150mm) or 5’’ 59/64 (Ø125mm), flexible if possible
(Fig.5/H), and stop it by a pipe clamp.
Connect the evacuation pipe to the external conduit and fix it by a pipe clamp. Do not
mount the activated charcoal filters.
Installing the pipes
(for exhaust version only)
Fix the anchor bracket to the wall (Fig.5/B) at the desired height using wall plugs and
screws supplied (Fig. 5/A).
Insert the upper telescopic pipe (Fig.5/P) into the lower telescopic pipe (Fig.5/F).
Position the lower telescopic pipe on the hood body. Lift up the upper telescopic pipe
and fix it to the bracket using the screws supplied (Fig.5C). Fix the lower telescopic
pipe to the hood body (Fig.5/G).