INSTALLATION, MAINTENANCE AND USE INSTRUCTIONS FOR FREE-STANDING COOKERS 90x60 cm (type M92/M92V)Dual oven READ THE INSTRUCTION BOOKLET BEFORE INSTALLING AND USING THE APPLIANCE. The manufacturer will not be responsible for any damage to property or to persons caused by incorrect installation or improper use of the appliance. The manufacturer is not responsible for any inaccuracies, due to printing or transcription errors, contained in this booklet.
CONTENTS: INSTALLER TECHNICAL MANUAL ............................................................................................................... pg. 2 Installing the cooker - Installation information ................................................................................................. pg. 2 Ventilation and aeration of rooms .................................................................................................................... pg. 3 Height-adjustable feet ........................
IMPORTANT INFORMATION FOR INSTALLING THE APPLIANCE The cooker can be installed separately, as a freestanding unit, or between kitchen units or between a kitchen unit and the wall. The device must be installed in accordance with the regulations stated in UNI 7129 and UNI 7131 standards. This appliance is not connected to devices which exhaust combustion products. Special attention must be focused on the prescriptions described below regarding room aeration and ventilation.
ADAPTATION TO DIFFERENT TYPES OF GAS FOR COOKER Before performing any maintenance operation, disconnect the appliance from the gas supply and electricity network. REPLACING THE NOZZLES TO OPERATE WITH ANOTHER TYPE OF GAS FOR COOKER: Follow the instructions below to change the burner nozzles on the work surface: 1) Pull out the plug from the electric outlet to avoid any type of electric contact. 2) Remove the grids from the work surface (Fig. 12).
Oven burner adjustment: follow the instructions below to adjust the minimum: 1) Light the burner setting the knob to the MAXIMUM position. 2) Close the oven door and operate the oven for at least 10 minutes. 3) Set the knob to the MINIMUM position (corresponding to 120°) and then remove it.
APPLIANCE MAINTENANCE ATTENTION: IMPORTANT WARNINGS For cookers resting on a base ATTENTION: If the cooker rests on a base, take the measures necessary to prevent the cooker from sliding along the support base. For cookers with glass covers ATTENTION: Before opening the appliance’s glass cover, carefully remove all liquid residues from the top of it. ATTENTION: Before closing the appliance’s glass cover, make sure that the work surface has cooled.
CONTROL PANEL DESCRIPTION On the control panel, small symbols show the function of each knob or key. Here as follows are the several controls that a cooker can have: the symbol or shows the disposition of burners on the worktop, the full dot identifies the burner in object (in this case the front burner on the right).
unobstructed (Fig.3) and activating the mechanical aeration device/exhaust hood or electric fan (Fig. 4 and Fig. 5). Intensive and continuous use of the appliance may require additional aeration, for example by opening a window, or more efficient aeration by increasing the power of the mechanical exhauster, if installed. USING THE GAS OVEN (left oven) GAS OVEN: All the gas oven cookers are equipped with a thermostat and safety device to adjust the cooking temperature.
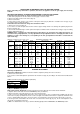
TABLE N°7 GAS OVEN COOKING TABLE TEMP °C MEAT PORK ROAST BEEF ROAST (YOUNG STEER) BEEF ROAST VEAL ROAST LAMB ROAST ROAST BEEF ROAST HARE ROAST RABBIT ROAST TURKEY ROAST GOOSE ROAST DUCK ROAST CHICKEN 220 250 240 220 220 230 235 220 235 225 235 235 (210) (240) (230) (210) (210) (230) (225) (210) (225) (215) (225) (225) 200-225 (190-215) FISH PASTRY FRUIT PIE TEA CAKE BRIOCHES SPONGE CAKE RING CAKE SWEET PUFF PASTRIES RAISIN LOAF STRUDEL SAVOIA COOKIES APPLE FRITTERS SAZOIARDI SANDWICH TOAST SANDWICH BREA
elements to be used have been set, the oven elements are turned on and off by the thermostat; therefore, it is normal for the orange light to turn on and off while the oven is working. To turn off the electric oven set the switch knob to position 0 to prevent the thermostat from controlling the elements. Setting the thermostat knob to position 0 turns off the elements but it is still possible, using the switch, to turn on the electric fan and the oven light.
TABLE N°8 NATURAL CONVENTIONAL ELECTRIC OVEN COOKING TABLE TEMP °C MEAT PORK ROAST 225 BEEF ROAST (YOUNG STEER) 225 BEEF ROAST 250 VEAL ROAST 225 LAMB ROAST 225 ROAST BEEF 230 ROAST HARE 250 ROAST RABBIT 250 ROAST TURKEY 250 ROAST GOOSE 225 ROAST DUCK 250 ROAST CHICKEN 250 HEIGHT MINUTES 4/5 4/5 4/5 4/5 4 4/5 4/5 4 4 4 4/5 4/5 60-80 60-80 50-60 60-80 40-50 50-60 40-50 60-80 50-60 60-70 45-60 40-45 FISH 200-225 3 15-25 PASTRY FRUIT PIE TEA CAKE BRIOCHES SPONGE CAKE RING CAKE SWEET PUFF PASTRIES RAIS
FISH 160-180 3/4 PASTRY FRUIT PIE TEA CAKE BRIOCHES SPONGE CAKE RING CAKE SWEET PUFF PASTRIES RAISIN LOAF STRUDEL SAVOIA COOKIES APPLE FRITTERS SAZOIARDI SANDWICH TOAST SANDWICH BREAD PIZZA 180-200 200-220 170-180 200-230 160-180 180-200 230-250 160 150-180 180-200 170-180 230-250 200-220 200-220 3 3 3 3 3 3 3 3 3 3 3 4 4 3 40-50 40-45 40-60 25-35 35-45 20-30 30-40 25-35 50-60 18-25 30-40 7 40 20 USING THE CONVENTIONAL ELECTRIC GRILL The electric grill can also be combined with the gas oven or electr
Heat is optimally distributed inside the oven when the thermometer dial has stopped. If the oven temperature drops or goes up, the thermometer dial will follow these variations in the same way. When the oven is turned off, the temperature on the thermometer will slowly drop until it reaches departure position. NOTE: The temperatures on the knob are indicative. Follow the thermometer temperature for cooking.
Fig. 1 Fig. 3 Fig. 4 Fig. 5 Fig.
Fig.
Fig.
Fig.
Fig.
Fig.
Fig.10 Fig.11 fig.12 fig.
fig.14 fig.15 fig.16 Fig. 17 Fig. 18 Fig. 19 T fig.20 fig.21 fig.21A fig.21B Fig.22 Fig.23 Fig.23 21 Fig.
Fig.24 fig.27 Fig.25 fig.27 Fig.26 fig.28 Fig.30 Fig.30 Fig. 32 Fig. 32 fig.29 Fig. 31 Fig. 31 Fig.
Fig. 33 Fig.35 Fig. 34 Fig.
Cod.