EN Instructions for Use DE Bedienungsanweisung FR Instructions d’utilisation F45CONVAPX F45PROVAPX
EN Environmental protection We ask you to read the instructions in this booklet very carefully as this will allow you to get the best results from using your Steam oven. KEEP THE DOCUMENTATION OF PRODUCT FOR FUTURE REFERENCE. THIS Always keep the instruction manual handy. If you lend the Steam oven to someone else give them the manual as well! Disposal of the packaging The packaging bears the Green Dot mark.
EN Contents Installation instructions ..................................................................................................................... 3 Before installation ............................................................................................................................. 3 After installation ................................................................................................................................ 3 Safety Instructions ...................................
EN Installation instructions Before installation After installation Check that the input voltage indicated on the characteristics plate is the same as the voltage of the power outlet you are going to use. The oven is equipped with a power cable and a plug for single phase (household) current, 230-240V ~ 50Hz. Open the oven door and take out all the accessories and remove the packing material. If the oven is to be installed on a permanent basis it must be installed by a qualified technician.
EN Safety Instructions Warning! Do not leave the oven unsupervised. Warning! If you see smoke or fire, keep the door closed in order to smother the flames. Switch off the oven and take the plug out of the socket or cut off the oven power supply. Overheated fat and oil can easily catch fire. Heating oil in the cooking space to sear meat is dangerous and should not be done.
EN Safety Instructions This oven is exclusively for domestic use! The appliance is designed for use in the home for preparing food. No liability is assumed for any damage caused by improper or incorrect use. Avoid damaging the oven or other dangerous situations by following these instructions: Do not cover or obstruct the ventilation openings. Do not keep any inflammable object inside the oven as it may burn if the oven is switched on. Do not use the oven as a pantry. Do not pour spirits (e.g.
EN Description of your oven 1. Ŕ Door window glass 2. Ŕ Safety catches 3. Ŕ Lamp bulb 4. Ŕ Control panel a. Ŕ Function lights b. Ŕ Timer light c. Ŕ Clock / Duration / Food type lights d. Ŕ Clock / Duration / Food type display and key e. Ŕ Temperature / Food group key 5. Ŕ Baking tray 6. Ŕ Perforated baking tray 7. Ŕ Shelf guides f. Ŕ Temperature / Food Group display and key g. Ŕ Water Level / Descale lights h. Ŕ Water Level / Descale display and key i. Ŕ “+”and “Ŕ” keys j.
EN Basic settings Initial Settings After your steam oven is first plugged in or after a power failure, the clock display will flash to indicate that the time shown is not correct. To set the clock and the water hardness parameter value proceed as described in the following chapters. The oven will not operate until the clock, and the water hardness parameter is set. Setting the clock To set the clock, proceed as follows: 1. Press the Clock key.
EN Basic settings Safety blocking The oven functioning can be blocked (for example, to stop it being used by children). 1. To block the oven, press the Stop key for 3 seconds. You will hear a sound signal and the display will show the word “SAFE”. The oven is blocked in this state and cannot be used. 2. To unblock the oven, press the Stop key again for 3 seconds. You will hear a sound signal and the display will show the time again. Timer The timer functions like an egg timer.
EN Basic functions Steam function Use this function to cook all sorts of vegetables, rice, cereals and meat. It is also suitable for extracting juice from berries and for simultaneous defrosting and cooking of vegetables. 1. Press the Steam Function key. The function key lights up. 2. Press the Temperature key to set the desired value. The respective light will start to flash. If you do not press this key, the oven operates at 100 ºC. 3. To change the Temperature press the “+” and “–” keys. 4.
EN Special Functions Cooking Vegetables Use this function cook the vegetables described in the table below. 1. Press the Cooking Vegetables function key. The function key lights up. 2. Press the Food group key selection key to change the food type. The respective light will flash. 3. Press “+” and “–” keys to change the programme, e.g. “A 1” (see following table). 4. Press the Start key. The oven will start to operate.
EN Special Functions Cooking Meat Use this function cook the meat types described in the table below. 1. Press the Cooking Meat function key. The function key lights up. 3. Press “+” and “–” keys to change the programme, e.g. “C 1” (see following table). 2. Press the Food group key selection key to change the food type. The respective light will flash. 4. Press the Start key. The oven will start to operate. The following table shows the Cooking Meat programmes, temperature and standing times.
EN Water feeding Filling the water tank All functions require the water tank to be full. Fill the water tank up to the ”MAX” mark with cold, fresh drinking water and introduce it into the slot located above the cavity (approximately 1L). If the indication “rES” appears, it means that the water tank was not properly inserted. overflow when it is pumped back to the water tank. RISK OF OVERFLOW.
EN When the oven is working... Interrupting a cooking cycle You can stop the cooking process at any time by pressing the Stop key once. The oven incorporates a steam-reduction function that is activated when the Stop key is pressed to gradually release the steam from the cavity, so that there is no sudden rush of steam when the appliance door is opened. This function takes around 3 minutes and during it the display shows the word “VAP”.
EN When the oven is working... End of a cooking cycle At the end of the set duration or when you press the Stop key to finish the cooking cycle the oven starts the steam-reduction function. This function gradually releases the steam from the cavity, so that there is no sudden rush of steam when the appliance door is opened. and dry it with a cloth. The door should be left open for some time so that the appliance can dry completely.
EN Usage, tables and tips Use of accessories The rack is used when cooking with small containers, as for example, dessert bowls and to regenerate plate dishes. The perforated container is suitable for cooking fresh or deep frozen vegetables, meat and poultry. In this case it is important that the nonperforated container is introduced into the first level. This way, dripping liquids are collected and the appliance does not get dirty.
EN Usage, tables and tips Meat Meat Quantity Temperature ºC Time min. Container Level Chicken leg 4-10 100 40-45 Perforated 2 Chicken breast 4-6 100 25-35 Perforated 2 Smoked pork loin 500g Ŕ 1000 g 100 40-50 Perforated 2 Turkey escalope 4-8 100 20-25 Perforated 2 Pork filet, whole 4-8 100 20-30 Perforated 2 80-100 10-15 Perforated 2 Temperature ºC Time min.
EN Usage, tables and tips Vegetables Vegetables Eggplant/Aubergine Temperature ºC Time min.
EN Usage, tables and tips Desserts Desserts Quantity Temperature ºC Time min. Container Level Stewed apples 500-1500 g 100 15-25 Not perforated 2 Stewed pears 500-1500 g 100 25-30 Not perforated 2 Crème brûlée 80 20-25 Rack - bowl 2 Crème caramel 80 25-30 Rack - bowl 2 Yogurt 40 4-6 hrs. Rack - bowl 2 100 15-20 Not perforated 2 Stewed peaches 500-1500 g Fruit (Sterilising/Boiling down) Quantity Temperature ºC Time min.
EN Usage, tables and tips Defrost Vegetables / Side dish Broccoli Temperature ºC Time min.
EN Care and maintenance Cleaning the cooking space Pull the shelf guides to the inside of the cavity and remove from the front. Avoid using abrasive cleaners such as scouring pads, steel wool, etc. as they can damage the surface. Wipe the cooking space clean using a damp cloth whilst the appliance is still warm. Finish off by drying the cooking space. For ease of cleaning, the shelf guides can be removed (see the following chapter).
EN Care and maintenance Removing the appliance door 1. Open the appliance door as far as it will go. 3. Close the appliance door just enough that it can be lifted out. 2. Insert 2 pins inside the holes in the hinges. 4. To reassemble, push the hinges into the holes from the front. 5. Open the appliance door as far as it will go and remove the pins.
EN Care and maintenance Suitable descaling solutions Descaling Whenever steam is produced, irrespective of the hardness of the local water supply (i.e. the limescale content of the water), limescale is deposited inside the steam generator. The time interval between descaling depends on the hardness of the water and frequency of use.
EN Care and maintenance Descaling procedure Warning: For safety reasons, the descaling process cannot be interrupted. The appliance can be descaled with the appliance door open or closed. The appliance must be in idle state prior to starting the descaling cycle. To run a descaling cycle proceed as follows: 1. Press the Descale and the Clock/Duration key at the same time. The display shows “CAL” and there is an intermittent beep. 2. Press the Start key. 3. When the display shows “0.
EN Oven cleaning Warning! Cleaning should be done with the oven power switched off. Take the plug out of the socket or switch off the oven’s power circuit. Do not use aggressive or abrasive cleaning products, scourers that scratch surfaces or sharp objects, since stains may appear. Do not use high pressure or steam jet cleaning appliances. Front surface Normally you just need to clean the oven with a damp cloth. If it is very dirty, add a few drops of dishwashing liquid to the cleaning water.
EN What should I do if the oven doesn’t work? WARNING! Any type of repair must only be done by a specialised technician. Any repair done by a person not authorised by the manufacturer is dangerous. You do not need to contact Technical Assistance to resolve the following questions: The display is not showing! Check if: - The time indication has been switched off (see section on Basic Settings). Nothing happens when I press the keys! Check if: - The Safety Block is active (see section on Basic Settings).
EN Technical characteristics Displays Display 1 Displays Display 2 1 2 3 ----- CAL --- 0.6L 1.0L Display 3 Descaling (clock) --- (clock) --- (clock) ---/(Temperature or foodstuff group) Water tank (Clock or time setting) --- (Clock) Description Soft water. Medium water. Hard water. Appliance must be descaled. Flashing Ŕ descaling starts. Feed 0.6 litre descaling solution into the water tank. Feed 1 litre cold water into the water tank for rinsing. Indication that water tank is missing.
EN Technical characteristics Description of Functions Symbol Function Steam Regenerating & Sterilising Cooking Vegetables Foods Cooking all sorts of vegetables, rice, cereals and meat. Extracting juice from berries. Simultaneous defrosting and cooking of vegetables. Regenerating plate dishes and ready-made meals. Sterilising/boiling down fruit. Cooking different types of vegetables. Cooking Fish Cooking different types of fish. Cooking Meat Cooking different types of meat.
DE Hinweise zum Umweltschutz Wir bitten Sie, die in diesem Heft enthaltenen Anweisungen aufmerksam durchzulesen, die helfen Ihnen, bei der Nutzung Ihres Dampfgarers gute Ergebnisse zu erzielen. Entsorgung der Verpackung BEWAHREN SIE DIE DOKUMENTATION DIESES GERÄTES AUF, UM KÜNFTIG IN IHR NACHSCHLAGEN ZU KÖNNEN. Benutzen Sie geeignete Behältnisse, um alle Verpackungsmaterialien, wie Pappe, Styropor und Folien, zu entsorgen.
DE Inhaltsverzeichnis Installationsanleitung ....................................................................................................................... 30 Vor der Installation .......................................................................................................................... 30 Nach der Installation ....................................................................................................................... 30 Sicherheitshinweise ...............................
DE Installationsanleitung Vor der Installation Überprüfen Sie, dass Versorgungsspannung, die auf Typenschild angegeben ist, mit Netzspannung übereinstimmt. Nach der Installation die dem Ihrer Öffnen Sie die Tür und entnehmen Sie alle Zubehörteile sowie das Verpackungsmaterial. Achtung! Die Vorderseite des Gerätes kann mit einer Schutzfolie versehen sein. Ziehen Sie diese Folie vor der ersten Benutzung des Gerätes vorsichtig ab, indem Sie an deren Unterseite beginnen.
DE Sicherheitshinweise Achtung! Lassen Sie das Gerät nicht unbeaufsichtigt arbeiten. Achtung! Falls Sie Rauch oder Feuer bemerken, dann halten Sie die Tür geschlossen, um die Flammen zu ersticken. Schalten Sie das Gerät ab und ziehen Sie den Stecker aus der Steckdose oder unterbrechen Sie die Stromversorgung des Gerätes. Überhitzte Fette und Öle können sich leicht entzünden. Erhitzen Sie deshalb kein Öl und Fett im Garraum.
DE Sicherheitshinweise Dieses Gerät ist lediglich für den Hausgebrauch bestimmt! Dieses Gerät ist für die Zubereitung der Lebensmittel im Haushalt geeignet. Es wird keine Haftung übernommen für Schäden, die durch ungeeigneten oder unzulässigen Gebrauch entstehen. Wenn Sie den Hinweisen gemäß vorgehen, dann vermeiden Sie Schäden am Gerät und sonstige gefährliche Situationen: Verdecken oder verstopfen Sie die Belüftungslöcher und -schlitze nicht.
DE Beschreibung des Gerätes 1. Ŕ Türglass 2. Ŕ Sicherheitsverriegelung 3. Ŕ Lampe 4. Ŕ Bedienblende a. Ŕ Funktionsanzeigeleuchte b. Ŕ Kurzzeitwecker c. Ŕ Uhr-/ Zeitwahl-/ Lebensmittelleuchte d. Ŕ Uhr-/ Zeitwahl-/ Lebensmittelanzeige und taste e. Ŕ Temperatur- und Lebensmittelgruppentaste. 33 5. ŔGelochtes Backblech 6. Ŕ Backblech 7. Ŕ Seitengitter f. Ŕ Temperatur-/ Lebensmittelgruppenazeige und taste g. Ŕ Wasserstand- und Entkalkungsleuchte h. Ŕ Wasserstand-/ Entkalkungsanzeige und taste i.
DE Grundeinstellungen Anfangseinstellungen Nach Anschluss des Gerätes an das Netz oder nach einem Stromausfall blinkt die Uhr und zeigt damit an, dass die Uhrzeit nicht korrekt ist. Das Gerät kann nicht in Betrieb genommen werden, bis die Uhrzeit, und die Wasserhärte eingestellt sind. Um die Uhr und die Wasserhärte einzustellen, bitte gehen Sie wie folgt vor. Uhr einstellen Gehen Sie folgendermaßen vor, um die Uhr einzustellen: 1. Drücken Sie die Uhr-Einstelltaste.
DE Grundeinstellungen Sicherheitsverriegelung / Kindersicherung Der Betrieb des Gerätes kann blockiert werden (zum Beispiel, um die Benutzung durch Kinder zu verhindern). 1. Drücken Sie die Taste Stop 3 Sekunden um das Gerät zu blockieren. Daraufhin erklingt ein Signal, und auf der Anzeige erscheint das Wort „SAFE“. Das Gerät ist verriegelt und gestattet keinerlei Bedienung. 2. Drücken Sie die Taste Stop erneut 3 Sekunden um das Gerät zu entriegeln.
DE Grundfunktionen Dampfgaren Benutzen Sie diese Funktion, um alle Gemüse, Reis, Fisch-, und Fleischarten zu Garen. Ist auch geeignet zum Entsaften von Beeren und für das gleichzeitige Auftauen und Garen von Gemüse. 1. Drücken Sie die Taste Funktionstaste leuchtet. Dampfgaren. Die 2. Drücken Sie die Taste Temperatur, um die die gewünschte Temperatur zu wählen. Die entsprechende Leuchte blinkt. Wenn Sie diese Taste nicht drücken, arbeitet das Gerät mit 100ºC. 3.
DE Sonderfunktionen Gemüse Benutzen Sie diese Funktion, um die Gemüsearten der Tabelle zuzubereiten. 1. Drücken Sie die Taste Funktionstaste leuchtet. Gemüse. Die 2. Drücken Sie die Lebensmittelgruppentaste um die Lebensmittelart zu ändern. Die entsprechende Leuchte blinkt. 3. Um das Programm zu ändern, drücken Sie die „+“- und „-“-Tasten, z.B. „A 1“ (siehe folgende Tabelle). 4. Drücken Sie die Taste Start. Das Gerät beginnt zu arbeiten. Die folgende Tabelle zeigt die Programme für Gemüse.
DE Sonderfunktionen Fisch Benutzen Sie diese Funktion, um die Fischarten der Tabelle zuzubereiten. 1. Drücken Sie die Taste Funktionstaste erleuchtet. Fisch. Die 2. Drücken Sie die Lebensmittelgruppentaste um die Lebensmittelart zu ändern. Die entsprechende Leuchte blinkt. 3. Um das Programm zu ändern, drücken Sie die „+“- und „-“-Tasten, z.B. „b 1“ (siehe folgende Tabelle). 4. Drücken Sie die Taste Start. Das Gerät beginnt zu arbeiten. Die folgende Tabelle zeigt die Programme für Fisch.
DE Sonderfunktionen Fleisch Benutzen Sie diese Funktion, um die Fleischarten der Tabelle zuzubereiten. 1. Drücken Sie die Taste Funktionstaste leuchtet. Fleisch. Die 2. Drücken Sie die Lebensmittelgruppentaste um die Lebensmittelart zu ändern. Die entsprechende Leuchte blinkt. 3. Um das Programm zu ändern, drücken Sie die „+“- und „-“-Tasten, z.B. „C 1“ (siehe folgende Tabelle). 4. Drücken Sie die Taste Start. Das Gerät beginnt zu arbeiten. Die folgende Tabelle zeigt die Programme für das Fleisch.
DE Sonderfunktionen Beilagen Benutzen Sie diese Funktion, um Beilagen zuzubereiten. 1. Drücken Sie die Taste Funktionstaste erleuchtet. Beilagen. Die 2. Drücken Sie die Lebensmittelgruppentaste um die Lebensmittelart zu ändern. Die entsprechende Leuchte blinkt. 3. Um das Programm zu ändern, drücken Sie die „+“- und „-“-Tasten, z.B. „d 1“ (siehe folgende Tabelle). 4. Drücken Sie die Taste Start. Das Gerät beginnt zu arbeiten. Die folgende Tabelle zeigt die Programme für Beilagen.
DE Wasser einfüllen Wassertank füllen Wassertank entleeren Bei allen Funktionen muss der Wassertank voll sein. Wenn das Gerät ausgeschaltet wird, wird das restliche Wasser zurück in den Wassertank gepumpt. Wassertank mit kaltem, frischem Trinkwasser bis zu der "MAX" Markierung füllen und bis zur Rastung über den Innenraum einschieben.ca. 1l Der Hinweis „rES“ bedeutet das der Wassertank nicht richtig platziert ist. Während das Wasser abgepumpt wird steht auf der Anzeige „PUMP".
DE Während des Betriebes... Unterbrechung eines Kochvorgangs Schließen Sie die Tür und drücken Sie die Taste Start, um den Vorgang wieder aufzunehmen. Sie können den Kochvorgang jederzeit unterbrechen, indem Sie einmal die Taste Start/Stopp drücken. Änderung der Parameter Das Gerät hat eine Dampfabbaufunktion, die durch die Taste Stopp aktiviert wird. Der Dampfaustritt beim öffnen der Tür wird dadurch vermindert. Es dauert ungefähr drei Minuten und während dieser Zeit steht „VAP“ auf dem Display.
DE Während des Betriebes... Ende eines Kochvorgangs Nach Ende des Garvorgangs oder nach drücken der Stopp-Taste, fängt die Dampfabbaufunktion an. Dampfaustoss Ein wechselnder Dampfaustoss ist bei diesem Gerät normal, dieser wird besonders in der Winterzeit oder in feuchten Umgebungen deutlich. Diese Funktion stößt schrittweise den Dampf aus dem Garraum, so dass weniger Dampf beim öffnen der Tür aus dem Gerät strömt.
DE Tabellen und Tipps Anwendung des Zubehörs Der gelochte Garbehälter wird zum Dämpfen von frischen oder tiefgekühltem Gemüse, Fleisch und Geflügel benutzt. Hierbei ist es wichtig, dass der ungelochte Garbehälter in die erste Leiste von unten in das Gerät eingeschoben wird. Die heruntertropfenden Flüssigkeiten werden so aufgefangen und verschmutzen nicht das Gerät. Der mit Lebensmittel belegte gelochte Garbehälter wird in die zweite Leiste von unten eingeschoben.
DE Tabellen und Tipps Fleisch Fleisch Menge Temperatur ºC Garzeit Min. Behälter Leiste v.u. Hähnchenbollen 4-10 100 40-45 gelocht 2 Hähnchenbrust 4-6 100 25-35 gelocht 2 500g -1000g 100 40-50 gelocht 2 Putenschnitzel 4-8 100 20-25 gelocht 2 Schweinefilet, ganz 4-8 100 20-30 gelocht 2 80-100 10-15 gelocht 2 Kasseler Würstchen Eier Eier Temperatur ºC Garzeit Min. Behälter Leiste v.u.
DE Tabellen und Tipps Gemüse Gemüse/ frisch Auberginen in Scheiben Bohnen Temperatur ºC Garzeit Min. Behälter Leiste v.u. 100 15-20 gelocht 2 100 35-45 gelocht 2 Broccoli Röschen mit Stiel 100 25-30 gelocht 2 Broccoli Röschen ohne Stiel 100 15-20 gelocht 2 Blumenkohl Röschen 100 25-30 gelocht 2 Blumenkohl ganzer Kopf 100 40-45 gelocht 1 100 30-35 gelocht 2 Erbsen Fenchel in Streifen 100 15-20 gelocht 2 Fenchel halbiert 100 20-30 gelocht 2 Kartoffeln m.
DE Tabellen und Tipps Desserts Desserts Menge Temperatur ºC Garzeit Min. Behälter Apfelkompott 500-1500 g 100 15-25 ungelocht Leiste v.u. 2 Birnenkompott 500-1500 g 100 25-30 ungelocht 2 Crème Brülèe 80 20-25 Rost-Schälchen 2 Crème Caramel 80 25-30 Rost-Schälchen 2 Joghurt 40 4-6 Std.. Rost-Schälchen 2 100 15-20 ungelocht 2 Pfirsichkompott 500-1500 g Obst (Sterilisieren/Einkochen) Obst Menge Temperatur ºC Garzeit Min. Behälter Leiste v.u.
DE Tabellen und Tipps Auftauen Gemüse/ Beilagen Broccoli Temperatur ºC Garzeit Min. Behälter Leiste v.u.
DE Wartung Reinigung des Innenraums Keinesfalls scheuernde Reinigungsmittel wie Allzweck-Scheuerschwämme, Metallwatte usw. benutzen. Dadurch wird die Oberfläche beschädigt. Auflagegitter etwas nach vorne herausnehmen. ziehen und Reinigen Sie das Garraum im warmen Zustand mit einem feuchteten Lappen Anschließend trocken wischen Zur einfacheren Reinigung, können die Seitengitter herausgenommen werde. (siehe folgende Kapitel).
DE Wartung Die Gerätetür herausnehmen 1. Öffnen Sie die Tür so weit wie möglich. 2. Fügen Sie zwei Bolzen in die Löcher der Türangeln ein. 3. Die Tür mit beiden Händen seitlich fassen und halb schließen. Heben Sie die Tür leicht an und ziehen Sie die Scharniere nach vorne aus den Türöffnungen. 4. Zum Einsetzen die Gerätetür mit beiden Händen seitlich fassen und die Scharniere in die Öffnungen am Gerät einschieben. 5. Öffnen Sie die Gerätetür so weit wie möglich und ziehen Sie die Bolzen heraus.
DE Wartung Entkalkung Bei jeder Dampferzeugung lagert sich, abhängig von der örtlichen Wasserhärte (d.h. vom Kalkgehalt des Wassers), Kalk im Dampferzeuger ab. Das Entkalkungsintervall ist von der jeweiligen Wasserhärte und der Häufigkeit der Benutzung abhängig.
DE Wartung Entkalkungsprozess Achtung: Aus Sicherheitsgründen kann der Entkalkungsprozess nicht unterbrochen werden. Das Gerät kann mit geöffneter oder geschlossener Tür entkalkt werden. Vor dem Entkalkungsprozess muss das Gerät im ausgeschaltetem Bereich sein Der Entkalkungsprozess wird wie folgt durchgeführt 1. Drücken Sie 5 Sekunden lang die Wasserstand-/ Entkalkungsanzeige und taste gleichzeitig mit die Uhr-/ Zeitwahl-/ Lebensmittelanzeige und taste an.
DE Reinigung und Wartung des Geräts Achtung! Die Reinigung muss an dem von der Stromversorgung getrennten Gerät durchgeführt werden. Ziehen Sie den Stecker aus der Steckdose oder schalten Sie den Stromversorgungskreis des Gerätes ab. Benutzen Sie keine aggressiven Reinigungsoder Scheuermittel, keine kratzenden Scheuertücher noch spitze Gegenstände, denn es können Flecken entstehen. Verwenden Sie keine HochdruckDampfstrahlreinigungsgeräte.
DE Was ist im Falle einer Funktionsstörung zu tun? ACHTUNG! Jegliche Art von Reparatur darf nur von spezialisierten Fachleuten ausgeführt werden. Jeder Eingriff, der durch nicht vom Hersteller autorisierte Personen vorgenommen wird, ist gefährlich. Folgende Probleme können behoben werden, ohne den Kundendienst zu benachrichtigen: Die Anzeige ist aus! Überprüfen, ob: - die Stundenanzeige ausgeschaltet wurde (siehe Abschnitt zu den Grundeinstellungen).
DE Technische Eigenschaften Anzeigen Display 1 Anzeigen Display 2 1 2 3 ----- CAL --- 0.5L 1.0L Display 3 Entkalkung (Uhr) --- (Uhr) --- (Uhr) Beschreibung Weiches Wasser. Mittelhartes Wasser. Hartes Wasser. Gerät muss Entkalkt werden. Blinkend, Entkalkung beginnt. 0,5 Liter Entkalkungslösung in den Wassertank geben. 1,0 Liter kaltes Wasser zum Spülen in den Wassertank geben.
DE Technische Eigenschaften Funktionsbeschreibung Symbol Funktion Dampfgaren Lebensmittel Alle Gemüse, Reis, Fisch-, und Fleischarten zubereiten und aufwärmen. Beeren entsaften. Gemüse gleichzeitig auftauen und garen. Regenerieren & Sterilisieren Teller- und Fertiggerichte regenerieren. Gemüse und Obst sterilisieren. Gemüse Verschiedene Gemüsearten zubereiten. Fisch Fleisch Beilagen Verschiedene Fischarten zubereiten. Verschiedene Fleischarten zubereiten.
FR Veuillez lire attentivement les indications contenues dans ce manuel. Elles vous aideront à obtenir de bons résultats lors de l'utilisation de votre four à vapeur. Instructions pour l'environnement la protection de Élimination de l’emballage L’emballage est marqué d’un point vert. CONSERVEZ LA DOCUMENTATION DE CET APPAREIL AFIN DE POUVOIR LA CONSULTER À L'AVENIR. Utilisez les conteneurs adéquats afin d’éliminer tous les matériaux d’emballage comme le carton, le polystyrène et le plastique.
FR Veuillez lire attentivement les indications contenues dans ce manuel. Elles vous aideront à obtenir de bons résultats lors de l'utilisation de votre four à vapeur. Instructions pour l'environnement la protection de Élimination de l’emballage L’emballage est marqué d’un point vert. CONSERVEZ LA DOCUMENTATION DE CET APPAREIL AFIN DE POUVOIR LA CONSULTER À L'AVENIR. Utilisez les conteneurs adéquats afin d’éliminer tous les matériaux d’emballage comme le carton, le polystyrène et le plastique.
FR Table des matières Instructions d’installation ................................................................................................................ 60 Avant l’installation ........................................................................................................................... 60 Après l’installation ........................................................................................................................... 60 Consignes de sécurité............................
FR Instructions d’installation Avant l’installation Après l’installation Vérifiez que la tension d’alimentation indiquée par la plaque d’identification correspond à la tension de votre réseau. L’appareil est équipé d’un cordon électrique et d’une prise pour un courant monophasé 230-240V ~ 50Hz Ouvrez la porte et retirez tous les accessoires ainsi que les matériaux d’emballage. En cas de raccordement permanent, l’appareil doit être installé par un technicien qualifié.
FR Consignes de sécurité Attention! Ne laissez jamais l’appareil fonctionner sans surveillance. Attention! Si vous remarquez de la fumée ou du feu, maintenez la porte fermée afin d'étouffer les flammes. Éteignez l'appareil et débranchez le cordon électrique ou arrêtez l’alimentation de l’appareil. La graisse et l’huile surchauffées peuvent s’enflammer facilement. Ne chauffez ni huile ni graisse dans le four.
FR Consignes de sécurité Cet appareil est uniquement destiné à une utilisation domestique! Cet appareil est destiné à la préparation de mets dans le cadre domestique. Toute responsabilité est déclinée en cas de dommages occasionnés par une utilisation inadéquate ou interdite. Si vous respectez les consignes, vous ne risquerez pas d’endommager l’appareil et éviterez toute autre situation dangereuse: Ne recouvrez pas et ne bouchez pas les trous ou la fente d’aération.
FR Description de l’appareil 1. Ŕ Porte vitrée 2. Ŕ Fermetures de sécurité 3. Ŕ Ampoule 4. Ŕ Panneau de contrôle 5. Ŕ Recipiente sem furos 6. Ŕ Bac de cuisson perforé 7. Ŕ Rayonnages a. Ŕ Voyant de fonctionnement b. Ŕ Voyant de la minuterie c. Ŕ Voyants de l’heure / de la durée / du type de nourriture d. Ŕ Affichage et réglage de l’heure / de la durée / du type de nourriture e. Ŕ Touche température / groupe de nourriture 63 f. Ŕ Affichage et réglage température / poids g.
FR Installation de base Installation initiale Après raccordement à la ligne de votre four à vapeur ou après une coupure de courant, l’affichage de l’heure clignote pour indiquer que l’heure n’est pas correcte. Le four ne fonctionnera pas jusqu’à ce que l’heure, le paramètre de dureté de l’eau et la calibration ne soient réglés. Pour régler l’heure et le paramètre de dureté de l’eau, suivez les consignes mentionnées dans les chapitres suivants.
FR Réglages essentielsDispositif de sécurité Le fonctionnement du four peut être bloqué (par exemple, pour éviter que les enfants ne l’utilisent). 1. Pour bloquer le four, appuyez sur la touche Stop pendant 3 secondes. Vous entendrez un signal sonore et le mot « SAFE (SECURITE) » sera affiché. Le four est alors bloqué et ne peut pas être utilisé. . 65 2. Pour débloquer le four, appuyez sur la touche Stop pendant 3 secondes.
FR Réglages essentiels Minuterie La minuterie fonctionne comme un minuteur. Elle peut être utilisée à n’importe quel moment et indépendamment de toutes les autres fonctions. Pour régler la minuterie, procédez comme suit : 1. Appuyez sur la touche Timer (Minuterie). La touche de fonction s’allume et l’affichage de l’heure clignote. 2. Appuyez sur les touches « + » et « - » pour remettre la minuterie. 3. Appuyez sur la touche Timer (Minuterie) pour enregistrer. La minuterie commencera à décompter.
FR Fonctions essentielles Fonction vapeur Utilisez cette fonction pour cuisiner toute sorte de légumes, riz, céréales et viande. Elle est également conseillée pour extraire le jus des baies et pour une action conjointe de décongélation et de cuisson des légumes. 1. Appuyez sur la touche Steam function (fonction vapeur). La touche fonction s’allume. 2. Appuyez sur la touche Température pour régler la température souhaitée. Le voyant respectif clignotera.
FR Fonctions spéciales Cuisson des légumes Utiliser cette fonction pour la cuisson des légumes selon le tableau ci-dessous. 1. Appuyez sur la touche de fonction Cuisson des légumes. La touche fonction s’allume. 2. Appuyez sur la touche groupe de nourriture pour changer le type de nourriture. Le voyant respectif clignotera. 3. Appuyez sur les touches « + » et « - » pour changer le programme, par exemple « A 1 » (voir le tableau suivant). 4. Appuyez sur la touche Start (Démarrer).
FR Fonctions spéciales Cuisson de la viande Utilisez cette fonction pour la cuisson des types de viande décrits dans le tableau ci-dessous. 1. Appuyez sur la touche de fonction Cuisson de la viande. La touche fonction s’allume. 2. Appuyez sur la touche groupe de nourriture pour changer le type de nourriture. Le voyant respectif clignotera. 3. Appuyez sur les touches « + » et « - » pour changer le programme, par exemple « C 1 » (voir le tableau suivant). 4. Appuyez sur la touche Start (Démarrer).
FR Fonctions spéciales Cuisson des plats d’accompagnement Utilisez cette fonction pour cuisiner la nourriture décrite dans le tableau ci-dessous. 1. Appuyez sur la touche de fonction Décongeler & Cuisiner. La touche fonction s’allume 2. Appuyez sur la touche groupe de nourriture pour changer le type de nourriture. Le voyant respectif clignotera. 3. Appuyez sur les touches « + » et « - » pour changer le programme, par exemple « d 01 » (voir le tableau suivant). 4. Appuyez sur la touche Start (Démarrer).
FR Alimentation en eau Remplir le réservoir d’eau Remplir à nouveau l’eau Il est nécessaire que le réservoir d’eau soit plein pour que l’appareil fonctionne correctement. Remplissez le réservoir d’eau jusqu’au niveau maximum indiqué par la marque « MAX », en utilisant de l’eau potable froide et introduisez le réservoir dans l’emplacement situé au dessus de la cavité (approximativement 1L). Si l’indication « rES » s’allume, cela signifie que le réservoir d’eau n’a pas été correctement positionné.
FR Pendant le fonctionnement du four... Interrompre un cycle de cuisson Changer les paramètres Vous pouvez interrompre un la cuisson à n’importe quel moment en appuyant une seule fois sur la touche Stop.
FR Pendant le fonctionnement du four... Attention ! Lorsque vous ouvrez la porte pendant la cuisson ou à la fin de celle-ci, prenez garde à l’évacuation de l’air chaud et / ou de la vapeur qui s’échappe de l’enceinte de cuisson. Reculez ou mettez-vous sur le côté pour éviter les brûlures. Écoulement de vapeur C’est normal qu’il y ait un écoulement de vapeur intermittent sortant de la partie frontale du four. Cela est spécialement visible en hiver ou dans un environnement très humide.
FR Tableaux et conseils Utilisation des accessoires Le bac de cuisson perforé sert à étuver des légumes, de la viande ou de la volaille frais ou congelés. Il est donc important que le bac de cuisson non perforé soit placé au premier niveau des supports en partant du bas. L’humidité va ainsi s’y déposer en gouttelettes et ne salira pas l’appareil. Le bac perforé contenant les aliments doit être placé au deuxième niveau en partant du bas.
FR Tableaux et conseils Viande Viande Quantité Température Temps de en ºC cuisson en min.
FR Tableaux et conseils Légumes Légumes/ frais Aubergines En tranches Haricots Température Temps de cuisson en ºC en min.
FR Tableaux et conseils Quenelles Température en ºC Temps de cuisson en min. Récipient Niveau des supports en partant du bas Buchtel 100 20-30 bac non perforé 2 Dampfnudel 100 15-20 bac non perforé 2 Hefeklöße 100 15-25 bac non perforé 2 Semmelknödel 100 20-25 bac non perforé 2 Serviettenkloß 100 25-30 bac non perforé 2 Quenelles Desserts Desserts Quantité Température Temps de en ºC cuisson en min.
FR Tableaux et conseils Décongeler Légumes/ garnitures Brocoli Fleurs avec tige Macédoine de légumes Température en ºC Temps de cuisson en min Récipient Niveau des supports en partant du bas 100 15-20 bac perforé 2 100 15-20 bac perforé 2 Feuilles d’épinards Portions 100 10-15 bac non perforé 2 Chou-fleur Bouquets 100 15-20 bac perforé 2 100 15-25 bac perforé 2 Haricots Chou vert Gros morceau 100 25-35 bac non perforé 2 Carottes En rondelles 100 15-20 bac perforé
FR Entretien Nettoyage de l’enceinte de cuisson N’utilisez jamais de produit nettoyant agressif comme des éponges à récurer, des éponges métalliques, etc. Cela peut endommager la surface de l'enceinte de cuisson. Tirez légèrement le support vers l’avant et sortezle du four. Nettoyez l’enceinte de cuisson à chaud avec un torchon humide. Pour terminer, essuyez avec un chiffon. Pour faciliter le nettoyage, les supports latéraux peuvent être enlevés (voir chapitre suivant).
FR Entretien Enlever la porte de l’appareil 1. Ouvrez la porte au maximum. 3. Fermez la porte juste ce qu’il faut pour pouvoir la soulever. 2. Placez deux chevilles dans les gongs de la porte. 4. Pour remettre la porte en place, insérez les charnières dans les trous. 5. Ouvrez la porte au maximum et enlevez les chevilles.
FR Entretien Détartrage Produits détartrants appropriés À chaque production de vapeur, du calcaire se dépose dans le générateur de vapeur, quelle que soit la dureté de l’eau (c.-à-d. de la contenance en calcaire de l'eau) Pour le détartrage, utilisez le produit détartrant « durgol ». La fréquence du détartrage dépend de la dureté de l’eau et de la fréquence d'utilisation.
FR Nettoyage et entretien Procédure de détartrage Attention : Pour des raisons de sécurité, il n’est pas possible d’interrompre le processus de détartrage. L’appareil peut être détartré que la porte de l’appareil soit ouverte ou fermée. L’appareil doit être éteint pour que le cycle de détartrage commence. Pour lancer le cycle de détartrage, procédez comme suit : 1. Appuyez sur la touche Descale (Détartrage). L’affichage indique « CAL » et un bip intermittent se fait entendre. 2.
FR Nettoyage et maintenance de l’appareil Attention! Le nettoyage doit être effectué lorsque l’appareil est hors tension. Retirez la fiche de la prise ou bien débranchez le circuit électrique de l’appareil. N’utilisez pas de produit nettoyant ou de produit à récurer agressif, de serpillère abrasive ni d’objets tranchants car leur action peut laisser des traces sur l’appareil. N'utilisez jamais de nettoyeur à haute pression ou à jet de vapeur. Façade Un chiffon humide suffit à nettoyer l’appareil.
FR Que faire en cas de disfonctionnement? ATTENTION! Toute réparation ne doit être effectuée que par un technicien. Toute intervention effectuée par une personne autre que la personne autorisée par le fabricant est dangereuse. Les problèmes suivants peuvent être résolus sans recourir au service après vente: Il n’y a plus d’affichage ! Vérifiez si: - l’affichage de l’heure a été désactivé (voir section sur les réglages de base).
FR Caractéristiques techniques Affichages Affichage 1 Affichages Affichage 2 1 2 3 ----- CAL --- 0.6L 1.0L Affichage 3 Détartrage (clock / heure) --- (clock / heure) --- (clock / heure) ---/(température ou groupe de nourriture) Réservoir d’eau (réglage de l’heure ou du temps) --- (clock / heure) Description Eau douce. Eau moyenne. Eau dure. L’appareil doit être détartré. Clignotant - commencement du détartrage. Versez 0,6 litre de solution détartrante dans le réservoir d’eau.
FR Propriétés techniques Description des fonctions Symbole Fonction Vapeur Régénération & stérilisation Nourriture Cuisson de toute sorte de légumes, riz, céréales et viande. Extraction du jus des baies. Action conjointe de décongélation et de cuisson des légumes. Régénération des plats et des plats préparés. Stérilisation / cuisson des fruits. Cuisson des légumes Cuisson de différents types de légumes. Cuisson du poisson Cuisson de différents types de poissons.
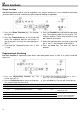
Installation / Einbau / Encastrement 100 558 560-568 mín. 450 mín.550 455 44 6 45 0 594 22 mín.550 600 EN 1. Push oven completely into the cabinet and centre it. 2. Open door and fasten the appliance to the cabinet using the four screws provided. Insert the screws through the front holes. DE 1. Den Dampfgarer in die Nische einschieben und entsprechend anpassen. 2. Die Tür der öffnen und das Gerät mit den vier mitgelieferten Schrauben am Küchenmöbel wie im Bild dargestellt befestigen. FR 1.
1630297-a