BERTAZZONI OWNER’S MANUAL GAS WORKTOP ELECTRIC SELF CLEAN OVEN MODEL 3100297 WWW.BERTAZZONI.
/ From the desk of the President From the desk of the President Dear new owner of a Bertazzoni, I want to thank you for choosing one of our beautiful appliances for your home. We know that you have many brands and products to choose from, and we are thrilled that you have decided to take one of our products into your home. We take as much pride in making our ranges as we hope you will in owning them. My family started manufacturing cooking appliances in 1882.
/ Table of contents TABLE OF CONTENTS WARNINGS ___________________________________________________________________ WORKTOP AND KNOBS LAYOUT ________________________________________________ GAS COOKTOP ________________________________________________________________ Burners caps and grates _______________________________________________________ Making sure the flame is optimal ________________________________________________ Using the gas burners _________________________________________________________ Usin
/ Warnings WARNINGS Warning and Important Safety Instructions appearing in this manual are not meant to cover all possible conditions and situations that may occur. Common sense, caution, and care must be exercised when installing, maintaining, or operating the appliance. Read and follow all instructions before using this appliance to prevent the potential risk of fire, electric shock, personal injury or damage to the appliance as a result of improper usage of the appliance.
/ Warnings Cooking Safety • Once the unit has been installed as outlined in • • • • • • • • • • the Installation Instructions, it is important that the fresh air supply is not obstructed. The use of a gas cooking appliance results in the production of heat and moisture in the room in which it is installed. Ensure that the kitchen is well-ventilated. Keep natural venting holes open or install a mechanical ventilation device.
/ Warnings Induction Cooking Surfaces • Surface areas on or adjacent to the unit may be • • • • • • • • hot enough to cause burns. Do not touch the cooking area as long as the light indicating residual heat on the glass-ceramic cooktop area, is “on”; this indicates that the temperature in the relative area is still high. DO NOT COOK ON BROKEN COOKING SURFACE – If cooking surface should break, cleaning solutions and spillovers may penetrate the broken cooking surface and create a risk of electric shock.
/ Warnings Electrical shock hazard Make sure all controls are OFF and oven is COOL before cleaning. Failure to do so can result in burns or electrical shock. DO NOT touch a hot oven light bulb with a damp cloth as the bulb could break. Should the bulb break, disconnect power to the appliance before removing bulb to avoid electrical shock. NEVER cover any slots, holes or passages in the oven bottom or cover an entire rack with materials such as aluminum foil.
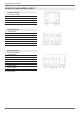
/ Worktop and knobs layout WORKTOP AND KNOBS LAYOUT Heating element 1 2 3 4 5 6 Oven functions selector Oven thermostat Left front burner Left rear burner Right front burner Right rear burner Heating element 1 2 3 4 5 6 7 8 Left front burner Left rear burner Left front burner Left rear burner Central front burner Central rear burner Right front burner Right rear burner Heating element 1 2 3 4 5 6 7 8 9 10 8 Oven functions selector Oven thermostat Left front burner Left rear burner Central front burne
/ Gas cooktop GAS COOKTOP BURNER CAPS AND GRATES The burners and the burner caps must be properly placed for the cooktop to function properly. X X The burner grates must be properly placed inside the recess on the cooktop. The correct flame height depends on: size and material of pan being used food being cooked amount of liquid in the pan. Never extend the flame beyond the base of the pan.
/ Gas cooktop USING THE POWER BURNER To give further flexibility, the dual power burner can be used as a single simmer burner if the central burner alone is ignited or as a power burner if the outer burner is also ignited. To light the central burner, press in the control knob and turn it anti-clockwise to the HIGH of the single ring position Continue to hold the knob in for 5 to 10 seconds after the burner ignites before releasing To also light the outer burner ,turn the knob to the HIGH double ring.
/ Electric Griddle ELECTRIC GRIDDLE Available on 48’’ models only the griddle using a heavy cloth. The electric stainless steel griddle is manufactured from 3/16 inches stainless steel designedfor maximum heat retention. Use extrem caution when operating the griddle to avoid burn hazard! PREPARING THE GRIDDLE • Check the griddle plate adjustment by pouring • • two tablespoons of water on the back of the griddle plate. The water should slowly roll into the grease tray.
/ Electric oven MAIN ELECTRC OVEN Attention! OVEN COOKING MODES When using the oven for the first time it should be operated for 15-30 minutes at a temperature of about 500°F/260°C without cooking anything inside in order to eliminate any moisture and odours from the internal insulation.
/ Electric oven Broil Heat from the broil element only The BROIL setting creates intense heat from the top of the cavity. Its use is recommended for no longer than 15 mins. The broil mode is effective when food is placed on upper racks. Beef steaks, ground meat patties, and lamb chops 1 inch or less: level 6. Meat 1 inches or more thick, fish, poultry, pork chops, ham steaks 1 inch or more: level 5. Browning food: level 6 • • • Convection broil Heat from broil element and air flow convection with fan.
/ Electric oven AUXILIARY ELECTRIC OVEN Available on 48’’ models only Attention! When using the oven for the first time it should be operated for 15-30 minutes at a temperature of about 500°F/260°C without cooking anything inside in order to eliminate any moisture and odours from the internal insulation. SHELVES POSITIONS Shelves are mounted on the appropriate guides situated on the sides of the oven compartment. Insert the shelf between top and bottom guide in any of the 7 positions indicated.
/ Electric oven CONDENSATION It is normal for a certain amount of moisture to evaporate from the food during any cooking process. The amount depends on the moisture content of the food. The moisture will condense on any surface cooler than the inside of the oven, such as the control panel. • • the pans and the oven walls so heat can circulate around each pan. To keep the oven as clean as possible, cook meat on a pan and not directly on the racks. Cooking will continue with residual heat.
/ Electric oven BROILING RECOMMENDATION Food item Control temperature setting selector Approximate cooking time Special instructions and tips BEEF Ground Beef Patties, ½” thick T-Bone Steak Flank Steak Eye of Round Roast 500°F fixed temperature setting 15 to 20 minutes Broil until no pink in center 500°F fixed temperature setting 500°F fixed temperature setting 325°F 12 to 20 minutes 12 to 20 minutes 20 to 25 min/lb PORK Loin Roast POULTRY Boneless Skinless Chicken Breasts Chicken Thighs 325°F 5
/ Electric oven OVEN TEMPERATURE INDICATOR End delay mode: The range is equipped with a device to indicate the temperature in the middle of the oven. This let you check the temperature inside the oven and adjust food cooking temperatures more accurately. When the oven is turned on, the heating elements will start working at maximum and the thermometer dial will start to move towards the set temperature.
/ Electric oven 4. Press MODE. 5. Press the “<" and “>” buttons to select the desired cooking temperature and press MODE 6. Insert the items to be cooked on the oven than connect the probe jack to the port located in the upper left side of the oven cavity. 7. The display will show the current temperature of the meata nt the settle temperature. 8. when the temperature settled will be reached a sound will be heard and the oven automatically switches off.
/ Electric oven Before Self Cleaning the Oven Wipe out large spillages, grease and any loose soil that can be easily removed. Remove any soil that is outside the door seal area. This appliance is designed to clean the oven interior and the portion of the door that faces the oven cavity. The outer edges of the door and the oven cavity are not in the cleaning zone. Wipe this area clean before starting the self-cleaning cycle. Remove all utensils and racks.
/ Electric oven TELESCOPIC GLIDES The telescopic glides fit any shelf level and work with the wire shelves provided as standard equipment. Fitting the glides • Locate the two spring clips at the front and back of the glides. • Locate the pin on the glide that indicates the back. • Choose the right level and position the telescopic glide near the upper wire. • Gently insert the front spring clip on the glide. • Insert the rear spring clip on the glide.
/ Keeping your Bertazzoni clean KEEPING YOUR BERTAZZONI CLEAN Burn hazard Cleaning the broiler pan Make sure the heating elements are turned off and allowed to cool completely before any cleaning and/or maintenance operation. Clean with detergent and hot water. For stubborn spots, use a soap-filled steel wool pad. The porcelain enamel finish is acid resistant, but not acid proof.
/ Simple maintenance SIMPLE MAINTENANCE These simple tasks can be performed by the owner. For any other maintainance task, we recommend employing a trained service technician. Please call our toll free line to identify service technicians in your area: ENGLISH 866 905 0010 FRANCAIS 800 561 7265 REPLACING OVEN LIGHTS Warning! Electric shock hazard! Disconnect the electric power at the main fuse or circuit breaker before replacing bulb. DO NOT touch bulb with bare hands.
/ Simple maintenance CLEANING INSIDE GLASS DOOR The inner glass door panels can be easily removed for cleaning. It is not necessary to remove the door in order to clean the glass panes. The glass can be cleaned in situ or removed. Open the oven door to its fully extended position. Flip down hinge clip on each hinge to secure the door in an open position. A screwdriver may be necessary to carefully pry the clip back Slide the clips towards the centre of the door.
/ Troubleshooting TROUBLESHOOTING Here are answer to common problems you may experience. You are also welcome to call our toll free Customer Service line to troubleshoot any issue with your Bertazzoni: Condensation forms in the oven ENGLISH 866 905 0010 FRANCAIS 800 561 7265 Smoke is generated in the oven The oven will not operate Is there power to the range? Check the switch fuse or circuit breaker. The oven does not heat Check that the showroom function is not activared.
/ Two year limited warranty TWO YEAR LIMITED WARRANTY The warranties provided by Bertazzoni Spa in this statement apply exclusively to Bertazzoni appliances and accessories sold as new products to the original owner by a Bertazzoni authorized distributor, retailer, dealer or service center and installed in the United States and Canada. The warranties provided in this statement are not transferable and have validity from the date of installation.