
Specification Guide


8
9
3LIOU1LG
3LIOU1LG
EN
waste pipe for the exhaust version, an air outlet
with a diameter of Ø 160 mm (6”19/64) must be
made through the wall.
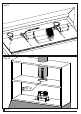
WALL FIXING OF THE COOKER HOOD
- INSTALLATION BY MEANS OF THE
BRACKET SUPPLIED
1) Check the size of the model you have purchased
(see picture 1).
2) When installing your product comply with the
distance from the cooking (see picture 2).
3) Make a hole, for air circulation, inside of your
furniture (see picture 3).
4) Secure the aluminium ange to the hood with two
screws (see picture 4).
5) Partially tighten the four screws holding the hood
to the furniture, make two holes in the wall and insert
the two dowels (see picture 5).
6) Remove the three metallic lters (see picture 6).
7) Place the hood in the four screws on the furniture
(see picture 7).
8) Push the hood to the wall (see picture 8 step 1 and
2), lock the hood and tighten the four screws (see
picture 8 step 3)
9) Insert and tighten the two locking screws to the
wall (see picture 9).
10) Drill a hole for the passage of the air intake duct,
insert the tube locking it with the clamp (see picture
10).
CONNECTION EXHAUST
Link a 150 mm diameter air outlet chimney to the
spigot. This pipe is an accessory of the hood.
Warning : To reduce the risk of re use only metal
ductwork.
Attention : The appliance is provided with a supply
cord, the appliance must be positioned so that the
plug is accessible.
Attention : If there are three wires in the electrical
supply cable they must be connected as follows :
Grey/Yellow = ground - White = neutral - Black = line
Important : The hood manufacturer will
not be responsible for any damage or
loss caused by failure to observe these
instructions.
Important : A damage power supply cord
must be replaced by the service.
WARNING
GROUNDING INSTRUCTIONS
This appliance must be grounded. In the event of
an electrical short circuit , grounding reduces the
risk of electric shock by providing an escape wire for
electric current. This appliance is equipped with a
cord having a grounding. The plug must be plugged
into an outlet that is properly installed and grounded.
WARNING : Improper grounding can result in a risk
of electrical shock.
Consult a qualied electrician if the grounding
instructions are not completely understood, or if
doubt exists as to whether the appliance is properly
grounded.
Do not use an extension cord. If the power supply
cord is too short have a qualied electrician install
an outlet near the appliance.
USING THE COOKER HOOD
The cooker hood should be switched on either before
or the same as cooking ot frying commences. The
lters are more effective if the fan is not switched off
immediately after cooking or frying is completed, but
only after a period of some 20-30 minutes. Before
using the cooker hood please ensure that all plastic
lms like on metal grease lter and stainless steel
ducting are removed.
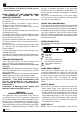
USER INSTRUCTION
The cooker hood is equipped of the following functions
(see below) :
0
3 2 1
0 - Light OFF
1 - Light ON
- Pilot light
3 - Third speed (maximum)
2 - Second speed (medium)
1 - First speed (minimum)
0 - Fan-off
LAMP REPLACEMENT
The hood has a halogen lamp, take care to not
touch with hands when you replace it. Use a dry and
not greasy protection (for example a cloth) in order
to avoid a direct contact with skin that could make
the lamp break. Never use lamps with wattage
higher than the one shown on the label inside the
hood.
SAFETY RULES
Do not do any dry ambè cooking underneath the
hood. When frying, never leave the pan alone
because the cooking oil could are up. Clean all the
surface frequently to avoid danger of re. This can
be done with a cloth or/and with a brush drenched
with denatured alcohol or with any other similar
substances, except for the button. It also important
to remove and clean or substitute frequently the
lter installed in the hood.
MAINTENENCE
NOTE : Prior to any maintenence, switch off and