
Installation & Assembly
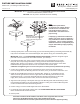
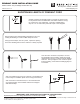

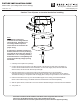
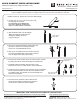

Table Of Contents

PENDANT CORD INSTALLATION GUIDE
Model U Series -04 (Low Voltage Pendant Set 12V)
UKIT.04, Rev.6 8-11
SHORTENING LENGTH OF PENDANT CORD
6695 Taylor Rd. Blacklick, OH 43004
www.besalighting.com
Carefully measure the desired length of cord and cut off the excess.
It is important to leave an additional 6” that will be inside the canopy
for connection to your transformer. Using the 10 AWG setting,
strip off 1-1/2” of outer teflon jacket with a pair of wire strippers.
Gently push the silver metal braiding downward on the cord,
causing the braiding to create a bubble shape as shown.
Using a pointed object, such as a pencil, expand an opening
in the silver braiding until the inner conductor is clearly exposed.
Once the inner conductor is exposed, it can now
be separated from the braiding. Slide the pointed
object between the inner conductor and the braiding,
as shown. Gently wedge the inner conductor apart
from the braiding. Now twist the braiding tightly into
a conductor.
Strip 1/2” insulation from the inner conductor. The pendant cord
is now ready for installation (Refer to the Canopy Instructions).
After connection to the transformer, it is recommended that
any exposed portion of the braided conductor be wrapped
with electrical tape.
IMPORTANT: KEEP THESE INSTRUCTIONS FOR YOUR RECORDS
Replacement parts for this Low Voltage Pendant Set are as follows (lamp included):
#TU210C50-SN.04 - 50W, 10’ clear cordset with Nickel Hardware
For Bronze cordset, use “Z” in place of “C” and “BR” in place of “SN”
For 15’ cordset, use “215” in place of “210”
Lamps Only:
#B5506 - 50W Low-pressure Halogen 12V Bi-Pin GY6.35