
Installation & Assembly
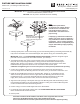
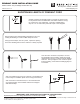

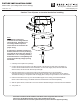
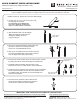

Table Of Contents

FIXTURE INSTALLATION GUIDE
All electrical connections and the installation of this fixture must be in agreement with local codes,
ordinances or the NEC (National Electric Code) or CEC (Canadian Electrical Code).
Do not connect this fixture to an electrical system that does not provide a means for equipment grounding.
Model T21QP (Low Voltage Quick-Connect Canopy)
21QP, Rev.3 6-10
Caution: Turn off power to electrical box before installing
6695 Taylor Rd. Blacklick, OH 43004
www.besalighting.com
1. Carefully remove parts from package.
2. Connect the house ground wire to the Bare Copper Lead and secure with wirenut provided (A).
Connect the electrical leads from the Transformer to the house supply wires, black to black and
white to white, and secure with wirenuts provided (B).
3. Align the Openings (C) on the Canopy with the Threaded Holes (D) on the Supply Box.
Push the Canopy over the Supply Box until the Canopy is flush to the ceiling, then secure with the
Threaded Screws (E). It is important that the Supply Box is deep enough to allow for the Transformer.
4. Place the Decorative Cover (F) over the threaded nipple on the canopy, then attach the Besa
Quick Connect Element (G). The Besa Quick Connect Element is furnished separately.
5. With the power still off, insert bulb of not more than the labeled wattage on the Quick Connect Element.
6. Turn power on.
A
B
C
D
E
F
G
Note:
For optimum performance,
an electronic low voltage dimmer
should be used. Installation of a
low voltage dimmer requires a
neutral lead in the switch box for
proper wiring.
If employing a standard incandescent
dimmer, low levels of noise (”buzzing”)
may emanate from either the dimmer or
transformer. This is usually caused by
dimmer/transformer incompatibility and
may be eliminated by simply replacing
the dimmer.