
Instructions / Assembly

Gutter Guard Installation Procedure
Good job in buying the “Raised Pattern Screen Gutter Guard” which is the best performing gutter guards on the market
today! Correct installation is very important to make the gutter guard work correctly (this is true for all types of products
too!). This product is intended to be installed by the DIY person (Do-It-Yourself), so careful attention to the install
instructions is highly recommend. Pro-Tip: Visit our website for more details and tips www.gutterguardinstallations.com
Safety (be safe at all times, be careful on ladders!)
When installing Gutter Guards, always make Safety your top priority, use your ladder, tools and equipment correctly.
Tools needed:
• Rechargeable Drill & 1/2’ Self Tapping Hex Screws and Magnetic Nut Setter.
• Metal cutting snips Aviation type recommended
• Silicone Caulking, Clear, 100% (GE brand, 4 oz tube works best)
• The correct Ladder and safety equipment
• Gutter scoop & gloves (to clean the gutters with).
Basic Installation Guidelines
• Clean Gutters before installation (use clean as you go method)
• Best to have the gutter guard at an angle (so the wind can blow off debris & leaves).
• Do not install with the gutter guard flat (no slope) because the debris & leaves will not blow off by the wind.
• Recommended to install the inside and outside corners first, then filling in the straight sections in between.
Clean Gutters and downspouts before installation
Clean out the gutters using a plastic gutter scoop, bucket and use gloves. Pro-Tip: Recommended to clean out the
gutters as you install the gutter guard, just clean out a section of gutter putting the debris in the bucket, then install the
gutter guard, then move the ladder and repeat.
There are TWO (2) Methods to Installation the gutter guard: #1 Under the Shingle or #2 Fascia Mount, choose the
method that works for your home
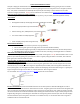
#1 Under the Shingle Method is where the rear Rail of the gutter guard slides under the roof shingle and on top of the
moisture barrier (or tar paper). The rear rail guard is supported by the roof deck, the front rail guard is attached to the
front lip of the gutter, use the Magnetic Nut Setter to fasten the Self-tapping Hex screw to fasten the guard. Typically, the
angle of the guard is enough to allow debris to “naturally self-clean” when using this method.
For more details, visit www.gutterguardinstallations.com for pictures and more details.
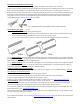
#2 Fascia Install Method is where the installer bends the rear rail either upward or downward 90 degrees in order to
mount the rear rail to the fascia board or rafter board with a screw. The gutter guard is then “fitted” within the gutter open
area, just under the roof shingle by installing the screw in the front rail to the gutter lip, then installing a screw in the back
rail and into the fascia board. The fascia method requires bending the Gutter Guard rear rail (Up or Down) along the entire
length of the gutter guard, and attaching the raised back rail of the gutter guard to the fascia (not under the roof shingles).
The bend should be up if the rain gutter is more than an inch below the roof, or it can be bent down if the rain gutter is
installed less than an inch below the roof.