Best Barns USA Assembly Book Revised February 20, 2018 the Aspen II 12' x 8' Manufactured by Reynolds Building Systems, Inc. 205 Arlington Drive, Greenville, PA 16125 This manual is copyrighted. Under the copyright laws, this manual may not be copied, in whole or in part, without consent from Reynolds Building Systems, Inc.
IMPORTANT INFORMATION ABOUT YOUR SHED KIT Thank you for your purchase. I want you to be completely satisfied with your building. The 2x4s we use in our kit are the best grade available, importing most from Europe. If you are dissatisfied with any lumber, we will replace it. Read the instructions before starting the assembly of the building. If you have any questions about assembling the kit, call 800-245-1577. Business hours (8:00-5:00 ET) Monday thru Friday.
Construction Details for Optional Floor System Check local building codes in your area, the construction may have to change. For a concrete slab, install sill sealer as a moisture barrier between the concrete and the wall plates. Foam sill sealer can be purchased at home centers in rolls 3-1/2" or wider. 1. Treated lumber is not cut to exact length. Cut (2) two 2x4-12' boards to 12'-0". Layout for 16" on center joist spacing. 'X' marks where floor joist will be placed.
Step 1 Assemble End Wall Frames 1. Install (3) three 2x4-72" wall studs between (2) two 48" long 2x4s. Install the center stud in the middle of the wall frame. Make (2) Two Frames Use (2) two 10d sinkers at each end of stud. 48" Wall Plate 2. Repeat to make (1) one more 48" frame. Set aside. 3. Place (1) one of the 48" wall frames on floor positioned on the left. Square frame by measuring diagonally (corner to corner). The measurements will be the same when square. 4.
Step 1 7 Assemble End Wall Frames Contined Install the siding panel with the angle cut with the 'LAP edge' flush with the end of the wall with the siding extending 3/4" below the bottom plate. The siding will extend 1/2" above the wall frame angled frame and 1" above top plate. Use 8d galv. nails spaced 12" apart. 8. Install a full width x 76-3/4" siding panel on the left. Siding will extend 3/4" below bottom plate andl extend 1" above the wall frame. Set wall aside.
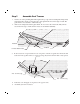
Step 2 Assemble Roof Trusses 1. Position one of the pre-built gable frames against the top edge of the end wall panels. Temporarily nail 1x4 blocks to the floor along the edge of the gable frame and on the angle of wall. The gable frame is not attached to wall in this step. 2. Remove the wall panels and the gable frame. Do not remove the 1x4 blocks. They will be used in the next step to make sure the trusses are assembled identically. 1x4 Block Pre-built Gable Frame 1x4 Block 3.
Step 3 Assemble Front Wall Frames 1. Position (2) two 72" long 2x4 boards together and X indicate where the wall studs will be located by X drawing lines and placing 'X' marks as shown. 72" Long Wall Plates 24-1/4" X X 24" X X X X 2. Install (4) four 2x4-72" wall studs between the 2x4s from above. Use 10d sinkers. 3. Install (2) two 72" wall studs between (2) two 13-1/2 long 2x4s . 4. Install a 72" long 2x4 at the end of each wall frame flush with bottom of bottom plate.
Step 4 Assemble Back Wall 1. Position (4) four 68-1/2" long 2x4s together and indicate with 'X' marks, where the wall studs will be located. Mark the ends that will butt together with the letters 'A' and 'B'. X X 19-3/4" X X 68-1/2" Wall Plate 68-1/2" Wall Plate X X 24" A B A B 23-1/4" X X X X 24" X X 2. Install 52-7/8" long wall studs, between the wall plates, over the 'A', 'B' and 'X' marks. Use 10d sinkers. Nail wall frames together. 3.
Step 5 Set Walls 1. Set the back wall and end wall on floor. Secure walls at corner with 10d coated sinkers. Nail bottom plate to floor. Use leftover galv. nails from the wood floor assembly. 2. Set the larger front wall panel. 3. Use one of the 2x4s from the shipping pallet to brace the front wall. 4. Install the other end wall panel and the 13-1-2" wall frame. Brace wall frame with another 2x4 from the shipping pallet. 5. Insure walls are plum and door opening is square. 6.
Step 6 Set Gables - Install 2X4 Tie Plates 1. Position a pre-built gable frame on the end wall flush with outside of 2x4 wall plate. NOT flush with siding. Secure the frame by toe nailing into the top plate of the end wall. Use 10d sinkers. 2. Repeat step to install the opposite gable frame. Front Wall of Shed 3. Install metal flashing on top of the siding. Nail with a couple of 6d galv. nails to hold the flashing in place until the siding is installed next. 4. Install flashing on opposite wall.
Step 7 Side Gables 1. Install gable siding using 6d galv. nails. The siding will extend above the gable frame to receive the roof sheathing. 2. Repeat on opposite gable. Siding Extends 1/2" Above Step 8 Set Trusses 1. Install 2x4 roof trusses directly over each wall stud on the back wall. The 3rd truss will be directly over the middle of the double studs. Secure trusses in place with metal truss hangers. Use 6d common nails to secure the metal hanger to the 2x4 wall plates and trusses.
Step 9 Install Roof Sheathing 1. Install (2) two 46" x 72" OSB sheathing panels across the front of the roof. Butt 46" edge against back of gable siding. The 72" edge should be flush with the end of the 2x4 truss, see detail below. Make sure the trusses are plumb and the roof sheathing meets the center of the 3rd truss. Use 7d sinkers spaced 12" apart. The roof sheathing will be about 1" below the ridge to allow for ventilation if a ridge vent is installed.
STOP! If you purchased the optional metal roofing go to the instructions packaged in the roofing kit. Steps 10, 11 & 12 in this book are skipped. Step 10 Install Soffit and Trim 1. Install 6-1/4" x 48" soffit panels under the truss overhang. Use 6d galv. nails. 2. Install (1) one 1x4x47-1/4" and (1) one 1x4x72" long gable trim, flush with the top of the roof sheathing on each end wall. Use 8d galv. nails. 3.
Step 11 Install Front 1x6 Fascia 1. Install 1x6 fascia over the ends of the trusses, flush with the top of the roof sheathing. Cut a 75" long 1x6 board so to be flush with the face of left wall gable trim and center of 3rd truss. Use 8d galv. nails. 2. Cut to fit the last 1x6x75" board and install to finish. Top of 1x6 Flush with Top of OSB Center of 3rd Truss Step 12 Install Roofing — Not Supplied in Kit 1. Install metal roof edging perimeter of the roof area.
Step 13 Install Doors Use 1-1/4" Screws Here 1. Lay the left door with the trim facing up. The 2x4 door stop on the left door extends past the trim. See detail below. 2. Install hinges to the left side of the door frame with 1-1/4" long screws. To position the hinge properly, hold the rectangular plate against the frame. 3. Install hinges to the right side of the other door. 4. Before you fasten the hinges to the door trim, temporarily prop the doors in the opening.
Aspen II " 12' x 8' Shed Kit Packing List For Material Shipped on Pallet Revised 2x4 Framing & Trim February 20, 2018 Hardware 18 2 x 4 72" 2 1x4 79-1/2" 1 Door Latch 2 lb. 10d Sinkers 5 2x4 69-1/2" 2 1x4 72" 6 4" Hinges 2 lb. 8d Galv. 4 2x4 68-1/2" 2 1x4 47-1/4" 2 6" Barrel Bolt 2 lb. 7d Sinkers 8 2x4 52-7/8" 2 1x4 58" 10 H1 - Truss Hangers 1 lb. 6d Common 4 2x4 48" 2 1x3 60" 25 2-1/2" Deck Screws 1/2 lb. 6d Galv.