Best Barns USA Assembly Book revised March 22, 2016 the Brookhaven 10' x 12' Manufactured by Reynolds Building Systems, Inc. 205 Arlington Drive Greenville, PA 16125 724-646-3775 This manual is copyrighted. Under the copyright laws, this manual may not be copied, in whole or in part, without consent from Reynolds Building Systems, Inc.
IMPORTANT INFORMATION ABOUT YOUR SHED KIT Thank you for your purchase. I want you to be completely satisfied with your building. The 2x4s are imported from Europe. Their lumber is the highest quality available, they grade lumber all four sides. If you are dissatisfied with any lumber, we will replace it. Read the instructions before starting the assembly of the building. If you have any questions about assembling the kit, call 800-245-1577. Business hours (8:00-5:00 ET) Monday thru Friday.
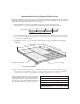
Construction Details for Optional Floor System Check local building codes in your area, the construction may have to change. For a concrete slab, install sill sealer as a moisture barrier between the concrete and the wall plates. Foam sill sealer can be purchased at home centers in rolls 3-1/2" or wider. 1. Treated lumber is not cut to exact length. Cut (2) two 2x4-12' boards to 12'-0". Layout for 16" on center joist spacing. 'X' marks where floor joist will be placed.
Step 1 Assemble Upper Roof Gable 1. Select a left and right pre-built gable frame. Positions gable frames on the floor as shown below. Screw the frames together using (4) four 2-1/2" long deck screws. Temporarily screw 2x4 blocks to the floor. There are short 2x4 blocks, that may have an angle on one end, supplied in the kit. This will trap the gable frames and aid in the assembly. Use 2-1/2" deck screws. Nails and wood gussets are packed between the doors.
Step 1 Assemble Upper Roof Gable Continued 5. Install the 3rd row of siding. Use 32-1/2" and 67-3/4" long siding panels. 6. Install the 4th row using a 59-3/4" and 24" long siding panels. 3rd Row Siding 67-3/4" Siding Panel 32-1/2" Siding Panel 7. Install the 5th row of siding using a 67-1/4" long siding panel. 8. Install the 6th row using a 50-3/4" long siding panel. 9. Install the 7th row using a 33-3/4" long siding panel. 10 Install a 12-1/4" wide x 4-1/2" long OSB filler at the top of gable.
Step 2 1. Assemble Roof Trusses Place (2) two 75-3/8" long 2x4 truss boards together, inside the 2x4 blocks,as shown below. Add (4) four more 2x4 blocks at corners to trap truss bottoms. 2. Secure the tops together with a wood gusset. Nail the gusset to the 2x4s with 6d common nails. Use 14 nails per gusset. Angle nail slightly so nails do not protrude through the 2x4 boards. 3. Turn this truss over and apply wood gussets to the opposite side. Wood Gusset 4.
Step 3 Assemble Sidewalls Continued 44-1/2" Frame 3. Nail both wall frames together with the small stud spaces towards the ends of the wall. Use (4) four 10d sinkers on each side of the double studs. A B 68-1/2" Wall Frame " IMPORTANT: Select 80-1/2" Long Siding For these Steps 4. Square wall frame. Measure diagonally (corner to corner). The measurements will be the same (138") when the wall is square.
Step 4 Assemble Back Wall 1. Position (4) four 2x4-72" boards together and indicate with 'X' marks where the wall studs will be located. Mark the ends that will butt together with and 'A' and 'B'. X X 23-1/4" X X 72" Wall Plate 24" X X 72" Wall Plate X X A B A B 23-1/4" 24" X X X X 72" Wall Plate B A ttom o 72" B Plate 2. Install 76-1/4" wall studs between the top and bottom plates. 3. Nail both wall frames together. Square wall frame (164-3/8" diagonally). 4.
Step 5 Assemble Front Wall 42" Wall Plate 1. Cut (2) two 72" long 2x4s to a length of 70-3/4" for header support. 2. Position (2) two 2x4-42" boards together and indicate with 'X' marks where the wall studs and header support will be located. 42" Wall Plates 76-1/4" Wall Studs X X 23-1/4" X X X XX 3. Install (3) three 76-1/4" wall studs between top and bottom plates. Nail 70-3/4" long 2x4 cut above to last wall stud. 4. Repeat steps 2-3 to assemble another wall frame.
Step 6 Set Walls Continued 3. Install the 63" 2x6 door header between the front wall panels. Use (2) two 2-1/2" deck screws on each end of the header. 4. Install a 2x4-60" plate across the top of the door header. Use 10d sinkers. 2x Step 7 r eade or H 6 Do Install Siding on Front Wall Farmes 1. Select a 24-3/4" siding panel with a 'Tongue' edge and install it on the left corner with the cut edge flush with the sidewall. 2. Install a 18" siding panel with 'LAP' edge next.
Step 8 Install Loft Floor Flush with Top Plate 1. Install a 68-1/2" long 'L' shape board on the back wall with 2x4 board flush with top wall plate. Butt against right sidewall. Use 2-1/2" long deck screws. Screw into 2x4 top plate every 24" and into each stud. 2 d oar B x4 2. Install another 'L' shape board next to the one installed above. 3. Repeat to install the 'L' shape boards on the front wall. Back Wall 4. Install (2) two 110" long 2x4 loft joist between the 'L' shape boards.
Step 9 Install Sidewall Trim 1. Install (2) two 1x6-64-3/8" trim boards, on the side wall, flush with the top of the loft flooring. The 1x6 will extend 4" beyond the siding on the front wall and back wall. Use 8d galv. nails, spaced 12" apart. Flush Across Top Loft Floor 1x6 Trim 4" 1x6 Trim Board 2. Install 1x6 trim on the opposite side wall. Step 10 Side Wall Front Wall Install Gables 1. Install a gable on the left side wall.
Step 11 Install Tie Plates 1. Install 2x4 tie plates over the front and back walls. Use 2x4s from the shipping pallet. You can also remove and use the 2x4s used to brace the front wall. Cut the 2x4s to fit between the roof gables. Use 10d sinkers. Cut 2x4 to fit 2x4 Tie Plate Step 12 Install Roof Trusses 1. Starting at the left gable, measure from the face of the 2x4 when marking the location of the first truss. Trusses are spaced 24" on center.
Step 13 Install Soffit Boxes and Corner Trim h aig str 1. Install a pre-built 71-3/4" soffit box on the left corner of the front wall. Position the soffit so the 2x4 blocks in the soffit are aligned with the top of the truss. dg te Install the soffit box to the 2x4 top and tie plates using 2-1/2" deck screws. e 1x6 Trim Board 2. Install the longer 73" long soffit box next to the first one. 3. Repeat on back wall. Start on right corner working left. 4.
Step 14 Install Roof Sheathing 1. The gable and trusses should be plumb before installing the roof sheathing . Install a 48" x 72" piece of roof sheathing on the lower front left corner. The sheathing should end in center of the 3rd truss and 32-1/2" from the peak of the trusses. The sheathing may not overlap all the lap siding on the gable. Use 7d sinkers, spaced 12" apart. 32-1/2" 48" X 72" 2. Install a 31-1/2" x 72" roof panel at the top.
Step 14 Install Roof Sheathing Continued 3. Remove from pallet a 48" x 75" OSB sheet. Install roof sheathing per the layout below. 4. Install sheathing on the opposite side. Mirror layout of front side. Building Tip; If you are installing metal roof panels, you may want to install metal panels on the front roof area before installing the roof sheathing on the back side. This will provide a working space to stand when installing the font metal panels.
Step 16 Install Door Sill 1. Bend a 3-1/2" x 5" metal flashing in half and install at each corner of the door opening. 2. Install a 4" x 60" long aluminum door sill between the door opening. Drill 1/8" hole and secure to the 2x4 floor board with (6) six pan head screws. View From Inside Screw Used as Spacer 2x4 Floor Treated Sill Board 60" Alum. Door Sill Notch in Sill 3. Install a 2-1/2" x 63" Treated Sill Board over the aluminum sill.
Step 18 Install Doors 1. Locate the door with the siding and trim extending past the 2x4 frame, see detail below. Hang this door on the left when standing inside of the building. Slide the rollers on the track as shown below. If necessary, adjust door so the bottom of the door does not rub on the treated threshold. To adjust the door height, loosen two screws that secure the carrier to the door. Adjust height and tighten the screws.
Step 1 9 Install Door Jamb & Trim 1. Cut to fit a 3-7/8" wide primed door jamb material under the door header flush with the face of the siding. Use 6d galv nails. 2. Install (2) two 3-7/8" x 71-1/2" long primed door jamb material on the sides of the door opening, flush with the face of the siding. 3. Install 72-1/2" long 1x4 door trim on each side of the door opening flush with top of door opening. Use 8d galv. nails 4. Install a 70" long 1x3 trim centered across the top of the door opening.
Brookhaven 10' x 12' Shed Kit " 4 " Packing List For Material Shipped in Cardboard Wrap 2x4 110" April 4, 2016 Loft Floor Joist Packing List For Material Shipped on 42" Wide Pallet 2x4 Framing & Trim Hardware 28 2 x 4 76-1/4" 8 1x4 75" 1 Door Hasp 3 lb. 10d Sinkers 10 2 x 4 75-3/8" 2 1x4 72-1/2" 2 Door Handles 3 lb. 8d Galv. 5 2x4 72" 1 1x3 70" 1 Sliding Door Latch 3 lb. 7d Sinkers 4 2x4 68-1/2" 4 1x6 64-3/8" 10 Truss Hangers 2 lb.