HTIB WIRELESS SURROUND SPEAKER SYSTEM RF-WHTIB USER'S MANUAL
Safety Information CAUTION: TO REDUCE THE RISK OF ELECTRIC SHOCK: DO NOT REMOVE SCREWS, COVERS OR THE CABINENT. NO USER SERVICING PARTS INSIDE. REFER SERVICING TO QUALIFIED SERVICE PERSONNEL. The lightning flash with arrowhead symbol within an equilateral triangle is intended to alert the user to the presence of uninsulated "dangerous voltage" within the product's enclosure that may be of sufficient magnitude to constitute a risk of electric shock to persons.
Introduction Contents System Overview Introduction 1 System Overview 1 Main Features 1 Packing Contents Functional Overview (Sender) Functional Overview (Receiver) 1 2 3 Preparation of the Units 4 Connecting the Sender 4 Connecting the Receiver 5 Basic Operations 6 Establishing Communication between the Sender and Receiver Units 6 Additional Operations 7 Placing the Receiver 7 Adjusting the Volume 7 Troubleshooting 8 Specification 9 Main Features RF-WHTIB System uses a proprie
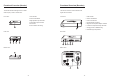
Functional Overview (Sender) Functional Overview (Receiver) The Sender transmits audio signals over a 2.4GHz radio frequency carrier to the Receiver. The Receiver receives 2.4GHz wireless Audio signals from the Sender. Front View: 1. LED Indicator 1 Front View: 1. LED Indicator 2. Power On/Off Button 2. Power On/Off Button 3. Right Speaker Input Terminals 3. Volume Control Dial 4. Left Speaker Input Terminals 4. Connect Button for Pairing 5. DC IN Jack 5.
Connecting the Receiver Preparation of the Units 2. Connect the Right speaker terminals of Sender to the Right Surround speaker terminals of your amplifier. (Similarly, connect the Left speaker terminals of Sender to the Left Surround speaker terminal of your amplifier.) 3. Each speaker cord consists of two wires in different colors. Connect the Red (+) terminals with the exposed tips of the Black (with White line) wire, and connect the Black (-) terminals with the exposed tips of the Black wire.
Basic Operations Additional Operations Establishing Communication between the Sender and Receiver Units To listen to the System. To power on the System. a. Make sure the System is powered on, and there is an active link between the Sender and Receiver. b. Turn on your amplifier. Play the audio or video source at your amplifier. Enjoy using the wireless audio system! a. Press the button on the rear panel of Sender. The LED indicator blinks to indicate that the Sender is plugged in and in Standby mode.
Troubleshooting Specification Please read this user manual carefully before using the System. Check this list for a possible troubleshooting solution before calling for service. Problem No Sound Output Solution Interference in the Sound No communication between Sender and Receiver Check the AC adapter is connected to the Sender and power cord is connected to the AC supply for the Receiver. Check all the cables are connected correctly.