
Installation Instructions

6
2. PREPARE THE INSTALLATION
NOTE: Before proceeding to the installation, check the contents of the box. If items are missing or damaged, contact the manufacturer.
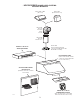
Remove the installation kit from inside the hood.
Make sure that the following items are included:
- Installation manual
- Accessories including:
• 3 Hybrid baffle filters
• Shielded halogen lights (GU10 type base, 120 V, 50 W) (2 for hoods up to 36” width, 4 for hoods from 42” to 48” width)
• Bag of parts including:
4 no. 10-32 lock nuts, 1 electrical cable clamp, 8 no. 8 x 1/2” double thread screws, 2 wire connectors, 2 no. 6 x 1/2” standard screws,
6 no. 8 x 3/8” screws.
Parts sold separately:
- Interior blower iQ6, P3 or P6 (all include rough-in kit and 8” round adapter/damper).
- In-line blower assembly ILB3, ILB6, ILB9 or ILB11 (all include transition(s) and rough-in plate)
- Exterior blower assembly EB6, EB9, EB12 or EB15 (all include rough-in plate)
- Duct, elbows, dampers, wall and roof caps. Refer to pages 3 and 4 for a complete list of venting options and model numbers
- RMP Series backsplash (optional)
- Non-duct kit ANKUP27M Series, mandatory for non-ducted installation.
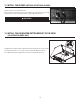
WARNING
!
When performing installation, servicing or cleaning the unit, it is recommended to wear safety glasses and gloves.
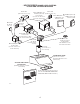
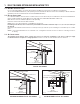
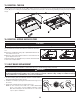
4. REMOVE HYBRID BAFFLE FILTERS
Remove tape on baffle filters.
Remove baffle filters from hood by pushing them towards the front of hood
and
rotating downward
.
Set aside filters.
NOTE: It is recommended to start with the center one.
HD0549
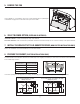
3. INSTALL BACKSPLASH (OPTIONAL)
Backsplash must be installed before the hood shell because the hood shell covers the backsplash top mounting screws. In order to be
able to install the backsplash, make sure you have at least 18’’ clearance between bottom of hood and range control panel or cooktop.
(See instructions packed with backsplash.)