
Installation Guide


- 12 -
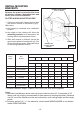
INSTALL MOUNTING
BRACKETS
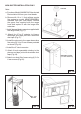
Remove the plastic protective fi lm from
all exterior surfaces, decorative fl ues and
fi lters, prior to fi nal installation
DUCTED AND NON-DUCTED HOODS
1. Construct wood wall framing that is fl ush
with interior surface of wall studs (Fig.9).
Make sure:
a) the framing is centered over installation
location.
b) the height of the framing will allow the
mounting brackets to be secured to the
framing within the dimensions shown.
2. After wall surface is fi nished, secure the
mounting brackets to framing with (4) 4.8 x
38 mm mounting screws. See chart below
for mounting brackets location.
FIG. 9
FRAMING BEHIND WOOD
CROSS SUPPORT
WOOD CROSS
SUPPORT BEHIND
DRYWALL
DRYWALL
3
1/2
”
3
1/2
”
2
3/16
”
Hood Distance Above 36” High Cook Top (in.)
Mounting Bracket Top Hole Location Above 36” High Cook Top
24” 25” 26” 28” 29” 30” 27”
XXX XX
XXX XX
X* X* X* X X XX*
XXX XXXX
XXX XXXX
XXX XXXX
XXX
X
DUCTED
NON-DUCTED
DUCTED
NON-DUCTED
DUCTED
NON-DUCTED
DUCTED
NON-DUCTED
8 FEET
9 FEET
10 FEET
11 FEET
* Possible installation height - however, Non-Duct Filter Slots will be exposed.
Notes:
a. Minimum hood distance above cook top must not be less than 24”. A maximum of 30”
above cook top is highly recommended for best capture of cooking impurities. Distances
over 30” are at the installer and the users discretion; and if ceiling height and fl ue lenght
permit.
b. Requires optional 10 / 11’ fl ue extension, ducted model AEWC345IQSB or non-ducted
model AEWC345IQSBN.
37
11
/
16
”38
11
/
16
”39
11
/
16
”41
11
/
16
”42
11
/
16
”43
11
/
16
”40
11
/
16
”
XXXX
Duct
Method
Ceiling
Height
XX
XX