
Installation Manual
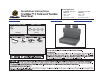


TrailMax™ II Fold and Tumble Rear Seat – Installation Instructions
Rev. 4 0907 39440 / 39441 pg. 2
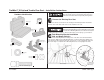
Parts List and
Hardware Identifi cation
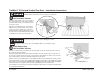
Floor Mounting Bracket Installation
1986 and Newer Vehicles
Seat, Qty - 1
Tapping Plate.,
Qty - 3
E-Clips, Qty - 2
Striker Plate,
Qty - 1
If your vehicle has carpet covering the fl oor, cut the carpet so
that the Floor Mounting Brackets are installed fl ush on the metal
fl oor. If the Floor Mounting Brackets are not fl ush mounted, the
seatback may not lock in place, which could result in serious injury to you and others.
Remove the Existing Rear Seat
Floor Mounting
Brackets, Qty - 2
Flat Washer,
Qty - 5
M8-1.25 Hex
Nut Qty - 5
M8-1.25 x 35mm Bolt, Qty - 5
Before beginning the seat installation, set the parking brake,
place the vehicle in gear or park and chock the wheels to
reduce the risk of the vehicle unexpectedly moving, which
could result in serious injury.
Locate the Floor Mounting Bracket mounting holes on the fl oor of the vehicle behind the
front seat risers. Align the Floor Mounting Brackets over the mounting holes with the loop
on the bracket positioned towards the front of the vehicle. Use the original bolts that were
removed in Step 1 to install the Floor Mounting Brackets. Securely tighten the bolts.
Rear of Vehicle
Floor Mounting
Brackets
Front
Loop
toward
front
Floor Mounting
Bracket - Place
over existing
holes
Original
Bolts
Remove the old rear seat. Remove the existing front mounting brackets. Discard the
brackets, but set the bolts aside to be used to install the new seat.