Nederlands Gebruikershandleiding statiefventilator Deutsch Gebrauchsanweisung Standventilator Français Mode d'emploi de ventilateur sur pied English User’s instructions stand fan Italiano Istruzioni per l'uso del ventilatore a piantana Español Manual del usuario del ventilador de pedestal v 110513-07 DFT45S
Gebruikershandleiding Nederlands Gefeliciteerd met de aankoop van deze statiefventilator. Bij deze ventilator kunt u de snelheid variëren, de hoogte van het statief instellen, de ventilator stil laten staan of laten zwenken en de ventilator naar beneden of recht vooruit richten. Eenvoudige mogelijkheden om de ruimte optimaal te ventileren. Veiligheidsvoorschriften - Algemeen • Lees de gebruiksaanwijzing goed door en bewaar deze zorgvuldig.
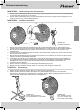
Gebruikershandleiding Werking - Algemeen 1 2 Nederlands Het apparaat is alleen bedoeld voor huishoudelijke doeleinden, niet voor professioneel gebruik. 4 3 5 7 6 1. 2. 3. 4. 5. 6. 7. 8. 9. 10. 11. 8 10 Ventilatorvinnen 11 Ventilatorkorf Motorhuis Zwenkvergrendeling Bedieningskast 9 Stopknop Snelheidsknoppen Vergrendeling ventilator op statief Snoer met stekker Uitschuifbaar statief Hoogtevergrendeling Figuur 1 werking - Vóór het eerste gebruik Haal de ventilator uit de verpakking.
Gebruikershandleiding montage - Montage voorbereiden Nederlands 1. Draai de bevestigingsknop van het motorhuis rechtsom (met de klok mee) en verwijder de knop. 2. Draai de bevestigingsring van het motorhuis linksom (tegen de klok in) en verwijder de ring het motorhuis. montage - Ventilator monteren B A D C Figuur 3 Ventilator monteren C 1.
3. Stel de gewenste richting van de luchtstroom in (zie figuur 5). U kunt de ventilator: a. recht vooruit (situatie a) of iets naar beneden richten (situatie b). Draai de ventilatorkorf en het motorhuis in de gewenste stand. b. van links naar rechts laten bewegen (in een hoek van 90 °). U ventileert een groot gedeelte van de ruimte. Druk de draaivergrendeling op het motorhuis volledig in. c. stil laten staan tijdens het ventileren. U ventileert op één plek.
Gebruikershandleiding Garantiebepalingen Nederlands De importeur geeft onder de volgende voorwaarden 60 maanden na aankoopdatum garantie op deze apparatuur tegen defecten die zijn ontstaan door fabricage- en/of materiaalfouten. 1. In de genoemde garantieperiode zullen geen kosten worden berekend voor arbeidsloon en materiaal. De onder garantie uitgevoerde reparatie verlengt de garantietermijn niet. 2.
Gebrauchsanweisung Wir gratulieren Ihnen zum Kauf dieses Standventilators. Sie können bei diesem Ventilator die Geschwindigkeit variieren, die Höhe des Stativs einstellen, den Ventilator still stehen oder sich schwenken lassen und ihn nach unten neigen oder gerade nach vorne richten. Einfache Möglichkeiten, um den Raum optimal zu lüften. • Lesen Sie die Bedienungsanleitung gut durch und bewahren Sie diese sorgfältig auf. • Verwenden Sie dieses Gerät nur so wie in dieser Bedienungsanleitung beschrieben.
Gebrauchsanweisung Funktion - Allgemein Das Gerät ist nur für den Hausgebrauch vorgesehen und nicht für die professionelle Verwendung. 1 2 4 Deutsch 3 5 7 6 10 1. Ventilatorflügel 11 2. Ventilatorkorb 3. Motorgehäuse Stativ 4. Schwenksperre 5. Bedienfeld 9 6. Stopptaste 7. Geschwindigkeitstasten 8. Blockierung des Ventilators am 9. Kabel mit Stecker 10. ausziehbares Stativ 11. Höhensperre funktion - Vor der ersten Verwendung Nehmen Sie den Ventilator aus der Verpackung.
Gebrauchsanweisung montieren - Vorbereitungen für die montieren 1. Drehen Sie den Befestigungsknopf auf der Achse des Motorgehäuses rechts herum (im Uhrzeigersinn) und nehmen Sie den Knopf von der Achse. 2. Drehen Sie den Befestigungsring auf das Motorgehäuse links herum (gegen den Uhrzeigersinn) und nehmen Sie den Ring von das Motorgehäuse. Montieren - Ventilator montieren B A Deutsch D C Abbildung 3 Ventilator montieren C 1.
Gebrauchsanweisung 3. Stellen Sie die gewünschte Richtung des Luftstroms ein (siehe Abbildung 5). Sie können den Ventilator: a. gerade nach vorn (Situation a) richten oder leicht nach unten neigen (Situation b). Drehen Sie den Ventilatorkob und das Motorgehäuse in die gewünschte Position. b. Von links nach rechts bewegen lassen (in einem Winkel von 90 °). Sie lüften einen Großteil des Raums. Drücken Sie die Drehsperre auf dem Motorgehäuse vollständig ein. c. Beim Lüften stillstehen lassen.
Gebrauchsanweisung Der Importeur gewährt für dieses Gerät unter den folgenden Bedingungen 60 Monate Garantie ab Kaufdatum auf Schäden, die aufgrund von Herstellungs- und/ oder Materialfehlern entstanden sind. 1. Innerhalb der genannten Garantiefrist werden keine Kosten für Arbeitslohn und Material berechnet. Die Garantiefrist wird durch die unter Garantie ausgeführte Reparatur nicht verlängert. 2.
Mode d’emploi Nous vous félicitons de votre achat! Votre ventilateur vous offre plusieurs vitesses, la possibilité de régler la hauteur, la possibilité de tourner immobile ou en pivotant, et la possibilité de diriger le courant d’air vers le bas ou vers l’avant. Ces réglages simples permettent la meilleure ventilation possible de la pièce. Consignes de sécurité - Généralités • Lisez soigneusement le mode d’emploi et conservez-le précieusement.
Mode d’emploi Fonctionnement - Généralités L’appareil est destiné uniquement à l’utilisation domestique, et non à l’usage professionnel. 1 2 4 3 5 7 6 8 10 Pales du ventilateur Corbeille du ventilateur 11 Bloc moteur Verrouillage de pivotant Boîtier de commande Bouton d’arrêt 9 Boutons de la vitesse Verrouillage d’angle du ventilateur sur son pied télescopique 9. Cordon et fiche 10. Pied télescopique 11.
Mode d’emploi montage - Préparatifs pour montage 1. Tournez vers la droite (dans le sens des aiguilles d’une montre) le bouton de fixation de l’arbre du bloc moteur, et détachez le bouton de l’arbre. 2. Tournez vers la gauche (contre le sens des aiguilles d’une montre) l’anneau de fixation de le bloc moteur, et détachez l’anneau de le bloc moteur. montage - Montage du ventilateur B A D Français Figure 3 C Montage du ventilateur C 1.
Mode d’emploi Figure 6 Panneau de commande avec trois boutons de réglage de la vitesse du ventilateur Nettoyage et entretien Figure 7 Démontage des pièces pour nettoyage et entretien De la poussière peut s’accumuler entre les barreaux de la corbeille du ventilateur, et sur les pales. Utilisez d’abord une brosse et/ou un aspirateur à poussière pour enlever la poussière. Si ceci ne suffit pas, vous pouvez démonter le ventilateur pour le nettoyer. 1.
Mode d’emploi Conditions de garantie Français À compter de la date d’achat de cet appareil, l’importateur donne, aux conditions suivantes, 60 mois de garantie couvrant tous les défauts consécutifs à des défauts de pièce et main d’œuvre. 1. Pendant la période de garantie aucun frais ne sera facturé pour les pièces et la main d’œuvre. Les réparations effectuées sous garantie ne prolongent pas le délai de garantie. 2.
User’s instructions Congratulations with the purchase of your stand fan. This fan is equipped with controls that enable you to vary the speed, adjust the height, allow the fan to swivel or fix the direction, and angle the fan for a horizontal or downward air flow; in other words, it offers you a simple means of ensuring for optimum ventilation. Safety instructions - General • Please read these instructions carefully and retain them for reference.
User’s instructions Operation - General The appliance is intended only for domestic use, not for professional use. 1 2 4 3 5 7 6 1. 2. 3. 4. 5. 6. 7. 8. 9. 10. 11. 10 Fan blades 11 Fan housing Motor housing Swivel button Control unit 9 Stop button Speed buttons Stand lock Power cord and plug Telescopic stand Height lock English operation - Before use for the first time Remove the fan from the packaging. montage - Assembling the stand 1.
User’s instructions montage - Preparations for assembling 1. Unscrew the spinner from the motor-housing shaft (by turning it clockwise) and remove the spinner. 2. Unscrew the locking ring from the motor-housing (by turning it anticlockwise) and remove the ring from the motor housing. montage - Assembling the fan B A C Figure 3 Assembling the fan C 1.
User’s instructions 3. Tilt the fan to the required angle (see Figure 5). You can set the fan: a. to blow horizontally (position a) or angled slightly downwards (position b). Tilt the ventilator housing and motor housing to the required angle. b. to oscillate from left to right (with a sweep of 90 °). This will ventilate much of the room. Press the oscillation button on the motor housing fully in. c. remain in the same position whilst the fan is turning. This will ventilate one area.
User’s instructions Guarantee terms The importer guarantees the appliance against defects caused by manufacturing and/or material faults for 60 months from the date of purchase, subject to the following conditions. 1. No charges will be made for labour costs or materials during the warranty period. Any repairs carried out during the warranty period do not extend the warranty period. 2.
Istruzioni per l’uso Desideriamo congratularci con voi per l’acquisto di questo ventilatore a piantana. Il ventilatore dispone di velocità variabile e di una piantana regolabile in altezza ed è provvisto di testa oscillante inclinabile e orientabile in orizzontale e in verticale, caratteristiche semplici che permettono di ventilare gli spazi in maniera ottimale. Norme di sicurezza - Avvertenze generali • Leggere attentamente le istruzioni per l’uso e conservarle con cura.
Istruzioni per l’uso Funzionamento - Avvertenze generali Questo apparecchio è concepito esclusivamente per l’impiego domestico e non per l’uso professionale. 1 2 4 3 5 7 6 8 10 1. 2. 3. 4. 5. 6. 7. 8. Pale del ventilatore Griglia di protezione 11 Vano motore Dispositivo per il blocco direzionale Blocco comandi Tasto di arresto 9 Tasti per la selezione della velocità Dispositivo di blocco del ventilatore sulla piantana 9. Cavo e spina 10. Piantana estraibile 11.
Istruzioni per l’uso Montaggio - Preparativi per montaggio 1. Ruotare verso destra (in senso orario) la manopola di fissaggio presente sull’asse del vano motore e rimuovere la manopola dall’asse. 2. Ruotare verso sinistra (in senso antiorario) l’anello di fissaggio presente sull del vano motore e rimuovere l’anello dall del vano motore. Montaggio - Montaggio del ventilatore B A D C Figura 3 Montaggio del ventilatore C 1.
Istruzioni per l’uso 3. Regolare la direzione del flusso di aria nella posizione desiderata (vedere la fig. 5). Il ventilatore può a. essere orientato in modo da dirigere il flusso di aria direttamente in avanti (a) o verticalmente, in modo leggermente inclinato verso il basso (b): portare la griglia di protezione del ventilatore e il blocco motore nella posizione desiderata; b. essere fatto oscillare orizzontalmente (con un’angolazione di 90 °).
Istruzioni per l’uso Condizioni di garanzia Di seguito sono riportate le condizioni alle quali l’importatore fornisce la garanzia per il presente apparecchio per un periodo di 60 mesi a decorrere dalla data d’acquisto, a copertura dei difetti di materiale e/o di fabbricazione. 1. Durante la validità di tale periodo di garanzia non verrà addebitato alcun costo di manodopera o di materiale. Le riparazioni effettuate nel corso di validità della garanzia non prolungano la durata della stessa. 2.
Manual del usuario Felicitaciones por la compra de este ventilador de pedestal. El ventilador dispone de velocidad variable, altura ajustable del pedestal, control de flujo directo o de rotación y ángulo de orientación hacia abajo o hacia el frente. Una variada selección de sencillas posibilidades que permiten ventilar el lugar en forma óptima. Normas de seguridad - General • Lea las instrucciones de uso con detenimiento y guárdelas cuidadosamente.
Manual del usuario Funcionamiento - General Este aparato está concebido únicamente para uso doméstico, no para uso profesional. 1 2 4 3 5 7 6 1. 2. 3. 4. 5. 6. 7. 8. 9. 10. 11.
Manual del usuario montaje - Preparativos para la ensamblaje 1. Gire la perilla del eje del alojamiento del motor hacia la derecha (en la dirección de las agujas del reloj) y retírela. 2. Gire el anillo de fijación del alojamiento del motor hacia la izquierda (en dirección opuesta a las agujas del reloj) y retírelo. montaje - Ensamblaje del ventilador B A D Figura 3 C Ensamblaje del ventilador C 1.
Manual del usuario 3. Ajuste el ángulo de orientación de la corriente de aire (ver figura 5). Las posiciones del ventilador son: a. Hacia el frente (situación a) o levemente inclinado hacia abajo (situación b). Gire la rejilla del ventilador y el alojamiento del motor a la posición deseada. b. Oscilación de izquierda a derecha (en un ángulo de 90 °). En esta posición se ventila una porción más amplia del lugar.
Manual del usuario Disposiciones de garantía Bajo las siguientes condiciones, y durante un período de 60 meses contado a partir de la fecha de compra, el importador otorgará garantía de este aparato por defectos ocasionados por deficiencias en la fabricación o en los materiales. 1. Durante el período de garantía mencionado no se cobrarán los costes de la mano de obra ni el material. Una reparación que tenga lugar durante el período de garantía no prolonga dicho período. 2.
DFT45S v 110513-07