SPIN BIKE USER’S MANUAL CAUTION Read all precautions and instructions in this manual before using this equipment. Keep this manual for future reference. Installation Video https://youtu.
CONTENTS Safety Precautions …………………………………………………………………………………………3 Exploded View …………………………………………………………………………………………........4 Part List .........................................................................................................................................5 Assembly Instructions ……………….........................................................................................6 Computer Operation Instructions …………………………………………………………………..9 Maintenance …………………………………………………..............................
Safety Precautions – Please Read the Instruction before Using! 1. According to the installation instruction, use original parts to assemble this product properly. Before assembly, inspect whether packages are in good condition and whether spare parts are complete in accordance with transport precautions and the list of spare parts. 2. Prior to exercise, make sure equipment fasteners are in locking state. 3. Please place the exercise bike on a dry and flat ground. 4.
EXPLODED VIEW Part #21 and #22 are pre-fitted Part #24 are pre-fitted on Part #13 on Part #11 4
Ø8 Flat Washer M8 Cap Nut M8*16 Combination Screw 13-15 Wrench Ø10 Flat Washer M5*55 Carriage Bolt M4*12 Screw M4*20 Self-Tapping Screw Multi-function Wrench (Screwdriver) L shape Wrench PART LIST NO. DESCRIPTION QTY NO.
ASSEMBLY INSTRUCTIONS 5 easy steps to assemble then you’re ready to workout – it takes approx 30 mins to assemble. STEP 1 a. Fix the Front Stabilizer (6) to Main frame (1) using 2 X M5*55 Carriage Bolts (8), 2 X Ø8 Flat Washers (14) and 2 X M8 Cap Nuts (15) provided. b. Repeat Step a. to install Rear Stabilizer (7) to Main Frame (1). STEP 2 a. Insert the Seat Support Tube (12) to the rear opening tube of the Main Frame (1). b.
STEP 3 a. As shown in figure A, disassemble Mobile Bracket (23) and get mobile bracket (23 upper) and mobile bracket (23 lower). As shown in figure B, insert Handlebar Support Tube (11) into the mobile bracket (23 lower). b. As shown in figure C, insert Handlebar Support Tube (11) into the Main Frame (1) and tighten with M10 Lock Knob (10). c. As shown in figure D, fix the Handlebar (9) on the Handlebar Support Tube (11), tighten with 4 X M8*16 Combination Screws (24) by the provided L shape Wrench.
STEP 4 a. Attach Computer Bracket (26) on the Handlebar (9), fasten with Self-Tapping Screw (27) by the Multi-function Wrench (Screwdriver). b. Insert the Computer Bracket (26) into the flute on the back of the Computer (19). Then remember to load the 2AA batteries, and insert the sensor wire from the main frame into “SENSOR INPUT” hole on the back of the computer. STEP 5 a.
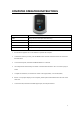
COMPUTER OPERATION INSTRUCTIONS SCAN Scans all functions – TIME, SPEED, DISTANCE, TOTAL DIST, CALORIES TIME Displays work out time lapse while exercising SPEED Displays the current speed DISTANCE Displays the distance while exercising TOTAL DIST Displays the total distance at the end of your workout CALORIES Displays the calories you have burned 1. You will need to prepare one or two batteries to operate the Computer. 2.
MAINTENANCE Regular maintenance will prolong the life of your spin bike and prevent injury. We strongly recommend that you do the following on a regular basis: 1. Clean the bike after use with a soft cloth – ensure it is dry. Note, a build up of moisture over time will cause corrosion. 2. Clean the Computer display with a soft cloth and anti-static computer spray to remove dust or finger prints.
EXERCISE INSTRUCTIONS Using your EXERCISE CYCLE will provide you several benefits, it will improve your physical fitness, tone your muscle, and in conjunction with calorie controlled diet, it will help you lose weight. 1. The Warm Up Phase This stage helps the blood flow around the body and the muscles work properly. It will also reduce the risk of cramp and muscle injury. It is advisable to do a few stretching exercises as shown below.
TROUBLESHOOTING REF PROBLEM SOLUTION 1 THE PEDALS ARE SPINNING 1. PRESS THE RED EMERGENCY STOP LEVER. OUT OF CONTROL 2. ADD MORE RESISTANCE BY TURNING THE TENSION CONTROL TO THE RIGHT. 3. START PEDALLING SLOWLY. 4. KEEP TURNING THE TENSION CONTROL TO THE RIGHT UNTIL YOU CAN FEEL RESISTANCE WHEN YOU PEDAL. 2 THE BIKE IS UNSTABLE 1. ADJUST THE FRONT AND BACK STABILIZERS UNTIL THEY ARE FLAT ON THE SURFACE. 2. SHAKE THE BIKE TO ENSURE IT’S STABLE. 3 THE HANDLEBARS 1.
WARRANTY 1. We have one year quality warranty to the products. Within the warranty period, we provide the FREE replacement parts, and provide technical support for life. 2. If caused by incorrect assembly, incorrect use or change of parts failures, our company takes no responsibility. 3. The exercise bike is only for home use, if the problems occurred by commercial use, our company takes no responsibility. 4.