
Specifications


3
29
ASSEMBLING AND TESTING THE ENGINE
3.4
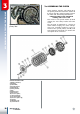
CLOSING THE ENGINE CASING
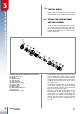
Insert two centring bushes A and replace
the gasket with a new one. Once the seal
is replaced with a new one, heat the main
bearing and the area around it on the right
casing. Continue heating until the casing
enters the motor shaft with minimal hin-
drance.
Before starting the heating process it is re-
commended to grease the oil seal found on
the outer side of the half-casing.
ATTENTION!
Be careful not to deteriorate the oil seal
while heating the bearing
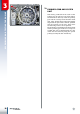
Press the right half-casing towards the left
half, ensuring that the shafts, bolts and
pins on the casings are inserted into their
respective housing and the half-casing is
positioned correctly. To facilitate the pro-
gressive approach and alignment of the two
half-casings, you can use two screws placed
diametrically opposite, then tightened gra-
dually. If the casings do not remain in their
correct position, do not tighten further but
loosen the screws and set the casings back
into their correct position.
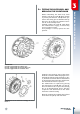
Ensure that the two casings fit perfectly then
mount and tighten the recessed hexagonal
head screws (M6x50), whose tightening tor-
que must be 10Nm. It is recommended to
tighten the screws in a cross-wise pattern.
Then carefully cut the excess parts of the
seal in the cylinder area and intake pipe.
Give a few blows to the end-parts of the
motor shaft with a rubber hammer in direc-
tion of the axes so as to release any residual
stress on the casings caused by the heating
process.
A
A