Warranty Information Read Before Beginning Assembly DHP warrants this product to be free from defects in material and workmanship and agrees to remedy any such defect. This warranty covers one year from the date of original purchase. This is solely limited to the repair or replacement of defective parts and assembly labor is not included. This warranty does not apply to any product which has been improperly assembled, subjected to misuse or abuse or which has been altered or repaired in any way.
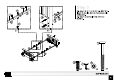
Step 8 8.1 Attach PAD 9 to (G) as illustrated below. 8.2 Attach PAD 9 to (G) as illustrated below. G 8.1 G 8.1 O Make sure that the PAD 9 is right under the specified tube as indicated.
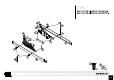
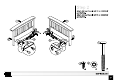
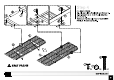
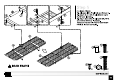
Instrucciones Paso 1 Una (L) en (B) con (4) y (5). Una (R) en (C) con (4) y (5). Paso 2 Una (B) en brazo con (1), (8) y (6). Una (C) en brazo con (1), (8) y (6). Paso 3 3.1 Una (D) en (H) con (3).Una (G) en (H) con (7); 3.2 Una (G) en brazo con (1) y (6). Paso 4 4.1 Una (O) en (P) con (E) y (7). 4.2/4.3 Una (Q) en (O & P) con (2) y (5). Paso 5 5.1 Una (O) en (P) con (E) y (7). 5.2 Una (Q) en (O & P) con (2) y (5). 5.3 Una (Q) en (O & P) con (12) y (13).
Instructions Étape 1 Attacher (L) à (B) avec (4) et (5); Attacher (R) à (C) avec (4) et (5); Étape 2 Attacher (B) à bras avec (1), (8) et (5); Attacher (C) à bras avec (1), (8) et (5); Étape 3 3.1 Attacher (D) à (H) avec (3); Attacher (G) à (H) avec (7), 3.2 Attacher (G) à bras avec (1) et (6); Étape 4 4.1 Associez (O & P) avec (E) et (7); 4.2/4.3 Attacher (Q) à (O & P) avec (2) et (5); Assurez-vous que le grillage de deux MAILLES ARMATURE est du même côté. Étape 5 5.1 Associez (O & P) avec (E) et (7); 5.