
Owners Manual


User Manual for BB Refrigerators Beverage-Air
Rev. 10/20 Beverage-Air 9
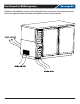
UNPACKING AND SET UP
Carefully inspect the shipping carton for damage. This is the only time that shipping damage may be claimed. If damage is
suspected, open the carton immediately and, if there is damage, retain the carton and contact the shipper to make a claim.
Do NOT contact the manufacturer.
Uncrating
Tools Needed: ¾” box wrench, adjustable wrench, level,
at head screw driver, and box cutter.
1. Remove the cardboard top capping, all clear tape,
and all staples including those at the bottom of the
cardboard carton and skid.
2. Start from the top of the carton. Using the box cutter,
carefully make one continuous cut to the bottom of
the skid. Remove cardboard carton and discard.
Note: additional clear plastic protective wrap is applied
directly to any product with a glass door.
3. Move unit as close to nal position as possible before
removing the skid.
Note: The skid must be removed before the casters or legs
can be attached.
Do NOT tip unit on its front or sides. If tipped onto the
back, unit must not be started for 3 hours.
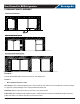
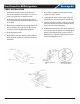
Skid Removal and Caster Attachment
Tip the unit forward and remove the skid.
Risk of personal injury.
Unit must be securely supported
while attaching casters or legs.
WARNING
1. Remove the shipping bolts using the ¾” box wrench
while cabinet is held in one direction. Repeat the process
while the cabinet is held in the opposite direction.
2. None of the threads on the leg or caster stem should
be visible once screwed in.
3. Tilt the cabinet in one direction approximately 8” and
block it securely with pieces of 2x4 lumber or other
suitable material.
4. Thread the stem casters or legs into the ½ -13 holes in
the bottom of the cabinet. Tighten by hand as much
as possible. Some models may already have levelers
installed. If so, then the levelers will need to rst be
removed and discarded.
5. Once the caster or leg cannot be turned any further,
use a 3/4 inch wrench to tighten the nut in between
the mounting plate and the wheel of the caster until
snug.
6. Repeat this procedure with unit secured in the
opposite direction so as to access the remaining legs/
casters/levelers.
7. If plate casters or legs are installed instead of stem
casters or legs, then repeat step 3 above and secure
the plate with either #14 AB screws, or ¼-20 screws,
depending upon which are required.
8. If levelers are employed, then repeat step 3 above and
thread the leveler in place. Then repeat step 6.
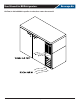
Leveling:
Cabinets must be leveled when installed. Level should be
measured on the headrail.
Failure to level your cabinet may result in door not
sealing, closing correctly, or condensed water draining not
draining properly.
For cabinets with legs, rotate the foot of the leg with an
adjustable wrench to achieve desired height for leveling.
For cabinets with casters, leveling can be achieved by
placing large washers in between the ½’ stud and the
holes located on the bottom of the case.
Do NOT loosen casters to level
the cabinet. Casters MUST be
tightly secured to cabinet for full
strength.
Install or attach any accessories that will be used
Remove any plastic covering the stainless steel.
CAUTION