
User's Manual

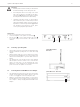
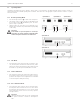
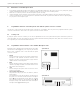
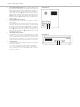
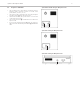

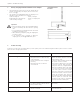
Table Of Contents
- Contents
- 1. Safety Instructions
- 2. Quinta CU Control Unit
- 3. Quinta MU Microphone Units
- 4. Programmable Functions of the Microphone Units with the Quinta Conference Software
- 5. Quinta CD 2 Charger in the Quinta CC 2 | CC 2 / 600 Case and Quinta CD 3 in the Quinta CC 3 Case
- 6. Battery Charging with External Mains Power Adapter
- 7. Trouble Shooting
- 8. Components
- 9. Accessories
- 10. Technical Specifications
- EC-DECLARATIONOF CONFORMITY
- FCC Regulation

Quinta – Microphone Units
11
3.2 How to Connect the Gooseneck Microphone
to Quinta MU 21/22/23
The following gooseneck microphones with an LED are available to
connect to the microphone unit.
– Classis GM 313 Q; 300 mm [11.81"] in length
– Classis GM 314 Q; 400 mm [15.75"] in length
– Classis GM 315 Q; 500 mm [19.69"] in length
– Classis GM 316 Q; 600 mm [23.62"] in length
• Take the gooseneck microphone by the shaft, put it into the
connection for gooseneck microphones and press the shaft
downwards until it locks in place.
• If you want to remove the gooseneck microphone, press into
the opening for unlocking the gooseneck microphone with
the supplied tool or a similar thin tool. Remove the gooseneck
microphone by taking it by the shaft and pulling.
3.3 Switching On / Off
How to switch on and allocate the microphone units
• The microphone unit is switched on by pressing the microphone
button. The microphone button will light up for a moment
and the operating control LED on the rear will illuminate
green. When the connection to the Quinta CU control unit has
been established, the buttons of the microphone unit will
illuminate white.
• To activate the microphone or to allocate the microphone unit
to a free channel of the Quinta CU control unit, press the
microphone button once again. Depending on the operating
mode, the microphone button will illuminate green (normal
operating mode) or red (request-to-speak mode).
Switching off
• By pressing the microphone button for more than 2 seconds
the microphone unit is switched off.
• If you press the standby button of the Quinta CU control unit
for more than 3 seconds, you switch off all the active Quinta MU
microphone units within the range of the Quinta CU control
unit.
• Furthermore, the microphone units are switched off automatically,
when they do not receive a signal from the Quinta CU control
unit for more than 3 minutes.
Quinta MU 23 Quinta MU 21Quinta MU 22
Quinta MU 33
Quinta MU 31