
Operation Manual

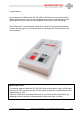


BEYERTONE
®
AG
www.beyertone.com
© X-2007 BEYERTONE AG CR-200 / CR-100 USB Ver. 2-3 - Installation and User Guide 8/64
3. Installing the appliance
First check that you have got all of the parts listed under ‘What comes with the Call-
Recorder’ and then install the unit as per the instructions in section 3.2 ‘Connecting the
appliance’.
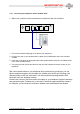
3.1 What comes with the CallRecorder
The box your appliance came in should have contained the following:
•
The CR-100 USB or CR-200 appliance
•
An RJ11 cable with two large 6/4 Western plugs (approx. 1.5m)
•
An RJ16 cable with two small 4/4 Western plugs (approx. 0.5m)
•
A USB type A plug to type B plug cable (only with CR-100 USB)
•
A mains adapter plug 9V DC (only with CR-200)
•
A CD-ROM with PC software, USB driver and documentation (only with CR-100
USB)
•
A USB flashdrive stick incl. PC software and documentation (only with CR-200)
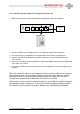
3.2 Connecting the appliance
In general, there are two different options for connecting your CallRecorder to your
telephone:
1. On telephones that have a handset cable, the CallRecorder should normally be
inserted into this handset connection line (via the ‘Handset’ sockets on the Call-
Recorder), as this ensures the best possible functionality.
2. If no handset cable is accessible (e.g. on cordless phones), the unit can instead be
plugged into the telephone’s connection line (via the ‘Line’ socket on the CallRe-
corder), provided that this is an analogue line. The unit cannot be plugged into digital
connection lines. In relation to this, please note also the advice in section 2.2.
IMPORTANT: Only ever use one of the two possible connection options. Never use
both the ‘Handset’ and the ‘Line’ connection sockets at the same time!
Now please proceed with the installation step by step, as described on the following
pages.