Contents Safety .................................................................................................................... 3 Environment ........................................................................................................ 4 1 Getting Started ................................................................................................. 5 1.3 Charging the Battery .......................................................................... 6 1.4 Starting up the device............
9.3 Calculator ......................................................................................... 40 10 Play Store* .................................................................................................... 41 11 FCC Statements ............................................................................................
Safety Never attempt to disassemble your phone. You alone are responsible for how you use your phone and any consequences of its use. As a general rule, always switch off your phone wherever the use of a phone is prohibited. Use of your phone is subject to safety measures designed to protect users and their environment. Do not use your phone in damp areas (bathroom, swimming pool…). Protect it from liquids and other moisture.
interfere with electronic medical equipment or implants, such as hearing aids, pacemakers, insulin pumps, etc. It is recommended that a minimum separation of 15 cm be maintained between the phone and an implant. Your doctor or the manufacturers of such equipment will be able to give you any advice you may need in this area. Hospitals: Always make sure that your phone is switched off in hospitals when so instructed by warning signs or by medical staff. Road safety: Do not use your phone when driving.
1 Getting Started To install the SIM card The SIM card contains your phone number, service details, and phonebook/ message memory. Your device is supported 2G, 3G (WCDMA) or 4G (FDD_LTE) SIM cards. 1. Remove the SIM card slot cover 2. Locate the SIM card slot, and then insert the SIM card with its gold contacts facing down and its cut-off corner facing out the card slot. 3. Slide the SIM card completely into the slot. Note: • The phone can be supported the double SIM cards.
strength, and usage patterns. Warning: To reduce risk of fire or burns: • Do not attempt to open, disassemble, or service the battery pack. • Do not crush, puncture, short external contacts, or dispose of in fire or water. • Do not expose to temperatures above 60°C (140°F). • Replace only with the battery pack designated for this product. • Recycle or dispose of used battery as stipulated by local regulations. 1.
To power on again, press & hold POWER. Silent mode To silence your phone quickly, press & hold the – volume button to zero volume. Or on the Home screen, touch and select Settings > Sound & notification > ‘Silent’ check box. Screen sleep After a period of inactivity, your screen will go to sleep (display will turn black). In sleep, your phone uses less battery power. You can control this behavior: Set screen timeout period 1. On the Home screen, touch and select Settings. 2. Select Display > Sleep.
The Home screen is your starting point for using all the applications on your phone. You can customize your Home screen to display applications, shortcuts, and widgets as you like. 1. The Home screen actually extends beyond the screen width. On Home screen, slide your fingertip left and right along the screen to reveal the full width of the Home screen. This additional space gives you more room to customize Home with applications, shortcuts, and widgets. 2.
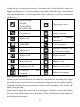
Along the top of your phone screen is the status bar. On the left side, icons will appear, notifying you of a new message, upcoming calendar event, or something else you should notice. On the right side of the status bar, you’ll see connection status icons.
To open the message, reminder, or other notification, you can touch the items. To close the notifications window, slide your finger up the screen.
2 Using phone features 2.1 Turning the phone function on and off To enable or disable Airplane Mode In many countries, you are required by law to turn off the phone while on board an aircraft. Another way to turn off the phone function is to switch your device to Airplane Mode. When you enable Airplane Mode, all wireless radios on your device are turned off, including the phone function, Bluetooth, and WLAN. 1. Touch > Settings > More > Airplane mode. 2. Touch ‘Airplane mode’ to enable or disable.
1. To answer an incoming call, slide ‘ANSWER’ (Green icon) button rightward. 2. To reject a call, slide ‘REJECT’ button (Red icon) button leftward. 2.4 In-call options While on a call, reveal the in-call options: Speaker, Mute, Hold, End. Note that if Bluetooth services are on and you are connected to a hands-free device, the more menu indicator will show Bluetooth on. 1. Speaker: To use the speaker, select ‘Speaker’ so it shows a green bar. To turn it off, select it again so the bar is unfilled.
2.5 Using call history 1. The missed call icon appears in the title bar when you missed a call. 2. Use ‘Call history’ tab to check who the caller was, or view all your dialed numbers, and received calls. To open ‘Call history’ tab, touch ‘Call history’ button in the phone screen to enter the call history list. 3. Scroll to select the contact or number you want to dial, touch ‘Call back’ button. 4.
3 Setting on your device Control phone-wide settings from the Home settings screen: touch and select Settings. 3.1 Wireless & networks Wi -Fi 1. Select this check box if you prefer to use Wi-Fi for your data connection. 2. Wi-Fi settings: Open the Wi-Fi settings screen; select it from the network list. Provide your username or password if required. Bluetooth 1. Use this check box to turn Bluetooth services on or off. 2. With Bluetooth services on, you can touch MENU to open the Bluetooth settings screen.
Sound & notification Select one user profile that you want and enter the following options: Volumes: Select to open the volume control, and then slide your finger along the volume bar to set an incoming call ring volume or alarm, playing back music, videos. Phone ringtones: Select to decide on a ring tone to use for incoming calls. Note that you can override this setting for individual contacts in the Edit contact details screens. Default notification sound: Select a ring tone to use for a notification (e.
application). 2. Disassociate the application with any actions. 3. Uninstall - If you’ve downloaded an application from Android Market, you will be able to uninstall it from this screen by selecting Uninstall. 3.3 Personal Location Select a source for determining your location. Security Screen unlock pattern: Create a pattern you will be asked to draw before your screen will unlock. You can select to make the pattern visible or invisible as you draw it.
Developer options If you are an application developer, you may be interested in these settings: USB debugging: If you want be able to communicate with your phone directly via USB, select ‘USB debugging’ check box. Stay awake: To prevent your phone from sleeping while charging (via power adapter or USB), select ‘Stay awake’ check box.
4 ActiveSync 4.1 Data synchronization Some applications on your phone (Contacts and so on) give you access to the same personal information that you can add, view, and edit on your computer using Web applications. This means that when you add, change, or delete your information in any of these applications on the Web, the updated information also appears on your phone, and vice versa.
and try again later. 4.2 Bluetooth You can use Bluetooth to send and receive calls using a headset or hands-free car kit. Turn on Bluetooth services 1. On the Home screen, then touch and select Settings. 2. Select Bluetooth, and then select ‘Bluetooth’ check box to turn on Bluetooth services. 3. When on, the Bluetooth icon appears in the status bar. Discoverability By default, your phone is “discoverable” when turned on the Bluetooth.
context menu. Select Un-pair, as appropriate. If you select ‘Un-pair’ when connected, you will be disconnected as well. Notes: The phone supports only the headset and hands-free Bluetooth profiles, so if you try to connect to a device that is not a headset or hands-free car kit, then you will receive an “unable to connect” message. If you pair with a second headset while connected to the first, the first headset will remain connected.
5 Contacts The contacts on your phone are synced with your account contacts stored on the Web. To view the contacts on your phone, touch and select Contacts. Contacts belonging to a specific group (you can choose which group) are listed in the Contacts tab. Only those contacts you star as “favorites” are listed in the Favorites tab. Browse through your contacts by sliding your fingertip up and down on the screen.
will be assigned. 5. To save your contact, press BACK, or touch ‘Done’ icon. Edit contact details You can always make changes to the information you’ve stored for a contact: 1 From Contacts, touch the contact you want to open the Contact details screen. 2. Select ‘Edit’ icon. The Edit contact screen appears. 3. Make your edits, then press ‘Done’ icon. Communicate with a contact From Contacts you can quickly call or text a contact’s default number, as displayed below their name on the screen.
If you have stored names and phone numbers on your SIM card, you can add these to the Contacts stored on your phone by selecting this settings option. From the contact list, press MENU to select ‘Import/export’, you can select to import from SIM card or memory card, once the list of names and numbers appears you can: Import only certain names/numbers in the list - Select the name/number you want to import, then repeat for others as you wish.
6 Exchanging Messages 6.1 SMS and MMS messaging To open the SMS & MMS Messaging application, on the Home screen, then touch and select Messaging icon. About text and multimedia messages SMS messages are also know as “text” messages and can each be around 160 characters. If you continue to type after the limit is reached, your message will be delivered as one, but count as more than one message. These are called “concatenated” messages.
2. Reply to a message: Simply start typing your message in the text box at the bottom of the screen to reply to a message. You can always press MENU and select to add a subject or an attachment to convert it to a multimedia message. Select ‘Send’ when ready. 3. Links in messages: If a message contains a link to a Web page, it will be selectable. To view the Web page in the Browser, simply select it. 4. Delete messages: Your messages will be saved until you explicitly delete them.
characters/messages you’re creating. Remember that text messages have a limit around 160 characters. Once you go over that limit, a new message is actually created but automatically joined into one when received. 6. Select ‘Send’ when ready. You can also save a draft. 7. As your message sends, progress displays in the title bar. If you see this icon to the right of the message, it means your message is still being delivered.
Use your POP3 and IMAP email account Once you’ve set up an account, you can do the following: 1. Refresh Inbox: From the Inbox, press MENU and then select ‘Refresh’ to update your Inbox with any previously-unfetched email. 2. Read email: You can display or collapse the messages in your Inbox by selecting Inbox. Unread messages display with a colored band. (Each account you add will use a different color.) 3. Forward, Reply, Reply all: You can forward, reply, or reply all to an email message from the Inbox.
1. From your account Inbox, press MENU and select ‘Account settings’. 2. The Account settings screen appears. You can do the following from this screen: Account name: Select to change the name of your account as it appears on your Accounts screen. Your name: Select to change your name as it appears in outgoing email. Email check frequency: Select this pop-up menu to set how frequently your email account is checked for new messages.
7 Internet 7.1 Ways of Connecting to the Internet Your device’s networking capabilities allow you to access the Internet or your corporate network through WLAN, GPRS, WCDMA or FDD_LTE (if SIM card supported). You can also add and set up a VPN or proxy connection. WLAN WLAN provides wireless Internet access over distances of up to 100 meters (300 feet). To use WLAN on your device, you need access to a wireless access point or “hotspot”.
Open a new window: From a Web page, press MENU and select ‘Windows’. The Current windows screen opens, showing the Web page you started from, plus a “new window”. Select ‘New window’. Your home page opens in a new window. To return to one of the other windows, press MENU and select ‘Windows’. Select the page you want to view. Manage bookmarks You can store as many bookmarks as you want on your phone. Press MENU and select ‘Bookmarks’. The Bookmarks screen opens. 1. Bookmark any page: Select ‘Add’.
following: 1. Before you can download Web applications, you must explicitly “allow” downloading from the Home > Settings screen: On the Home screen, then press and select Settings. Select ‘Security’, then select ‘Unknown sources’ check box. 2. All items downloaded form the Web are stored on your memory card, so be sure you have a card installed in your phone before you download from the Browser. 3. The Browser will only allow you to download items that are supported by an application installed on the phone.
8 Experiencing Multimedia 8.1 Camera & Picture All the pictures you can capture or view on your phone are stored on memory card, which must be installed in your phone. Before you can use the Camera or view pictures in Pictures, make sure you have a card installed. Load pictures onto your memory card Read the instructions below to add pictures to your Memory card or the phone storage. 1.
To view the pictures you’ve captured, as well as any you’ve stored on your memory card or the phone storage, go to Gallery application: 1. To open Pictures, on the Home screen, touch and select Gallery icon. 2. Depending on how many pictures you’ve stored, they may take a few minutes to load. 3. If you’ve stored your pictures in folders on your Memory card, then the folders will display as separate “albums”. The top left album always contains all the pictures in all the albums. 4.
appear in the Contact details screen, as well as on any incoming call notifications. 7. Crop picture: In full-screen view, press MENU and select Crop. Touch & hold an edge of the cropper to reveal the sizing arrows, then drag the edge in or out to size. Touch & drag the center of the cropper to move it within the picture. 3 When you are happy with the cropped area, select ‘Save’. Select Discard to cancel the crop. The cropped picture is saved to Pictures as a copy. Your original is not touched. 8.
2. On your computer, find the mounted USB drive and open it. 3. Although your phone will find all music files on your memory card, it’s advisable to keep the number of files or folders at the root level to a minimum. So, if you wish, create a folder at the top-level called “music” (or whatever you want) to store your files. 4. Open this folder and copy music files into it. If you want, create folders within “music” to organize your music further.
automatically in a playlist called “My recordings”. Create a playlist on your phone 1. From the Library, select a category. From the list that appears, navigate to the artist, album, or song that you want on a playlist. 2. Touch & hold the artist, album, or song to open the context menu. 3. Select Add to playlist. 4. In the Add to playlist menu that opens, select New to create a new playlist, or one of the existing playlists. 5. The song(s) are added.
be affected. You can improve the effect in the following ways: Near window, adjust the position of earphone cable or adopt manual adjustment. 8.4 Sound record The phone can be as sound record.
9 Other applications 9.1 Calendar Calendar views You can view multiple calendars on your phone, so each calendar event is coded with a color. You can view your calendar in a variety of ways. Touch the date on the left-top of the screen to select from Day, Week, Month or Agenda. Create an event From any of the views, press MENU and select ‘New event’ to open the new Event details screen. • Type the information in the fields. • Select date & time. • Name that appears in Day view.
Set the following options: Alarm: Select the check box to turn alarm on (checked) or off (cleared). This is the same check box that appears on the main Alarm Clock screen. Time: The time the alarm will go off is shown. To change this time, select Time to open the time selector. Slide the finger up or down to set the time you want, and then select Set. Repeat: The current repeat selection is shown. To change the setting, select Repeat and make a selection from the menu.
The Date & time settings screen appears. 2. Use the network-provided values by selecting ‘Automatic’ check box. 3. Select ‘Use 24 hour format’ check box if you wish to use that rather than 12 hour format. 4. Select t ‘Select date format’ option to open the menu of various date formats. 9.3 Calculator To open Calculator, on the Home screen, then touch and select the Calculator icon. The Calculator offers two panels: basic and advanced.
10 Play Store* This function is to the actual configuration of the mobile phone, please take to the actual mobile phone. Android Market provides you with direct access to software developers throughout the world. It is the place to go to find fun games and cool applications that have been rated by your fellow Androids. If you ever need help or have questions about Android Market, press MENU and select ‘Help’. The Browser will take you to the Android Market “help & info” Web page.
can give your permission. Be sure to read this carefully! Be especially cautious if an application has access to many functions or a significant amount of your data. Once you select ‘OK’ on this screen, you will be responsible for the results of using this item on your phone. • After selecting ‘Install’, the item will start downloading immediately. • After selecting ‘Buy’, you may be asked to sign in to an additional Google account. Sign in and select Purchase now if you want to proceed.
Items you download and install on your phone typically have access to functionality. You can view what an item has access to on your phone: 1. From the Android Market Home screen, press MENU and select ‘Downloads’. 2. Select the item you want to read about. The Item details screen appears. 3. Press MENU and select ‘Security’. 4. All areas of your phone that this item has access to are listed. 5. Dismiss the screen by selecting ‘OK’.
3. Your rating and comments are removed.
11 FCC Statements 1. This device complies with Part 15 of the FCC Rules. Operation is subject to the following two conditions: (1) This device may not cause harmful interference. (2) This device must accept any interference received, including interference that may cause undesired operation. 2. Changes or modifications not expressly approved by the party responsible for compliance could void the user's authority to operate the equipment. 3.
and manufactured not to exceed the emission limits for exposure to radiofrequency (RF) energy set by the Federal Communications Commission of the U.S. Government. These limits are part of comprehensive guidelines and establish permitted levels of RF energy for the general population. The guidelines are based on standards that were developed by independent scientific organizations through periodic and thorough evaluation of scientific studies.
user guide, is 0.481 W/Kg (Body-worn measurements differ among phone models, depending upon available accessories and FCC requirements). The maximum scaled SAR in hotspot mode is 0.529 W/Kg. While there may be differences between the SAR levels of various phones and at various positions, they all meet the government requirement for safe exposure. The FCC has granted an Equipment Authorization for this model phone with all reported SAR levels evaluated as in compliance with the FCC RF exposure guidelines.
requirements may not comply with RF exposure requirements and should be avoided. Use only the supplied or an approved antenna.