® CREATED BY ® Quick Start Guide and Safety Information
16Feb07
IMPORTANT SAFETY INSTRUCTIONS WARNING: TO REDUCE THE RISK OF FIRE OR ELECTRIC SHOCK, DO NOT EXPOSE THE APPARATUS TO RAIN OR MOISTURE AND OBJECT FILLED WITH LIQUIDS, SUCH AS VASES, SHOULD NOT BE PLACED ON THIS APPARATUS. Read these instructions. Only use attachments/accessories specified by the manufacturer. Keep these instructions. Heed all warnings. Follow all instructions. Do not use this apparatus near water. Clean only with a dry cloth. Warning: This appliance must be earthed.
For more complete instructions, see the software Help file, or the printable Help documument (on CD). Nexia Quick Start Connecting to stand alone Nexia device Each Nexia unit comes loaded with a default system configuration. Follow steps 1-7 for connecting to a Nexia default configuration. To create and load your own custom configuration, follow steps 1-5 and then go to step 10. 1. Install Nexia software on a Windows® 2000/XP Professional PC PC must have a 10/100baseT NIC. 2.
4. Connect PC to Nexia unit Connect “cross-over” Ethernet cable (supplied with unit) from PC 10/100baseT Ethernet jack to Ethernet jack located on rear panel of Nexia unit. “Cross-over” Ethernet cables have their pins swapped (pin 1 to pin 3, pin 2 to pin 6, pin3 to pin1) and can easily be identified by looking at the conductors on the RJ-45 connectors. If the wiring is different at each end, it is a “cross-over” cable. 5.
9. Disconnect PC from Network File>Network>Disconnect from network If you do not want to use the default Nexia configuration and wish to load your own custom configuration, follow steps 1-7 above and then follow below. 10. Reset/Initialize Nexia unit Because each Nexia unit ships from the factory with a default system configuration, you must first reset/initialize that unit before loading our own configuration. File>Network>Perform Nexia Device Maintenance>Reset/Initialize Nexia unit 11.
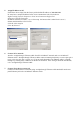
13. Enter appropriate Nexia unit serial number to equipment table Tools>Equipment table>Select serial number Select OK when complete 14. Send Configuration File>Network>Send System Configuration Sends layout configuration to selected Nexia unit. 15. Start Audio Upon loading configuration, select the option to start audio 16. Adjust component parameters as needed Optional: 17. Disconnect PC from Nexia system File>Network>Disconnect from Nexia system 18.
Connecting to a networked system using two or more Nexia devices 1. Install Nexia software on a Windows® 2000/XP Professional PC PC must have a 10/100baseT NIC. 2. Design and Layout system Launch Nexia software. Layout signal flow and DSP as desired. Save layout file (.nex). 3. Compile Layout Compilation results will display number and type of Nexia devices required as well as DSP power used and NexLink connections between units. 4.
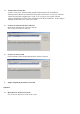
5. Assign IP address to PC Each Nexia device ships from the factory with a default IP address of 192.168.1.101. PC must have a unique IP address before it can communicate with a Nexia device. Right Click My Network>Properties>Local Area Connection>Right Click Properties>TCP/IP>Properties IP address should be 192.168.1.x (x=1-254 except 101 because that is what Nexia is set to.) Subnet mask should be 255.255.255.0 Click Ok when complete Close My Network 6.
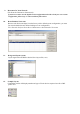
8. Connect to network with Nexia software Open Nexia software then connect to network. File>Network>Connect to network Close when complete 9. Assign IP address to Nexia device All Nexia units ship from the factory with an assigned IP address of 192.168.1.101. When using more than one device in a system, each device must have a unique IP address. Nexia device IP addresses must be different from any PC IP address that will be used in this system.
. Reset/Initialize each Nexia unit Because each Nexia unit ships from the factory with a default system configuration, you must first reset/initialize that unit before loading our own configuration. File>Network>Perform Nexia Device Maintenance>Reset/Initialize each connected Nexia unit 12.
15. 16. 17. Send Configuration File>Network>Send System Configuration Sends layout configuration to selected Nexia unit. Start Audio Upon loading configuration, select the option to start audio Adjust component parameters as needed Optional: 18. Disconnect PC from Nexia system File>Network>Disconnect from Nexia system 19.
WARRANTY BIAMP SYSTEMS IS PLEASED TO EXTEND THE FOLLOWING 5-YEAR LIMITED WARRANTY TO THE ORIGINAL PURCHASER OF THE PROFESSIONAL SOUND EQUIPMENT DESCRIBED IN THIS MANUAL 1. BIAMP Systems warrants to the original purchaser of new products that the product will be free from defects in material and workmanship for a period of 5 YEARS from the date of purchase from an authorized BIAMP Systems dealer, subject to the terms and conditions set forth below. 2.