
User Manual


For more complete instructions, see the software Help file, or the printable Help documument (on CD).
Nexia Quick Start
Connecting to stand alone Nexia device
Each Nexia unit comes loaded with a default system configuration. Follow steps 1-7 for connecting
to a Nexia default configuration.
To create and load your own custom configuration, follow steps 1-5 and then go to step 10.
1. Install Nexia software on a Windows
®
2000/XP Professional PC
PC must have a 10/100baseT NIC.
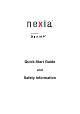
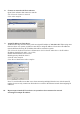
2. Assign IP address to PC
Each Nexia device ships from the factory with a default IP address of 192.168.1.101.
PC must have a unique IP address before it can communicate with a Nexia device.
Right Click My Network>Properties>Local Area Connection>Right Click
Properties>TCP/IP>Properties
IP address should be 192.168.1.x (x=1-254 except 101 because that is what Nexia is set to.)
Subnet mask should be 255.255.255.0
Click Ok when complete
Close My Network
3. Power up Nexia devices
Connect supplied power cord to a grounded AC mains voltage of 100-240VAC @50/60Hz. Connect
other end of power cord to power entrance located on the rear of Nexia unit. Note status of front panel
LEDs. Under normal conditions, all LEDs will remain green once power-up sequence has
completed.