
Full Product Manual


6
Speaker wire tips
If you are using Method A as shown in
Drawing 3, here are some suggestions
that will insure proper operation:
Speaker wire type
The choice of speaker wire is depen-
dent on the type of amplifier, the dis-
tance you intend to run the wire, and
your budget. In general, you should not
use extremely thin wire. If in doubt as to
what brand or type of wire to use, con-
sult your audio dealer.
Length of speaker wires
When hooking up your main/satellite
speakers, make the hookup wires the
SAME LENGTH for BOTH speakers, even
if one speaker is much closer to your
amplifier than the other. You may need
to loosely coil up part of one channel’
s
wire behind the amplifier if one speaker
is quite close and the other far away
from the amp or receiver. But it’s worth
it. Keeping both wires the same length
will help maintain proper signal balance
and imaging. Likewise, when making
connections between your receiver and
the V815/V1020/V1220’
s FROM RECEIV-
ER terminals, make sure that the wire
lengths are the same.
Establishing polarity
It is very important that left and right
connections be made with the same
plus/minus polarity.
• Most speaker wire is polarity coded.
This means that each conductor is labeled
either “+” positive or “–” negative. The
(+) positive conductor may be a differ-
ent color or texture than the (–) negative
conductor. For example, it may be cop-
per-colored (instead of silver-colored),
have a white stripe printed on it, have a
series of fine ridges stamped in it or sim-
ply be labeled with little “+” marks.
• V815/V1020/V1220 FROM RECEIVER
terminals and OUT TO SPEAKERS termi-
nals are color-coded: Red for positive
(+) and black for negative (–).
•Any connection that uses speaker wire
requires care in maintaining polarity.
When connecting speakers or a sub-
woofer to speaker terminals, or during
V815/V1020/V1220
Method A Hookup,
make sure to connect “+” wires to “+”
terminals, and “–” wires to “–” termi-
nals. For example, if your speaker wire
has one copper-colored conductor and
one silver-colored conductor, connect
both ends of the copper-colored wire
(+)
to red (+) terminals. Likewise, con-
nect the wire you’ve identified as negative
(in this case, the silver
-colored wire), to
black (–) terminals.
Method A:
Amplifier wiring
hookup steps for
receivers or surround
sound receivers with
NO sub output jack
Refer to Drawing 3 on page 7
o
1. IMPORTANT: Make sure that ALL
stereo system components including
the V815/V1020/V1220 are turned
OFF before proceeding.
o
2. Following the prior instructions on
this page, strip and twist TWO lengths of
speaker wire that will reach between your
receiver’s left and right speakers terminals
and the V815/V1020/V1220. Make these
two lengths of wire only as long as is neces-
sary to run between the two components.
o
3. Connect one speaker wire to the
RIGHT “+” and “–” speaker terminals of
your receiver or integrated amplifier. Then
connect the other end of this speaker wire
to the RIGHT“+” and “–” FROM RECEIV-
ERterminals on the back of the
V815/V1020/V1220. Use the tips on deter-
mining speaker wire polarity to make sure
that “+” is connected to “+” and “–” is
connected to “–”.
o
4. Connect the other speaker wire to
the LEFT “+” and “–” speaker terminals of
your receiver or integrated amplifier. Then
connect the other end of this speakerwire
to the LEFT
“+” and “–” FROM
RECEIVER
terminals on the back of the
V815/V1020/V1220. As in step 3, double
check “+” and “–” polarity.
o
5.
Connect your main/satellite speakers
to the V815/V1020/V1220 OUT TOSPEAK-
ERSterminals.
o
6.
You are now ready to put your
V815/V1020/V1220 subwoofer into use.
Skip to “E –
INITIAL LISTENING TEST
.”
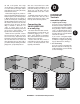
Preparing speaker wire
1. Separate the two
conductors that make
up each wire for a dis-
tance of about one inch.
Then strip off
1
/
2
˝ of insula-
tion from both ends of each
conductor using a wire strip
-
per, diagonal pliers or knife.
2
. Twist each set of thin wires
into a tightly bunched spiral.
If your wire is exceptionally thick (12-
gauge zipcord or special speaker inter-
connect cable), divde the strands into
three equal bundles and twist each into a
spiral.