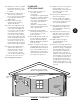
a Company Model FH8-W In-Wall Speakers Installation and Owner’s Manual
TABLE OF CONTENTS 2 A What you need to do the job Speaker system parts inventory.......................................................................2 Tools for installation .......................................................................................2 Speaker wire...................................................................................................3 Amplifier considerations.................................................................................
SPEAKER WIRE AMPLIFIER CONSIDERATIONS The amount of wire you’re going to need will vary with speaker placement (which we cover next). But we’re covering the subject of wire now because it’s something you may have to go out and obtain along with whatever tools you don’t already have. Virtually any receiver, power amplifier or integrated amplifier can be used with your B.I.C In-Wall Speakers. Although B.I.
Of course, if the speakers are being installed in an area where listeners usually stand up (such as a kitchen or hallway), “ear level” will be higher on the wall than for rooms where listeners are often seated. EXCELLENT for stereo imaging FINE for background music; ACCEPTABLE for stereo effect Corners and reflections 4 When an in-wall speaker is placed close to the corner of a room, bass frequencies are emphasized.
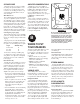
C CLOTH DÉCOR & PAINTABLE GRILLES If you like the designer white finish, we recommend you use the white cloth décor accessory grilles included with your new FH8-W speakers. But if you want your speakers to completely blend in with a colored wall or accent the surface, paintable metal grilles are also included with your new FH8-W speakers. The speakers’ outer surfaces are primed to accept ordinary latex wall paint or aerosol spray paint.
DOWN, ACROSS AND BACK UP (BASEMENT OR LOWER CRAWL SPACE) E RUNNING CONNECTING WIRES 6 Now you know where the wires have to run. It’s time to actually route them. As mentioned before, there are several possibilities. 1. DOWN, ACROSS & BACK UP. If you have a crawl space under your house or a relatively unfinished basement, your job is broken into three parts: 1) Down from the amplifier to the crawl space; 2) Across the crawl space to the wall(s) with the speakers; 3) Up the wall to each speaker. 2.
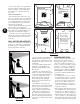
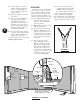
m8. Making sure the end doesn’t get pulled back down through the hole, reel out cable until you reach the space under the amplifier. m9. Extend at least 10 (TEN) extra feet of cable and cut the end off the roll. You’ve now run wires from both speakers to a point directly below where the amplifier will be. m10. Drill a 1-inch hole through the horizontal 2x4 directly below the amplifier wall outlet hole. m11.
m12. Continue “paying out” both cables until they and the weight hit bottom. Tie the free end of the plumb bob string to something so that it doesn’t fall down the hole. m13. Exit the attic crawl space and stretch for a moment. 8 m14. Go over to the 1-inch amplifier wire hole and look for the extended string/plumb bob and attached cables. If they’re not visible, form a small hook on the end of your wire. Then fish around for them and pull them through the hole. Then rescue the plumb bob from the attic.
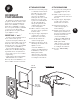
F HOOKING UP YOUR SPEAKERS The main thing to remember when hooking up speakers is that the two conductors in the speaker wire are not interchangeable. One will be used as a POSITIVE (+) conductor and the other as a NEGATIVE (-) conductor. These correspond to the RED (+) and BLACK (-) connectors on your B.I.C In-Wall Speakers and also to the speaker terminals on your amplifier or receiver. IDENTIFYING “+” and “-” You need to be able to discriminate between the two conductors in the zip cord.
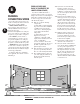
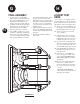
H G FINAL ASSEMBLY 10 1. If you haven’t done so already during painting, remove the perforated grilles from from your B.I.C In-Wall Speaker. To remove the grille, just use the mounting screw (dog leg) on the rear to push the grille off. 2. See Drawing 11. Make sure all the clamping brackets (dog legs) are turned inward as shown in the picture before installing. 3. Insert the speaker into the cutout hole. 4.
A QUICK TROUBLESHOOTING GUIDE Before returning your B.I.C In-Wall Speaker for service, it’s a good idea to check out these simple remedies first. No sound from either speaker. 1. Incorrect source selected on receiver or preamplifier. 2. Mute button pressed on receiver. 3. Wrong speaker output selected – many receivers have an “A” and “B” speaker switch. Make sure it’s in the right position. No sound from one speaker. 1. Un-secure connection at either the speaker or amplifier – double check them. 2.
INSTALLING B.I.C SPEAKERS DURING NEW CONSTRUCTION B.I.C America Speakers Five-Year Limited Warranty Needless to say, installing speakers when a house is being built is far easier than doing it later. • If possible run speaker wires after AC wiring is in place to avoid induced hum caused by close parallel proximity. • Secure speaker wires in place along the run with insulated staples only and be careful not to pierce the insulation. Allow a bit of slack for expansion of building materials.